- Page 2 and 3:
The Darkroom Cookbook
- Page 4 and 5:
The DARKROOM COOKBOOK Third Edition
- Page 6 and 7:
Dedication This book is dedicated t
- Page 8 and 9:
Table of Contents PREFACE ix ACKNOW
- Page 10 and 11:
Preface The Darkroom Cookbook is ba
- Page 12 and 13:
Preface xi Which brings us to the q
- Page 14 and 15:
Acknowledgments There are two husba
- Page 16 and 17:
Introduction Today everybody seems
- Page 18 and 19:
Introduction xvii coating your own
- Page 20 and 21:
Contributing Photographers Bruce Ba
- Page 22 and 23:
Contributing Photographers xxi Gord
- Page 24 and 25:
Contributing Photographers xxiii Jo
- Page 26 and 27:
List of Formulas Many of the formul
- Page 28 and 29:
Push-Processing Formulas 230 47. Di
- Page 30 and 31:
Amidol Paper Developer 261 105. Ami
- Page 32 and 33:
Selenium Toners 294 162. Dassonvill
- Page 34 and 35:
Planning a Darkroom Art does not de
- Page 36 and 37:
Planning a Darkroom 3 Core® availa
- Page 38 and 39:
Planning a Darkroom 5 available as
- Page 40 and 41:
Placement of Equipment and Workfl o
- Page 42 and 43:
Planning a Darkroom 9 Floors call f
- Page 44 and 45:
Planning a Darkroom 11 for modern e
- Page 46 and 47:
How Safe Is Your Safelight? Richard
- Page 48 and 49:
Equipment People are under the illu
- Page 50 and 51:
Equipment 17 customary models. It i
- Page 52 and 53:
Developers One developing agent is
- Page 54 and 55:
Developers 21 quantity of metol to
- Page 56 and 57:
Developers 23 pH Scale The pH scale
- Page 58 and 59:
Developers 25 Anhydrous, having no
- Page 60 and 61:
Potassium Iodide Developers 27 Alth
- Page 62 and 63:
Ascorbic Acid: Developing Agent or
- Page 64 and 65:
Developers 31 Alicia De Larocha, so
- Page 66 and 67:
Film Development It is the photogra
- Page 68 and 69:
Film Development 35 ● Conventiona
- Page 70 and 71:
Film Development 37 include Efke IR
- Page 72 and 73:
Film Development 39 cycle per minut
- Page 74 and 75:
Film Development 41 minimum. Howeve
- Page 76 and 77:
Film Development 43 fi rst 60 secon
- Page 78 and 79:
Film Development 45 Not long after
- Page 80 and 81:
Film Development 47 These disadvant
- Page 82 and 83:
REPLENISHMENT OF DEVELOPERS Film De
- Page 84 and 85:
Film Development 51 Flower Composit
- Page 86 and 87:
Film Development 53 Yvette at the C
- Page 88 and 89:
Monobath Film Developing 55 possibl
- Page 90 and 91:
Washing Monobath Film Developing 57
- Page 92 and 93:
Pyrogallol and Pyrocatechin 59 in A
- Page 94 and 95:
Pyrogallol and Pyrocatechin 61 Edwa
- Page 96 and 97:
Pyrogallol and Pyrocatechin 63 A la
- Page 98 and 99:
Crystal Springs #659, 2002. © 2008
- Page 100 and 101:
Broken Vase, 2002. © 2008 Gordon H
- Page 102 and 103:
Pyrogallol and Pyrocatechin 69 Test
- Page 104 and 105:
Print Developers They say my print
- Page 106 and 107:
Print Developers 73 when a limited
- Page 108 and 109:
Print Developers 75 Brett Weston &
- Page 110 and 111:
Printing Methods and Techniques Tak
- Page 112 and 113:
Printing Methods and Techniques 79
- Page 114 and 115:
Cold Tones (Blue-black) Printing Me
- Page 116 and 117:
Manipulating Exposure and Developme
- Page 118 and 119:
Printing Methods and Techniques 85
- Page 120 and 121:
#2-5041, 1996. © 2008 Henry Gilpin
- Page 122 and 123:
Four French Tulips, Carmel, Califor
- Page 124 and 125:
Printing Methods and Techniques 91
- Page 126 and 127:
Sequoias and Sunburst, 1976. © 200
- Page 128 and 129:
Printing Methods and Techniques 95
- Page 130 and 131:
Rescuing Thin Shadows Saïd Nuseibe
- Page 132 and 133:
Printing Methods and Techniques 99
- Page 134 and 135:
Printing Methods and Techniques 101
- Page 136 and 137:
Stop Baths and Fixers Surely, it is
- Page 138 and 139:
Stops Baths and Fixers 105 concentr
- Page 140 and 141:
Stops Baths and Fixers 107 determin
- Page 142 and 143:
Toning Prints There is a road from
- Page 144 and 145:
TONER TEST STRIPS Toning Prints 111
- Page 146 and 147:
Toning Prints 113 gold toning for c
- Page 148 and 149:
Toning Prints 115 The sepia/sulfi d
- Page 150 and 151:
Multiple Toning Toning Prints 117 I
- Page 152 and 153:
Toning Prints 119 and selenium �
- Page 154 and 155:
K49 Jellyfi sh, 2008. © 2008 Ryuij
- Page 156 and 157:
Photographic Reduction and Intensif
- Page 158 and 159:
Photographic Reduction and Intensif
- Page 160 and 161:
Photographic Reduction and Intensif
- Page 162 and 163:
Photographic Reduction and Intensif
- Page 164 and 165:
Photographic Reduction and Intensif
- Page 166 and 167:
Pitman Arm, 2000. © 2008 Jay Dusar
- Page 168 and 169:
SAFELIGHT Development by inspection
- Page 170 and 171:
PYRO AND DEVELOPMENT BY INSPECTION
- Page 172 and 173:
leak light. What is important is th
- Page 174 and 175:
Procedure for Reversal Processing R
- Page 176 and 177:
Reversal Processing and Enlarged Ne
- Page 178 and 179:
Procedure for Making an Enlarged Ne
- Page 180 and 181:
Printing Out Processes You must alw
- Page 182 and 183: Printing Out Processes 149 Caution:
- Page 184 and 185: Printing Out Processes 151 over the
- Page 186 and 187: Printing Out Processes 153 Sleeples
- Page 188 and 189: Printing Out Processes 155 Add the
- Page 190 and 191: Printing Out Processes 157 Camera O
- Page 192 and 193: Safety in Handling Photographic Che
- Page 194 and 195: Safety in Handling Photographic Che
- Page 196 and 197: Chemicals Photography, in the fi na
- Page 198 and 199: Chemicals 165 In this 3rd edition o
- Page 200 and 201: Chemicals 167 ethylenediaminetetraa
- Page 202 and 203: Pharmacopoeia The artist lives to e
- Page 204 and 205: Pharmacopoeia 171 Glacial acetic ac
- Page 206 and 207: Pharmacopoeia 173 Uses: Preservativ
- Page 208 and 209: Pharmacopoeia 175 ALUM, POTASSIUM S
- Page 210 and 211: Pharmacopoeia 177 AMMONIUM THIOSULF
- Page 212 and 213: BROMIDE (see Potassium bromide) Pha
- Page 214 and 215: Appearance: Greenish crystalline sc
- Page 216 and 217: HYPO (see Sodium Thiosulfate) Pharm
- Page 218 and 219: Pharmacopoeia 185 working. Tropical
- Page 220 and 221: Pharmacopoeia 187 Uses: To precipit
- Page 222 and 223: Pharmacopoeia 189 Uses: As a preser
- Page 224 and 225: SODA (see Sodium carbonate) Pharmac
- Page 226 and 227: Pharmacopoeia 193 Notes: Caustic al
- Page 228 and 229: Pharmacopoeia 195 SODIUM SULFITE Sy
- Page 230 and 231: Proofi ng for Maximum Black The cam
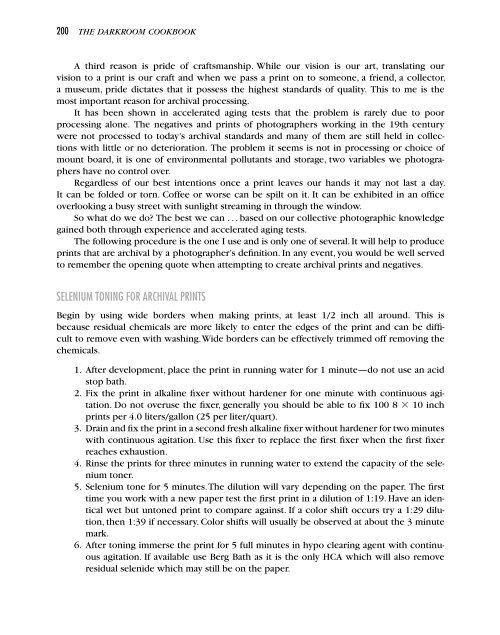
- Page 234 and 235: Archival Print Procedure 201 7. At
- Page 236 and 237: Formulas FILM DEVELOPERS Developmen
- Page 238 and 239: SOLUTION B Water at 110F/43C, 750.0
- Page 240 and 241: SOLUTION B Water at 110F/43C, 750.0
- Page 242 and 243: SOLUTION B Formulas 209 Water at 90
- Page 244 and 245: Dilution B Distilled water at 125F/
- Page 246 and 247: 4 minutes: water without agitation.
- Page 248 and 249: Metol, 3.0 g Sodium sulfi te, 45.0
- Page 250 and 251: Borax, granular, 7.0 g Boric acid,
- Page 252 and 253: Formulas 219 Use as you would XTOL.
- Page 254 and 255: SOLUTION A Water at 125F/52C, 750.0
- Page 256 and 257: SOLUTION A Water at 125F/52C, 750.0
- Page 258 and 259: Stock Solution B Water at 125F/52C,
- Page 260 and 261: Formulas 227 Sodium hydroxide, 17.6
- Page 262 and 263: FORMULA #45 Keelan’s Monobath (H.
- Page 264 and 265: The development times at 68F/20C ar
- Page 266 and 267: Pyro, 28.0 g Sodium sulfi te, 100.0
- Page 268 and 269: Formulas 235 NOTE 1: To help preser
- Page 270 and 271: SOLUTION B Distilled water, 750.0 m
- Page 272 and 273: Sodium sulfi te, 90.0 g Water to ma
- Page 274 and 275: Metol, 12.0 g Sodium sulfi te, 90.0
- Page 276 and 277: Developing time and procedures are
- Page 278 and 279: FORMULA #69 Blue-Black Developer Fo
- Page 280 and 281: Formulas 247 Benzotriazole, 0.2 g G
- Page 282 and 283:
FORMULA #78 Gevaert G.253 Soft-Port
- Page 284 and 285:
Hydroquinone, 10.0 g Water to make
- Page 286 and 287:
Sodium carbonate, monohydrate, 138.
- Page 288 and 289:
Sodium sulfi te, 23.0 g *Potassium
- Page 290 and 291:
Formulas 257 and then processed fol
- Page 292 and 293:
Normal exposure should be determine
- Page 294 and 295:
Pyro, 4.4 g Sodium carbonate, monoh
- Page 296 and 297:
FORMULA #108 Amidol Teaspoon Formul
- Page 298 and 299:
Amidol, 16.0 g 10% potassium bromid
- Page 300 and 301:
Formulas 267 Add a suffi cient amou
- Page 302 and 303:
FORMULA #123 Acid Hypo (J. Ghislain
- Page 304 and 305:
Formulas 271 When the above is thor
- Page 306 and 307:
Formulas 273 FILM: Film should be c
- Page 308 and 309:
TONERS Formulas 275 ● Different p
- Page 310 and 311:
Formulas 277 Add 16 drops of concen
- Page 312 and 313:
With stirring add: Thiourea, 1.0 g
- Page 314 and 315:
Formulas 281 This solution should b
- Page 316 and 317:
SOLUTION A *Potassium bichromate, 5
- Page 318 and 319:
Prepare the bleaching bath as follo
- Page 320 and 321:
Formulas 287 Using the Toner: Print
- Page 322 and 323:
*Glacial acetic acid, 5.0 ml Water
- Page 324 and 325:
Formulas 291 the solubility of the
- Page 326 and 327:
FORMULA #158 Kodak GP-2 (Thanks to
- Page 328 and 329:
Formulas 295 Dissolve the sodium su
- Page 330 and 331:
Formulas 297 As with Kodak Rapid Se
- Page 332 and 333:
Formulas 299 After treatment in the
- Page 334 and 335:
FORMULA #169 Flattening Reducer For
- Page 336 and 337:
Formulas 303 To use, take 2 parts o
- Page 338 and 339:
NEGATIVE INTENSIFIERS FORMULA #176
- Page 340 and 341:
STOCK SOLUTION #4 Metol, 6.5 g Sodi
- Page 342 and 343:
Formulas 309 Add 30.0 ml of Solutio
- Page 344 and 345:
Keep hands in Solution A for a few
- Page 346 and 347:
Distilled water, 180.0 ml Potassium
- Page 348 and 349:
FORMULA #194 Kodak SH-5 Formulas 31
- Page 350 and 351:
FORMULA #197 Kodak TC-3 Stain Remov
- Page 352 and 353:
Formulas 319 Development time is 8-
- Page 354 and 355:
Sodium metabisulfi te, 10.0 g Boric
- Page 356 and 357:
Conversion Tables DIRECT EQUIVALENT
- Page 358 and 359:
Direct equivalents (Continued) Conv
- Page 360 and 361:
0.7 � 10 0.8 � 11.7 0.9 � 13
- Page 362 and 363:
225 ml � 7.2 fl oz 250 ml � 8 f
- Page 364 and 365:
Sodium Carbonate Conversion Table C
- Page 366 and 367:
Conversion Tables 333 always possib
- Page 368 and 369:
TABLE 5 Film Development Temperatur
- Page 370 and 371:
Material Sources 337 RH Designs (St
- Page 372 and 373:
Azo Forum, www.michaelandpaula.com/
- Page 374 and 375:
Bibliography 341 James, T.H. The Th
- Page 376 and 377:
Index A ABC Pyro formula, 231-232,
- Page 378 and 379:
C Cabinets, darkroom planning, 9 Ca
- Page 380 and 381:
fi ne-grain, 44, 211-214 general-pu
- Page 382 and 383:
Filters and safelights, 10-11 in th
- Page 384 and 385:
In-cassette processing developing,
- Page 386 and 387:
Panchromatic paper, and safelights,
- Page 388 and 389:
and development by inspection, 137
- Page 390 and 391:
Strong ammonium thiosulfate reducer
- Page 392:
Weston amidol developers, formulas,


