Tecnai on-line help manual -- Options - UT Southwestern
Tecnai on-line help manual -- Options - UT Southwestern
Tecnai on-line help manual -- Options - UT Southwestern
- No tags were found...

Create successful ePaper yourself
Turn your PDF publications into a flip-book with our unique Google optimized e-Paper software.
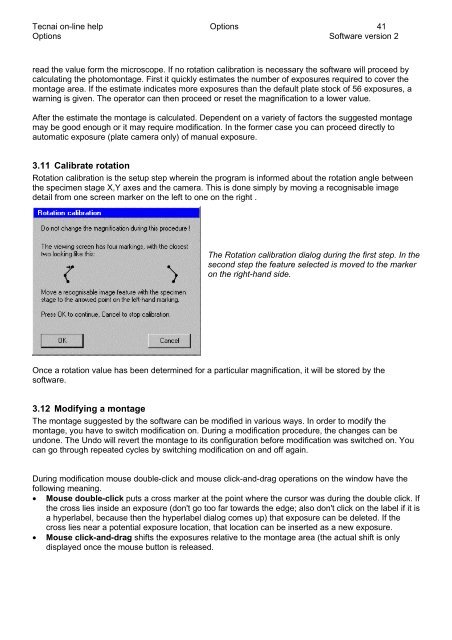
<str<strong>on</strong>g>Tecnai</str<strong>on</strong>g> <strong>on</strong>-<strong>line</strong> <strong>help</strong> Opti<strong>on</strong>s 41Opti<strong>on</strong>s Software versi<strong>on</strong> 2read the value form the microscope. If no rotati<strong>on</strong> calibrati<strong>on</strong> is necessary the software will proceed bycalculating the photom<strong>on</strong>tage. First it quickly estimates the number of exposures required to cover them<strong>on</strong>tage area. If the estimate indicates more exposures than the default plate stock of 56 exposures, awarning is given. The operator can then proceed or reset the magnificati<strong>on</strong> to a lower value.After the estimate the m<strong>on</strong>tage is calculated. Dependent <strong>on</strong> a variety of factors the suggested m<strong>on</strong>tagemay be good enough or it may require modificati<strong>on</strong>. In the former case you can proceed directly toautomatic exposure (plate camera <strong>on</strong>ly) of <strong>manual</strong> exposure.3.11 Calibrate rotati<strong>on</strong>Rotati<strong>on</strong> calibrati<strong>on</strong> is the setup step wherein the program is informed about the rotati<strong>on</strong> angle betweenthe specimen stage X,Y axes and the camera. This is d<strong>on</strong>e simply by moving a recognisable imagedetail from <strong>on</strong>e screen marker <strong>on</strong> the left to <strong>on</strong>e <strong>on</strong> the right .The Rotati<strong>on</strong> calibrati<strong>on</strong> dialog during the first step. In thesec<strong>on</strong>d step the feature selected is moved to the marker<strong>on</strong> the right-hand side.Once a rotati<strong>on</strong> value has been determined for a particular magnificati<strong>on</strong>, it will be stored by thesoftware.3.12 Modifying a m<strong>on</strong>tageThe m<strong>on</strong>tage suggested by the software can be modified in various ways. In order to modify them<strong>on</strong>tage, you have to switch modificati<strong>on</strong> <strong>on</strong>. During a modificati<strong>on</strong> procedure, the changes can beund<strong>on</strong>e. The Undo will revert the m<strong>on</strong>tage to its c<strong>on</strong>figurati<strong>on</strong> before modificati<strong>on</strong> was switched <strong>on</strong>. Youcan go through repeated cycles by switching modificati<strong>on</strong> <strong>on</strong> and off again.During modificati<strong>on</strong> mouse double-click and mouse click-and-drag operati<strong>on</strong>s <strong>on</strong> the window have thefollowing meaning.• Mouse double-click puts a cross marker at the point where the cursor was during the double click. Ifthe cross lies inside an exposure (d<strong>on</strong>'t go too far towards the edge; also d<strong>on</strong>'t click <strong>on</strong> the label if it isa hyperlabel, because then the hyperlabel dialog comes up) that exposure can be deleted. If thecross lies near a potential exposure locati<strong>on</strong>, that locati<strong>on</strong> can be inserted as a new exposure.• Mouse click-and-drag shifts the exposures relative to the m<strong>on</strong>tage area (the actual shift is <strong>on</strong>lydisplayed <strong>on</strong>ce the mouse butt<strong>on</strong> is released.