Tecnai on-line help manual -- Options - UT Southwestern
Tecnai on-line help manual -- Options - UT Southwestern
Tecnai on-line help manual -- Options - UT Southwestern
- No tags were found...
Create successful ePaper yourself
Turn your PDF publications into a flip-book with our unique Google optimized e-Paper software.
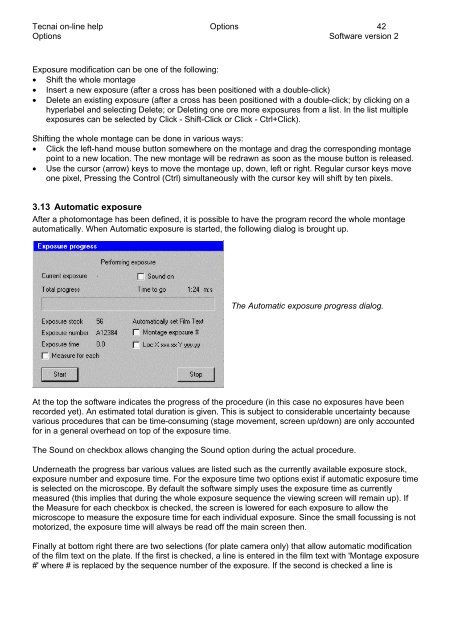
<str<strong>on</strong>g>Tecnai</str<strong>on</strong>g> <strong>on</strong>-<strong>line</strong> <strong>help</strong> Opti<strong>on</strong>s 42Opti<strong>on</strong>s Software versi<strong>on</strong> 2Exposure modificati<strong>on</strong> can be <strong>on</strong>e of the following:• Shift the whole m<strong>on</strong>tage• Insert a new exposure (after a cross has been positi<strong>on</strong>ed with a double-click)• Delete an existing exposure (after a cross has been positi<strong>on</strong>ed with a double-click; by clicking <strong>on</strong> ahyperlabel and selecting Delete; or Deleting <strong>on</strong>e ore more exposures from a list. In the list multipleexposures can be selected by Click - Shift-Click or Click - Ctrl+Click).Shifting the whole m<strong>on</strong>tage can be d<strong>on</strong>e in various ways:• Click the left-hand mouse butt<strong>on</strong> somewhere <strong>on</strong> the m<strong>on</strong>tage and drag the corresp<strong>on</strong>ding m<strong>on</strong>tagepoint to a new locati<strong>on</strong>. The new m<strong>on</strong>tage will be redrawn as so<strong>on</strong> as the mouse butt<strong>on</strong> is released.• Use the cursor (arrow) keys to move the m<strong>on</strong>tage up, down, left or right. Regular cursor keys move<strong>on</strong>e pixel, Pressing the C<strong>on</strong>trol (Ctrl) simultaneously with the cursor key will shift by ten pixels.3.13 Automatic exposureAfter a photom<strong>on</strong>tage has been defined, it is possible to have the program record the whole m<strong>on</strong>tageautomatically. When Automatic exposure is started, the following dialog is brought up.The Automatic exposure progress dialog.At the top the software indicates the progress of the procedure (in this case no exposures have beenrecorded yet). An estimated total durati<strong>on</strong> is given. This is subject to c<strong>on</strong>siderable uncertainty becausevarious procedures that can be time-c<strong>on</strong>suming (stage movement, screen up/down) are <strong>on</strong>ly accountedfor in a general overhead <strong>on</strong> top of the exposure time.The Sound <strong>on</strong> checkbox allows changing the Sound opti<strong>on</strong> during the actual procedure.Underneath the progress bar various values are listed such as the currently available exposure stock,exposure number and exposure time. For the exposure time two opti<strong>on</strong>s exist if automatic exposure timeis selected <strong>on</strong> the microscope. By default the software simply uses the exposure time as currentlymeasured (this implies that during the whole exposure sequence the viewing screen will remain up). Ifthe Measure for each checkbox is checked, the screen is lowered for each exposure to allow themicroscope to measure the exposure time for each individual exposure. Since the small focussing is notmotorized, the exposure time will always be read off the main screen then.Finally at bottom right there are two selecti<strong>on</strong>s (for plate camera <strong>on</strong>ly) that allow automatic modificati<strong>on</strong>of the film text <strong>on</strong> the plate. If the first is checked, a <strong>line</strong> is entered in the film text with 'M<strong>on</strong>tage exposure#' where # is replaced by the sequence number of the exposure. If the sec<strong>on</strong>d is checked a <strong>line</strong> is


