Strato X User Manual - Image Works
Strato X User Manual - Image Works
Strato X User Manual - Image Works

Create successful ePaper yourself
Turn your PDF publications into a flip-book with our unique Google optimized e-Paper software.
USER'S MANUAL<br />
General instructions for use<br />
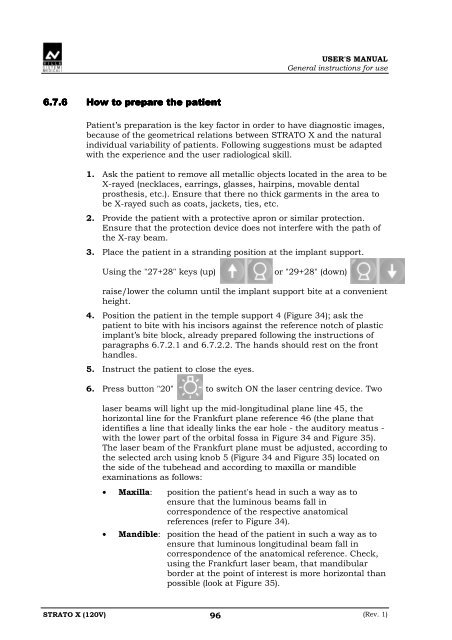
6.7.6 How to prepare the patient<br />
Patient’s preparation is the key factor in order to have diagnostic images,<br />
because of the geometrical relations between STRATO X and the natural<br />
individual variability of patients. Following suggestions must be adapted<br />
with the experience and the user radiological skill.<br />
1. Ask the patient to remove all metallic objects located in the area to be<br />
X-rayed (necklaces, earrings, glasses, hairpins, movable dental<br />
prosthesis, etc.). Ensure that there no thick garments in the area to<br />
be X-rayed such as coats, jackets, ties, etc.<br />
2. Provide the patient with a protective apron or similar protection.<br />
Ensure that the protection device does not interfere with the path of<br />
the X-ray beam.<br />
3. Place the patient in a stranding position at the implant support.<br />
Using the "27+28" keys (up)<br />
or "29+28" (down)<br />
raise/lower the column until the implant support bite at a convenient<br />
height.<br />
4. Position the patient in the temple support 4 (Figure 34); ask the<br />
patient to bite with his incisors against the reference notch of plastic<br />
implant’s bite block, already prepared following the instructions of<br />
paragraphs 6.7.2.1 and 6.7.2.2. The hands should rest on the front<br />
handles.<br />
5. Instruct the patient to close the eyes.<br />
6. Press button "20" to switch ON the laser centring device. Two<br />
laser beams will light up the mid-longitudinal plane line 45, the<br />
horizontal line for the Frankfurt plane reference 46 (the plane that<br />
identifies a line that ideally links the ear hole - the auditory meatus -<br />
with the lower part of the orbital fossa in Figure 34 and Figure 35).<br />
The laser beam of the Frankfurt plane must be adjusted, according to<br />
the selected arch using knob 5 (Figure 34 and Figure 35) located on<br />
the side of the tubehead and according to maxilla or mandible<br />
examinations as follows:<br />
• Maxilla: position the patient's head in such a way as to<br />
ensure that the luminous beams fall in<br />
correspondence of the respective anatomical<br />
references (refer to Figure 34).<br />
• Mandible: position the head of the patient in such a way as to<br />
ensure that luminous longitudinal beam fall in<br />
correspondence of the anatomical reference. Check,<br />
using the Frankfurt laser beam, that mandibular<br />
border at the point of interest is more horizontal than<br />
possible (look at Figure 35).<br />
STRATO X (120V) 96<br />
(Rev. 1)