5-speed manual gearbox 0A4.pdf
5-speed manual gearbox 0A4.pdf
5-speed manual gearbox 0A4.pdf

Create successful ePaper yourself
Turn your PDF publications into a flip-book with our unique Google optimized e-Paper software.
Protected by copyright. Copying for private or commercial purposes, in part or in whole, is not permitted unless authorised by Volkswagen AG. Volkswagen AG does not guarantee or accept any liability with respect to the correctness of information<br />
in this document. Copyright by Volkswagen AG.<br />
Golf Variant 2007 ➤ , Golf Variant 2010 ➤ , Jetta 2005 ➤ , Jetta 2011 ➤<br />
5-<strong>speed</strong> <strong>manual</strong> <strong>gearbox</strong> 0A4 - Edition 04.2010<br />
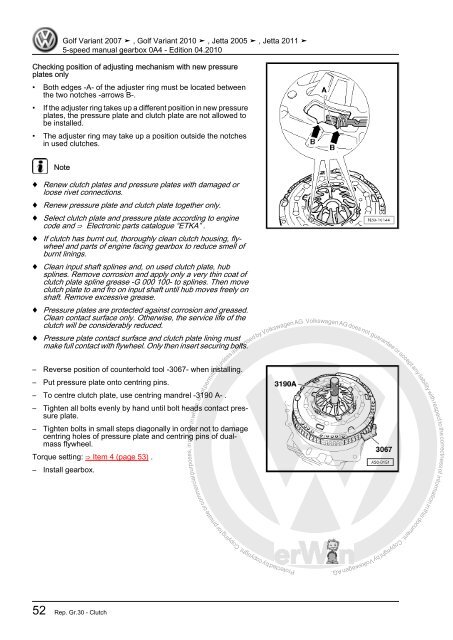
Checking position of adjusting mechanism with new pressure<br />
plates only<br />
• Both edges -A- of the adjuster ring must be located between<br />
the two notches -arrows B-.<br />
• If the adjuster ring takes up a different position in new pressure<br />
plates, the pressure plate and clutch plate are not allowed to<br />
be installed.<br />
• The adjuster ring may take up a position outside the notches<br />
in used clutches.<br />
Note<br />
♦ Renew clutch plates and pressure plates with damaged or<br />
loose rivet connections.<br />
♦ Renew pressure plate and clutch plate together only.<br />
♦ Select clutch plate and pressure plate according to engine<br />
code and ⇒ Electronic parts catalogue “ETKA” .<br />
♦ If clutch has burnt out, thoroughly clean clutch housing, flywheel<br />
and parts of engine facing <strong>gearbox</strong> to reduce smell of<br />
burnt linings.<br />
♦ Clean input shaft splines and, on used clutch plate, hub<br />
splines. Remove corrosion and apply only a very thin coat of<br />
clutch plate spline grease -G 000 100- to splines. Then move<br />
clutch plate to and fro on input shaft until hub moves freely on<br />
shaft. Remove excessive grease.<br />
♦ Pressure plates are protected against corrosion and greased.<br />
Clean contact surface only. Otherwise, the service life of the<br />
clutch will be considerably reduced.<br />
♦ Pressure plate contact surface and clutch plate lining must<br />
make full contact with flywheel. Only then insert securing bolts.<br />
– Reverse position of counterhold tool -3067- when installing.<br />
– Put pressure plate onto centring pins.<br />
– To centre clutch plate, use centring mandrel -3190 A- .<br />
– Tighten all bolts evenly by hand until bolt heads contact pressure<br />
plate.<br />
– Tighten bolts in small steps diagonally in order not to damage<br />
centring holes of pressure plate and centring pins of dualmass<br />
flywheel.<br />
Torque setting: ⇒ Item 4 (page 53) .<br />
– Install <strong>gearbox</strong>.<br />
52 Rep. Gr.30 - Clutch