5-speed manual gearbox 0A4.pdf
5-speed manual gearbox 0A4.pdf
5-speed manual gearbox 0A4.pdf

You also want an ePaper? Increase the reach of your titles
YUMPU automatically turns print PDFs into web optimized ePapers that Google loves.
Protected by copyright. Copying for private or commercial purposes, in part or in whole, is not permitted unless authorised by Volkswagen AG. Volkswagen AG does not guarantee or accept any liability with respect to the correctness of information<br />
in this document. Copyright by Volkswagen AG.<br />
Golf Variant 2007 ➤ , Golf Variant 2010 ➤ , Jetta 2005 ➤ , Jetta 2011 ➤<br />
5-<strong>speed</strong> <strong>manual</strong> <strong>gearbox</strong> 0A4 - Edition 04.2010<br />
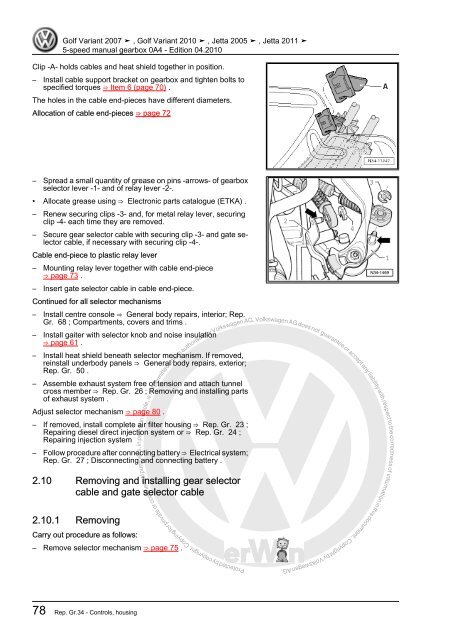
Clip -A- holds cables and heat shield together in position.<br />
– Install cable support bracket on <strong>gearbox</strong> and tighten bolts to<br />
specified torques ⇒ Item 6 (page 70) .<br />
The holes in the cable end-pieces have different diameters.<br />
Allocation of cable end-pieces ⇒ page 72<br />
– Spread a small quantity of grease on pins -arrows- of <strong>gearbox</strong><br />
selector lever -1- and of relay lever -2-.<br />
• Allocate grease using ⇒ Electronic parts catalogue (ETKA) .<br />
– Renew securing clips -3- and, for metal relay lever, securing<br />
clip -4- each time they are removed.<br />
– Secure gear selector cable with securing clip -3- and gate selector<br />
cable, if necessary with securing clip -4-.<br />
Cable end-piece to plastic relay lever<br />
– Mounting relay lever together with cable end-piece<br />
⇒ page 73 .<br />
– Insert gate selector cable in cable end-piece.<br />
Continued for all selector mechanisms<br />
– Install centre console ⇒ General body repairs, interior; Rep.<br />
Gr. 68 ; Compartments, covers and trims .<br />
– Install gaiter with selector knob and noise insulation<br />
⇒ page 61 .<br />
– Install heat shield beneath selector mechanism. If removed,<br />
reinstall underbody panels ⇒ General body repairs, exterior;<br />
Rep. Gr. 50 .<br />
– Assemble exhaust system free of tension and attach tunnel<br />
cross member ⇒ Rep. Gr. 26 ; Removing and installing parts<br />
of exhaust system .<br />
Adjust selector mechanism ⇒ page 80 .<br />
– If removed, install complete air filter housing ⇒ Rep. Gr. 23 ;<br />
Repairing diesel direct injection system or ⇒ Rep. Gr. 24 ;<br />
Repairing injection system<br />
– Follow procedure after connecting battery ⇒ Electrical system;<br />
Rep. Gr. 27 ; Disconnecting and connecting battery .<br />
2.10 Removing and installing gear selector<br />
cable and gate selector cable<br />
2.10.1 Removing<br />
Carry out procedure as follows:<br />
– Remove selector mechanism ⇒ page 75 .<br />
78 Rep. Gr.34 - Controls, housing