- Page 1:
IBM WebSphere Application Server -
- Page 4 and 5:
Take Note! Before using this inform
- Page 6 and 7:
2.4.3 JavaServer Pages. . . . . . .
- Page 8 and 9:
8.3 Using JSPs in the Online Catalo
- Page 10 and 11:
13.1.1 Configuration and management
- Page 12 and 13:
16.5.1 Adding JAAS authentication t
- Page 14 and 15:
xii IBM WebSphere Application Serve
- Page 16 and 17:
Trademarks The following terms are
- Page 18 and 19:
Information Systems. His areas of e
- Page 20 and 21:
xviii IBM WebSphere Application Ser
- Page 22 and 23: 1.1 What is IBM WebSphere Applicati
- Page 24 and 25: ► A Web container ► Web service
- Page 26 and 27: 1.1.7 Roles and responsibilities In
- Page 28 and 29: ► Migrating Applications from IBM
- Page 30 and 31: 1.3 Bringing up Studio Site Develop
- Page 32 and 33: illustrates techniques for internat
- Page 34 and 35: Figure 1-4 Customer service example
- Page 36 and 37: From a lower-level perspective, we
- Page 38 and 39: 2.1 Design considerations e-busines
- Page 40 and 41: Note: WebSphere Application Server
- Page 42 and 43: Note: WebSphere Application Server
- Page 44 and 45: Actors can be identified by asking
- Page 46 and 47: The maintain inventory use case has
- Page 48 and 49: Input Page (View) Display Page (Vie
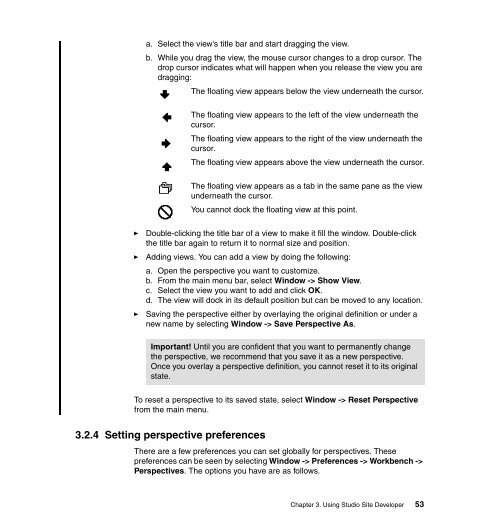
- Page 50 and 51: In the following sections, we discu
- Page 52 and 53: Figure 2-9 Dependencies allowed in
- Page 54 and 55: 2.4.4 Tag libraries ► Separation
- Page 56 and 57: 2.4.7 Struts Struts is an open-sour
- Page 58 and 59: 2.5.2 Indexes Third normal form In
- Page 60 and 61: CUSTOMER CUSTOMER_ID :CHAR(10) CUST
- Page 62 and 63: 42 IBM WebSphere Application Server
- Page 64 and 65: 3.1 The workspace Studio Site Devel
- Page 66 and 67: Figure 3-2 Compare with Local Histo
- Page 68 and 69: Shortcut bar Figure 3-4 Web perspec
- Page 70 and 71: 3.2.2 Using fast views 1. From the
- Page 74 and 75: 3.3 Finding help ► Select a defau
- Page 76 and 77: The online help is laid out in an e
- Page 78 and 79: 4.1 Enterprise application An enter
- Page 80 and 81: Elements contained within a Web app
- Page 82 and 83: ► A set of initialization paramet
- Page 84 and 85: Some elements of Example 4-1 on pag
- Page 86 and 87: Although this wizard allows you to
- Page 88 and 89: Figure 4-4 Creating a Web Project 5
- Page 90 and 91: Figure 4-6 Creating a Web Project 8
- Page 92 and 93: Figure 4-8 Creating a Web Project 1
- Page 94 and 95: ► WebContent: The location of all
- Page 96 and 97: 76 IBM WebSphere Application Server
- Page 98 and 99: 5.1 HTML support in Studio Site Dev
- Page 100 and 101: Project Navigator view The Project
- Page 102 and 103: 2. From the Thumbnails view, drag t
- Page 104 and 105: Colors view Figure 5-5 Setting colo
- Page 106 and 107: Palette view The Web tools Palette
- Page 108 and 109: ► Double-Click Support: you can d
- Page 110 and 111: Figure 5-9 Servers view When a serv
- Page 112 and 113: Tip: When you place the cursor with
- Page 114 and 115: Important: Using Web Site Designer
- Page 116 and 117: Important: If a Web page icon has b
- Page 118 and 119: Item Sub Item Category Description
- Page 120 and 121: Item Sub Item Category Description
- Page 122 and 123:
Item Sub Item Category Description
- Page 124 and 125:
Figure 5-16 Associated page icon Pa
- Page 126 and 127:
Inserting a navigation trail You ca
- Page 128 and 129:
Example 5-1 spec.html [ < !-- site
- Page 130 and 131:
An example of a page template you w
- Page 132 and 133:
d. Select HTML or XHTML as the Mark
- Page 134 and 135:
header.html menu.html Figure 5-20 W
- Page 136 and 137:
5.1.7 Adding tables, links, text, a
- Page 138 and 139:
Figure 5-23 Adding a link These val
- Page 140 and 141:
5.1.9 Working with style sheets Sty
- Page 142 and 143:
5. Select the Link radio button fro
- Page 144 and 145:
the WebArt Gallery tab and the Gall
- Page 146 and 147:
Figure 5-27 Using the WebArt Design
- Page 148 and 149:
Figure 5-29 Grouping objects You wi
- Page 150 and 151:
Figure 5-30 Type of frames Creating
- Page 152 and 153:
The animation is played starting wi
- Page 154 and 155:
Figure 5-36 WebSphere Studio Animat
- Page 156 and 157:
3. To add our company name to the W
- Page 158 and 159:
Figure 5-39 Set Selector of New Sty
- Page 160 and 161:
Figure 5-41 Add Style dialog 17.Cli
- Page 162 and 163:
Figure 5-44 WebSphere Studio Art De
- Page 164 and 165:
Figure 5-46 Opening Web Site Design
- Page 166 and 167:
Figure 5-49 Creating an HTML page 7
- Page 168 and 169:
Figure 5-51 index.html opened in Pa
- Page 170 and 171:
Figure 5-53 Runtime of index.html 1
- Page 172 and 173:
152 IBM WebSphere Application Serve
- Page 174 and 175:
6.1 Java Database Connectivity (JDB
- Page 176 and 177:
Using databases in an application i
- Page 178 and 179:
6.2.2 Creating the database Althoug
- Page 180 and 181:
3. This will open the The New Datab
- Page 182 and 183:
Note that the class location points
- Page 184 and 185:
Figure 6-7 Create a schema 2. Enter
- Page 186 and 187:
SHIPPING_ORDER table The SHIPPING_O
- Page 188 and 189:
Figure 6-9 Create the table columns
- Page 190 and 191:
The next logical step is to create
- Page 192 and 193:
Figure 6-13 Execute the DDL - step
- Page 194 and 195:
To access the DB Output view: 1. Cl
- Page 196 and 197:
Java package: During the wizard you
- Page 198 and 199:
Note: You can use this same process
- Page 200 and 201:
Figure 6-20 Select the tables 9. Mo
- Page 202 and 203:
Figure 6-22 Database select conditi
- Page 204 and 205:
Figure 6-24 The generated SQL state
- Page 206 and 207:
Figure 6-26 Defining the controller
- Page 208 and 209:
Figure 6-27 Design the input form 7
- Page 210 and 211:
Figure 6-28 Design the master view
- Page 212 and 213:
Figure 6-30 Renaming the Web pages
- Page 214 and 215:
PRICE ASC This does two things.
- Page 216 and 217:
In order to run the application usi
- Page 218 and 219:
► How credentials are passed to t
- Page 220 and 221:
6.2.9 Testing We have not looked at
- Page 222 and 223:
Figure 6-36 Select database and dri
- Page 224 and 225:
Figure 6-38 Finished JDBC 8. With t
- Page 226 and 227:
Figure 6-40 Data source information
- Page 228 and 229:
Figure 6-41 JDBC connection paramet
- Page 230 and 231:
Figure 6-43 Server variables page 1
- Page 232 and 233:
SQL statement you want to build fro
- Page 234 and 235:
214 IBM WebSphere Application Serve
- Page 236 and 237:
7.1 Servlet overview The servlet me
- Page 238 and 239:
The service() method is called with
- Page 240 and 241:
7.1.3 Servlets in an enterprise app
- Page 242 and 243:
Figure 7-3 Package wizard 7. Click
- Page 244 and 245:
7.2.2 Web perspective The Web persp
- Page 246 and 247:
Figure 7-6 Content assist Content a
- Page 248 and 249:
Figure 7-8 Quick Fix Outline view A
- Page 250 and 251:
Figure 7-11 Details - URL Mappings
- Page 252 and 253:
Figure 7-17 WebSphere extensions 7.
- Page 254 and 255:
Figure 7-19 Servlet wizard - screen
- Page 256 and 257:
Figure 7-21 Servlet wizard - screen
- Page 258 and 259:
Get data from HTML form String user
- Page 260 and 261:
7.4 References Some additional refe
- Page 262 and 263:
8.1 JSP overview In the early days
- Page 264 and 265:
In fact, in WebSphere’s JSP imple
- Page 266 and 267:
8.1.3 JSP 1.2 elements The JSP 1.2
- Page 268 and 269:
Directives Directives give a way to
- Page 270 and 271:
A point of note concerns the sessio
- Page 272 and 273:
Note: After deployment to a server,
- Page 274 and 275:
The syntax for expression tags is:
- Page 276 and 277:
The include action tag works in fas
- Page 278 and 279:
Note: You would not have the conten
- Page 280 and 281:
The list you see is relevant to the
- Page 282 and 283:
Figure 8-7 Outline view Palette vie
- Page 284 and 285:
5. You have three options for proce
- Page 286 and 287:
In this example, we will be buildin
- Page 288 and 289:
Figure 8-11 Adding tag files For ou
- Page 290 and 291:
Figure 8-13 Add the JSP to web.xml
- Page 292 and 293:
INSERT INTO DB2ADMIN.ITEM( ITE
- Page 294 and 295:
274 IBM WebSphere Application Serve
- Page 296 and 297:
9.1 Custom tag library (taglibs) co
- Page 298 and 299:
9.1.2 When to use ► Controller lo
- Page 300 and 301:
These are: - TagExtraInfo: Provides
- Page 302 and 303:
This variable will store the name a
- Page 304 and 305:
The TLD contains two main elements,
- Page 306 and 307:
It is possible to avoid the need to
- Page 308 and 309:
9.2 Studio Site Developer and tag l
- Page 310 and 311:
Figure 9-3 Importing a tag library
- Page 312 and 313:
3. From the first Import window sel
- Page 314 and 315:
Figure 9-7 Adding the Validtag tagl
- Page 316 and 317:
9.2.3 Snippets view The Snippets vi
- Page 318 and 319:
Page tag library (from Jakarta) The
- Page 320 and 321:
Tip: If you want to see how the tag
- Page 322 and 323:
Each taglib is different and will h
- Page 324 and 325:
9.3.2 Step 2: Adding a taglib direc
- Page 326 and 327:
2. Select JSP- > Insert Custom... f
- Page 328 and 329:
As you are working with taglib code
- Page 330 and 331:
10.1 XML overview 10.1.1 XML markup
- Page 332 and 333:
Welcome to the ITSO SG24-6555
- Page 334 and 335:
10.1.4 Validation A DTD identifies
- Page 336 and 337:
It is worth noting that XSDs can be
- Page 338 and 339:
Note that the XSD file has to be a
- Page 340 and 341:
► Create XML documents from DTDs,
- Page 342 and 343:
10.2.2 Wizards Figure 10-3 XML pers
- Page 344 and 345:
XSL wizard This is a tool for creat
- Page 346 and 347:
Figure 10-4 XML editor The XML edit
- Page 348 and 349:
Figure 10-5 Using the XML schema ed
- Page 350 and 351:
When you first create a new DTD fro
- Page 352 and 353:
10.3 Using XML in the Online Catalo
- Page 354 and 355:
Example 10-1 FeaturedItem SQL state
- Page 356 and 357:
7. On the next page, select the Cre
- Page 358 and 359:
NAME DESCRIPTION PRICE
- Page 360 and 361:
Figure 10-13 Libraries tab 5. Click
- Page 362 and 363:
5. Verify that the Public modifier
- Page 364 and 365:
import java.util.*; import java.net
- Page 366 and 367:
Placeholder for xslContent // //Add
- Page 368 and 369:
if (paramValues != null) paramValue
- Page 370 and 371:
xslContent += ""; xslContent += "";
- Page 372 and 373:
Figure 10-18 Web site diagram 6. Cl
- Page 374 and 375:
354 IBM WebSphere Application Serve
- Page 376 and 377:
11.1 Web services overview What is
- Page 378 and 379:
Service Requestor Internet Figure 1
- Page 380 and 381:
► UDDI (universal description, di
- Page 382 and 383:
Encoding rules Encoding rules defin
- Page 384 and 385:
service. A binding template points
- Page 386 and 387:
More information The Web site of th
- Page 388 and 389:
Code Generation The Code Generation
- Page 390 and 391:
Using the WSDL editor, you can do t
- Page 392 and 393:
11.3 Using Web services in the Onli
- Page 394 and 395:
Figure 11-8 Web services page a. Ve
- Page 396 and 397:
Figure 11-10 Web service selection
- Page 398 and 399:
Figure 11-12 Web service test page
- Page 400 and 401:
- Proxy: The proxy class makes the
- Page 402 and 403:
► WSDL 1.1 specification at: http
- Page 404 and 405:
12.1 Struts overview Struts is an o
- Page 406 and 407:
When a browser submits an HTML form
- Page 408 and 409:
When initialized, the action servle
- Page 410 and 411:
Note: Once Struts support has been
- Page 412 and 413:
3. Select Add Struts support and JS
- Page 414 and 415:
Struts tools You can set the follow
- Page 416 and 417:
► Evaluate conditional logic tags
- Page 418 and 419:
► Graphical connection format Spe
- Page 420 and 421:
► Forwards: A Struts forward is a
- Page 422 and 423:
Item Parent Function Icon Draw All
- Page 424 and 425:
12.2.5 Wizards To use an action, se
- Page 426 and 427:
Figure 12-11 Action wizard - In the
- Page 428 and 429:
- If you want to specify a form bea
- Page 430 and 431:
- If you want to reuse an existing
- Page 432 and 433:
g. If you want to create method stu
- Page 434 and 435:
c. Specify the name of the Java pac
- Page 436 and 437:
10.On the Design the Form page, you
- Page 438 and 439:
Note: The Exception wizard can also
- Page 440 and 441:
5. Type the name of the new Struts
- Page 442 and 443:
d. If you want to associate the Web
- Page 444 and 445:
12.2.8 Data Mappings view The Strut
- Page 446 and 447:
Note: We did not follow this sample
- Page 448 and 449:
Note: The Web diagram file (*.gph)
- Page 450 and 451:
Important: Notice that the icons ar
- Page 452 and 453:
Important: Notice that the connecti
- Page 454 and 455:
You will notice that there is a war
- Page 456 and 457:
Example 12-5 Adding a html text tag
- Page 458 and 459:
23.Save your changes and exit the P
- Page 460 and 461:
Admin2 page The admin2.jsp page wil
- Page 462 and 463:
Figure 12-31 Creating an ActionForm
- Page 464 and 465:
The method returns errors if either
- Page 466 and 467:
Example 12-13 LoginAction class pub
- Page 468 and 469:
Figure 12-35 Local forwards for the
- Page 470 and 471:
Example 12-14 LogoutAction class pu
- Page 472 and 473:
Important: If you use the Struts fr
- Page 474 and 475:
The ActionServlet handles the reque
- Page 476 and 477:
13.1 Application server overview We
- Page 478 and 479:
Application developer Internet user
- Page 480 and 481:
Note: The Web perspective also cont
- Page 482 and 483:
13.3 Defining servers and server co
- Page 484 and 485:
Figure 13-6 Creating servers and se
- Page 486 and 487:
3. Update the server configuration
- Page 488 and 489:
13.4.2 Publishing an application to
- Page 490 and 491:
Note: If you have not changed the s
- Page 492 and 493:
Figure 13-13 Check the console for
- Page 494 and 495:
Tip on setting a server preference:
- Page 496 and 497:
The following are the steps require
- Page 498 and 499:
Figure 13-18 Define the remote serv
- Page 500 and 501:
Figure 13-20 Defining the copy sett
- Page 502 and 503:
Figure 13-21 Deployed application f
- Page 504 and 505:
The server configuration can be ope
- Page 506 and 507:
► Trace: Allows you to enable Web
- Page 508 and 509:
Note: You can also start the server
- Page 510 and 511:
3. Enter the EAR file name to expor
- Page 512 and 513:
Example 13-2 IBM Agent settings
- Page 514 and 515:
14.1 Debugging in the Web perspecti
- Page 516 and 517:
Figure 14-2 500 page error These er
- Page 518 and 519:
14.1.4 Editors Note: The Tasks view
- Page 520 and 521:
► Standard output: Default color
- Page 522 and 523:
Figure 14-7 Debug perspective Break
- Page 524 and 525:
Note: For additional information on
- Page 526 and 527:
Figure 14-12 Breakpoint properties
- Page 528 and 529:
Figure 14-13 Setting a breakpoint i
- Page 530 and 531:
Note: For additional information ab
- Page 532 and 533:
Figure 14-17 Breakpoint view 14.3.3
- Page 534 and 535:
514 IBM WebSphere Application Serve
- Page 536 and 537:
15.1 Team development with CVS CVS
- Page 538 and 539:
15.2 Team environment using Studio
- Page 540 and 541:
d. Select the connection type (auth
- Page 542 and 543:
Note: When you share a project you
- Page 544 and 545:
15.4.2 Copy (commit) the project to
- Page 546 and 547:
It makes sense to do this when you
- Page 548 and 549:
Figure 15-5 Viewing the project ver
- Page 550 and 551:
15.6 Working with the team using th
- Page 552 and 553:
Figure 15-8 Working with conflicts
- Page 554 and 555:
► Current change: In the Text Com
- Page 556 and 557:
If there is a conflict, use the Tex
- Page 558 and 559:
► Based on the project in your wo
- Page 560 and 561:
Tip: You can see existing branch na
- Page 562 and 563:
Developer 1 (maintenance developer)
- Page 564 and 565:
You will find the following informa
- Page 566 and 567:
When such a situation occurs, you w
- Page 568 and 569:
Figure 15-16 File (text) compare ed
- Page 570 and 571:
550 IBM WebSphere Application Serve
- Page 572 and 573:
16.1 Terms Before starting this top
- Page 574 and 575:
Figure 16-1 Web module deployment d
- Page 576 and 577:
16.4 Securing applications with rol
- Page 578 and 579:
2. Define roles to represent a logi
- Page 580 and 581:
Figure 16-4 Add a role Define the c
- Page 582 and 583:
Figure 16-6 Adding a constraint 3.
- Page 584 and 585:
Assign a role to the constraint Wit
- Page 586 and 587:
Figure 16-10 Enterprise application
- Page 588 and 589:
Tip: If you are using Internet Expl
- Page 590 and 591:
} // get the principal from the req
- Page 592 and 593:
Figure 16-13 JAAS security 6. Save
- Page 594 and 595:
This configuration allows access to
- Page 596 and 597:
Enabling security when installing D
- Page 598 and 599:
16.7 Using SSL with applications Th
- Page 600 and 601:
Note: For additional SSL informatio
- Page 602 and 603:
Wizard The Template application wiz
- Page 604 and 605:
Icon Name Description Web Pages Sec
- Page 606 and 607:
Figure A-3 Template application pre
- Page 608 and 609:
Figure A-5 Template selection 5. Cl
- Page 610 and 611:
Figure A-7 Application properties p
- Page 612 and 613:
Figure A-9 Database connection page
- Page 614 and 615:
- Up moves the widget up within the
- Page 616 and 617:
596 IBM WebSphere Application Serve
- Page 618 and 619:
► Different versions of a feature
- Page 620 and 621:
Figure B-3 Install configuration vi
- Page 622 and 623:
Feature updates view The Feature up
- Page 624 and 625:
Figure B-7 Feature install wizard -
- Page 626 and 627:
Figure B-9 Feature install wizard -
- Page 628 and 629:
Figure B-11 Available updates searc
- Page 630 and 631:
Figure B-12 My computer folder 610
- Page 632 and 633:
Online Catalog sample application o
- Page 634 and 635:
SHIPPING_ORDER table The SHIPPING_O
- Page 636 and 637:
Homepage XST file calls Servlet Fig
- Page 638 and 639:
Item Folder/Package Description adm
- Page 640 and 641:
Catalog Item Folder/Package Descrip
- Page 642 and 643:
Note: To add items to the wishlist
- Page 644 and 645:
session.setAttribute("att1", o); ..
- Page 646 and 647:
Figure C-7 Web site diagram view of
- Page 648 and 649:
Figure C-8 theme folder Deployment
- Page 650 and 651:
Table C-11 Servlet login items Item
- Page 652 and 653:
Item Folder/Package Description Log
- Page 654 and 655:
Using the Web material The addition
- Page 656 and 657:
Update the FeaturedItemXMLServlet s
- Page 658 and 659:
15.On the Create a Resource Propert
- Page 660 and 661:
640 IBM WebSphere Application Serve
- Page 662 and 663:
Other resources These publications
- Page 664 and 665:
► Java Authentication and Authori
- Page 666 and 667:
646 IBM WebSphere Application Serve
- Page 668 and 669:
oker 357 BSF 32 buffer attribute 24
- Page 670 and 671:
host variable 184, 187 HTML 60 crea
- Page 672 and 673:
460, 466, 522, 527, 529, 540-541 XM
- Page 674 and 675:
Session 297-298, 300-301 Sslext 300
- Page 676 and 677:
XML schema editor graph view 328 xm
- Page 680:
IBM WebSphere Application Server -