
Create successful ePaper yourself
Turn your PDF publications into a flip-book with our unique Google optimized e-Paper software.
12.01<br />
E Siemens AG, 2001. All rights reserved<br />
<strong>SINUMERIK</strong> <strong>840D</strong>/<strong>810D</strong> Description of Functions <strong>ShopMill</strong> (FBSP) - 12.01 Edition<br />
1<br />
2Installation and Start-Up<br />
2.2 Initial start-up sequence<br />
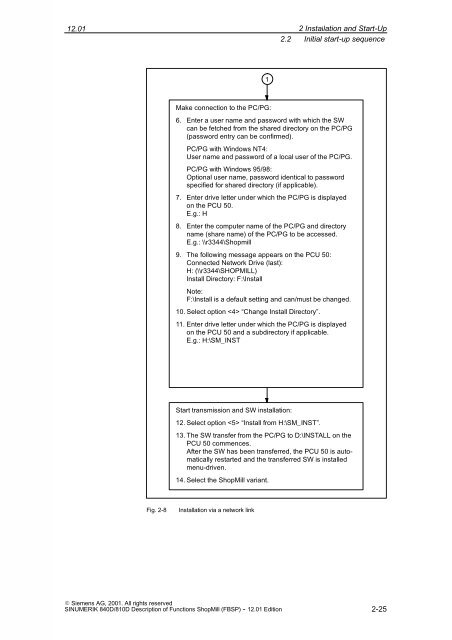
Make connection to the PC/PG:<br />
6. Enter a user name and password with which the SW<br />
can be fetched from the shared directory on the PC/PG<br />
(password entry can be confirmed).<br />
PC/PG with Windows NT4:<br />
User name and password of a local user of the PC/PG.<br />
PC/PG with Windows 95/98:<br />
Optional user name, password identical to password<br />
specified for shared directory (if applicable).<br />
7. Enter drive letter under which the PC/PG is displayed<br />
on the PCU 50.<br />
E.g.: H<br />
8. Enter the computer name of the PC/PG and directory<br />
name (share name) of the PC/PG to be accessed.<br />
E.g.: \\r3344\Shopmill<br />
9. The following message appears on the PCU 50:<br />
Connected Network Drive (last):<br />
H: (\\r3344\SHOPMILL)<br />
Install Directory: F:\Install<br />
Note:<br />
F:\Install is a default setting and can/must be changed.<br />
10. Select option “Change Install Directory”.<br />
11. Enter drive letter under which the PC/PG is displayed<br />
on the PCU 50 and a subdirectory if applicable.<br />
E.g.: H:\SM_INST<br />
Start transmission and SW installation:<br />
12. Select option “Install from H:\SM_INST”.<br />
13. The SW transfer from the PC/PG to D:\INSTALL on the<br />
PCU 50 commences.<br />
After the SW has been transferred, the PCU 50 is automatically<br />
restarted and the transferred SW is installed<br />
menu-driven.<br />
14. Select the <strong>ShopMill</strong> variant.<br />
Fig. 2-8 Installation via a network link<br />
2-25