
You also want an ePaper? Increase the reach of your titles
YUMPU automatically turns print PDFs into web optimized ePapers that Google loves.
Techniques <strong>for</strong> adjusting illumination<br />
Be<strong>for</strong>e render the scene, try to finish all the modeling as this greatly simplifies the task of adjusting the<br />
illumination. The number of objects, object location, material type, color and even size will all affect the<br />
illumination in some way.<br />
When beginning to create the lighting solution it is important to have a solid base in which to begin<br />
evaluating how you will need to light your scene, as well as how it will react to lighting. With Vray this task is<br />
very easy because of how the environment light works. Basically with you’re environment color set to white<br />
(255,255,255) and the intensity set to 1, you should get a neutral lighting of your scene. This is useful in that<br />
it will allow you to properly assess the appearance of your materials, as well see if there are any areas of your<br />
scene which will naturally receive more or less light from the environment.<br />
Now lets see this in action. Open file Cup-Illumination-01.3dm again. This is a easy open space example,<br />
there is no light added to the scene, and the Environment color and intensity are currently set to Val 255 and<br />
1 respectively.<br />
Using a white floor color is important as it will show the most amount of light that will effect the scene. This<br />
is because white allows the most amount of light energy to be retained after it bounces off a surface. With<br />
the white floor, we know that if we change its material to something that is darker, than we can expect a<br />
little less bounced light in our scene. In an exterior scene like this one the effect is minimal, but when<br />
creating an interior illumination solution this is an important thing to know<br />
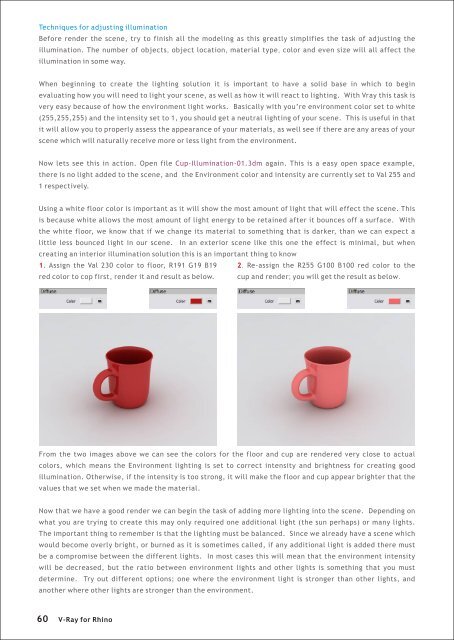
1. Assign the Val 230 color to floor, R191 G19 B19 2. Re-assign the R255 G100 B100 red color to the<br />
red color to cop first, render it and result as below. cup and render; you will get the result as below.<br />
From the two images above we can see the colors <strong>for</strong> the floor and cup are rendered very close to actual<br />
colors, which means the Environment lighting is set to correct intensity and brightness <strong>for</strong> creating good<br />
illumination. Otherwise, if the intensity is too strong, it will make the floor and cup appear brighter that the<br />
values that we set when we made the material.<br />
Now that we have a good render we can begin the task of adding more lighting into the scene. Depending on<br />
what you are trying to create this may only required one additional light (the sun perhaps) or many lights.<br />
The important thing to remember is that the lighting must be balanced. Since we already have a scene which<br />
would become overly bright, or burned as it is sometimes called, if any additional light is added there must<br />
be a compromise between the different lights. In most cases this will mean that the environment intensity<br />
will be decreased, but the ratio between environment lights and other lights is something that you must<br />
determine. Try out different options; one where the environment light is stronger than other lights, and<br />
another where other lights are stronger than the environment.<br />
60<br />
V-<strong>Ray</strong> <strong>for</strong> <strong>Rhino</strong>