Process Unit 73 LF - Knick
Process Unit 73 LF - Knick
Process Unit 73 LF - Knick

You also want an ePaper? Increase the reach of your titles
YUMPU automatically turns print PDFs into web optimized ePapers that Google loves.
<strong>Process</strong> <strong>Unit</strong> <strong>73</strong> <strong>LF</strong><br />
0(4) mA<br />
Output<br />
2<br />
Controller output Y [%]<br />
100<br />
ÍÍÍÍÍÍÍÍÍÍÍÍ<br />
ÍÍÍÍÍÍÍÍÍÍÍÍ<br />
50<br />
ÍÍÍÍÍÍÍÍÍÍÍÍ<br />
ÍÍÍÍÍÍÍÍÍÍÍÍ<br />
0<br />
ÍÍÍÍÍÍÍÍÍÍÍÍ<br />
–50<br />
Active<br />
control range<br />
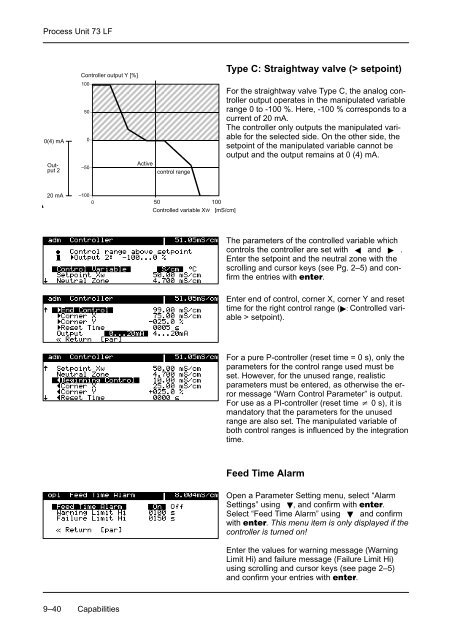
Type C: Straightway valve (> setpoint)<br />
For the straightway valve Type C, the analog controller<br />
output operates in the manipulated variable<br />
range 0 to -100 %. Here, -100 % corresponds to a<br />
current of 20 mA.<br />
The controller only outputs the manipulated variable<br />
for the selected side. On the other side, the<br />
setpoint of the manipulated variable cannot be<br />
output and the output remains at 0 (4) mA.<br />
20 mA<br />
–100<br />
0<br />
50 100<br />
Controlled variable X W [mS/cm]<br />
The parameters of the controlled variable which<br />
controls the controller are set with and .<br />
Enter the setpoint and the neutral zone with the<br />
scrolling and cursor keys (see Pg. 2–5) and confirm<br />
the entries with .<br />
Enter end of control, corner X, corner Y and reset<br />
time for the right control range (: Controlled variable<br />
> setpoint).<br />
For a pure P-controller (reset time = 0 s), only the<br />
parameters for the control range used must be<br />
set. However, for the unused range, realistic<br />
parameters must be entered, as otherwise the error<br />
message “Warn Control Parameter” is output.<br />
For use as a PI-controller (reset time 0 s), it is<br />
mandatory that the parameters for the unused<br />
range are also set. The manipulated variable of<br />
both control ranges is influenced by the integration<br />
time.<br />
Feed Time Alarm<br />
Open a Parameter Setting menu, select “Alarm<br />
Settings” using , and confirm with .<br />
Select “Feed Time Alarm” using and confirm<br />
with . This menu item is only displayed if the<br />
controller is turned on!<br />
Enter the values for warning message (Warning<br />
Limit Hi) and failure message (Failure Limit Hi)<br />
using scrolling and cursor keys (see page 2–5)<br />
and confirm your entries with .<br />
9–40 Capabilities