

MMC User Manual - AMS Neve
MMC User Manual - AMS Neve
MMC User Manual - AMS Neve

Create successful ePaper yourself
Turn your PDF publications into a flip-book with our unique Google optimized e-Paper software.
Tools Menu<br />
I/O Config<br />
To start a new I/O Configuration<br />
To start a new I/O Configuration while in I/O Config click the New button.<br />
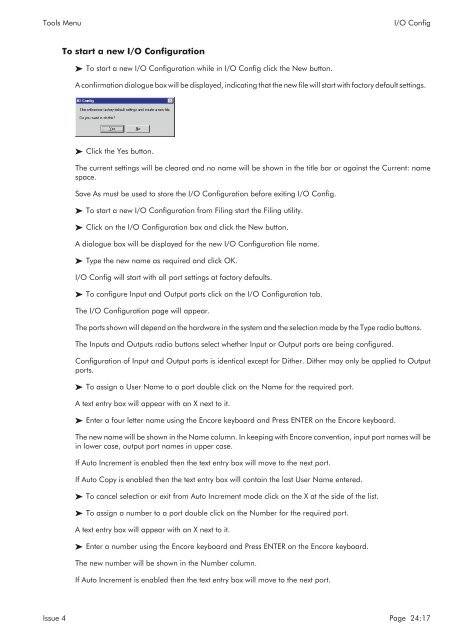
A confirmation dialogue box will be displayed, indicating that the new file will start with factory default settings.<br />
Click the Yes button.<br />
The current settings will be cleared and no name will be shown in the title bar or against the Current: name<br />
space.<br />
Save As must be used to store the I/O Configuration before exiting I/O Config.<br />
To start a new I/O Configuration from Filing start the Filing utility.<br />
Click on the I/O Configuration box and click the New button.<br />
A dialogue box will be displayed for the new I/O Configuration file name.<br />
Type the new name as required and click OK.<br />
I/O Config will start with all port settings at factory defaults.<br />
To configure Input and Output ports click on the I/O Configuration tab.<br />
The I/O Configuration page will appear.<br />
The ports shown will depend on the hardware in the system and the selection made by the Type radio buttons.<br />
The Inputs and Outputs radio buttons select whether Input or Output ports are being configured.<br />
Configuration of Input and Output ports is identical except for Dither. Dither may only be applied to Output<br />
ports.<br />
To assign a <strong>User</strong> Name to a port double click on the Name for the required port.<br />
A text entry box will appear with an X next to it.<br />
Enter a four letter name using the Encore keyboard and Press ENTER on the Encore keyboard.<br />
The new name will be shown in the Name column. In keeping with Encore convention, input port names will be<br />
in lower case, output port names in upper case.<br />
If Auto Increment is enabled then the text entry box will move to the next port.<br />
If Auto Copy is enabled then the text entry box will contain the last <strong>User</strong> Name entered.<br />
To cancel selection or exit from Auto Increment mode click on the X at the side of the list.<br />
To assign a number to a port double click on the Number for the required port.<br />
A text entry box will appear with an X next to it.<br />
Enter a number using the Encore keyboard and Press ENTER on the Encore keyboard.<br />
The new number will be shown in the Number column.<br />
If Auto Increment is enabled then the text entry box will move to the next port.<br />
Issue 4 Page 24:17


