

MMC User Manual - AMS Neve
MMC User Manual - AMS Neve
MMC User Manual - AMS Neve

Create successful ePaper yourself
Turn your PDF publications into a flip-book with our unique Google optimized e-Paper software.
Fader Assignment<br />
Layer Selection on The Fader Strips<br />
Fader Assignment<br />
Logic <strong>MMC</strong> makes economical use of the fader strips by having up to four paths each across 6 banks assigned<br />
to each fader strip. The paths assigned to each layer are initially determined with Desk Designer in Desk Edit.<br />
The paths that are currently active on the faders are said to be "on the surface".<br />
Layer Selection on The Fader Strips<br />
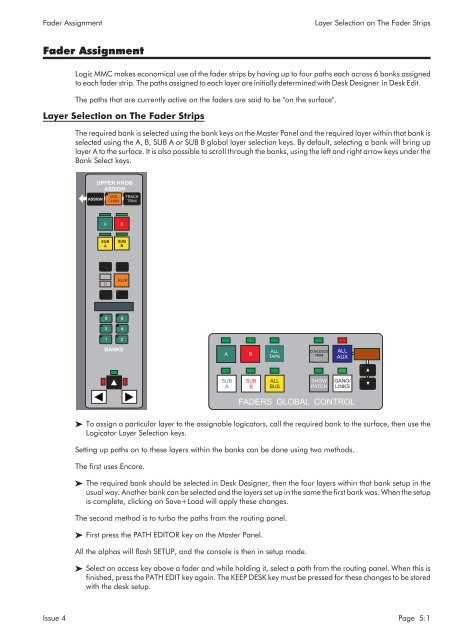
The required bank is selected using the bank keys on the Master Panel and the required layer within that bank is<br />
selected using the A, B, SUB A or SUB B global layer selection keys. By default, selecting a bank will bring up<br />
layer A to the surface. It is also possible to scroll through the banks, using the left and right arrow keys under the<br />
Bank Select keys.<br />
ASSIGN<br />
UPPER KNOB<br />
ASSIGN<br />
2ND<br />
CHAN<br />
TRACK<br />
TRIM<br />
A<br />
B<br />
SUB<br />
A<br />
SUB<br />
B<br />
A<br />
B<br />
FLIP<br />
5<br />
6<br />
3 4<br />
1<br />
2<br />
BANKS<br />
A<br />
B<br />
ALL<br />
TAPE<br />
COALESCE<br />
TRIM<br />
ALL<br />
AUX<br />
AUX2<br />
SUB<br />
A<br />
SUB<br />
B<br />
ALL<br />
BUS<br />
SHOW<br />
PATCH<br />
GANG/<br />
LINKS<br />
FADERS GLOBAL CONTROL<br />
To assign a particular layer to the assignable logicators, call the required bank to the surface, then use the<br />
Logicator Layer Selection keys.<br />
Setting up paths on to these layers within the banks can be done using two methods.<br />
The first uses Encore.<br />
The required bank should be selected in Desk Designer, then the four layers within that bank setup in the<br />
usual way. Another bank can be selected and the layers set up in the same the first bank was. When the setup<br />
is complete, clicking on Save+Load will apply these changes.<br />
The second method is to turbo the paths from the routing panel.<br />
First press the PATH EDITOR key on the Master Panel.<br />
All the alphas will flash SETUP, and the console is then in setup mode.<br />
Select an access key above a fader and while holding it, select a path from the routing panel. When this is<br />
finished, press the PATH EDIT key again. The KEEP DESK key must be pressed for these changes to be stored<br />
with the desk setup.<br />
Issue 4 Page 5:1


