

MMC User Manual - AMS Neve
MMC User Manual - AMS Neve
MMC User Manual - AMS Neve

Create successful ePaper yourself
Turn your PDF publications into a flip-book with our unique Google optimized e-Paper software.
Routing<br />
Path Routing with the Access Keys<br />
Press the keys for the required sources at the bottom of the screen or the numbered GROUP keys then<br />
release the destination key.<br />
The Auxiliaries can only be selected as destinations, not as sources.<br />
To route multiple sources to Groups, Main Outputs or Auxiliaries press and hold the required number key in<br />
the GROUP, AUX or MAIN OUTPUTS area.<br />
Existing sources will be indicated by the screen, source key LEDs and ACCESS Key LEDs.<br />
Press the keys for the required sources then release the destination key.<br />
To access additional Tracks (if available) press the left/right arrow keys above the screen.<br />
The red hashing will move to the next/previous row of Track numbers.<br />
Path Routing with the Access Keys<br />
The ACCESS Keys on the Fader Strips, can be used for routing, either by using other ACCESS Keys or any of the<br />
routing controls associated with the Routing Screen. When an ACCESS Key is used for routing a Track then it can<br />
only be used as a routing source.<br />
To route a path to destinations press and hold the ACCESS Key or main output for a Channel or Track Group<br />
then press the keys for valid destinations on the routing screen or other Access Keys.<br />
Existing routing of the path will be indicated by the illumination of LEDs above ACCESS keys and integral LEDs<br />
in the keys around the Routing Screen illuminating red.<br />
The integral LEDs in the keys for the selected destinations will illuminate red and the Routing Screen will show<br />
routing changes.<br />
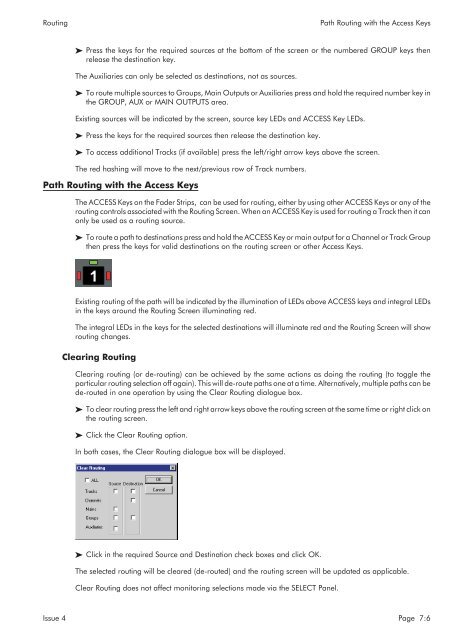
Clearing Routing<br />
Clearing routing (or de-routing) can be achieved by the same actions as doing the routing (to toggle the<br />
particular routing selection off again). This will de-route paths one at a time. Alternatively, multiple paths can be<br />
de-routed in one operation by using the Clear Routing dialogue box.<br />
To clear routing press the left and right arrow keys above the routing screen at the same time or right click on<br />
the routing screen.<br />
Click the Clear Routing option.<br />
In both cases, the Clear Routing dialogue box will be displayed.<br />
Click in the required Source and Destination check boxes and click OK.<br />
The selected routing will be cleared (de-routed) and the routing screen will be updated as applicable.<br />
Clear Routing does not affect monitoring selections made via the SELECT Panel.<br />
Issue 4 Page 7:6


