

MOAC_Powerpoint_2016

You also want an ePaper? Increase the reach of your titles
YUMPU automatically turns print PDFs into web optimized ePapers that Google loves.
4<br />
Lesson 1<br />
STEP BY STEP<br />
Use the Ribbon<br />
GET READY. USE the new, blank presentation that is still open from the first exercise in this<br />
lesson.<br />
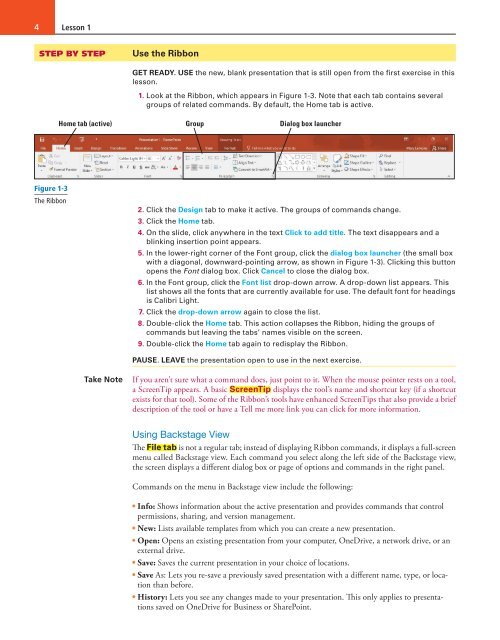
1. Look at the Ribbon, which appears in Figure 1-3. Note that each tab contains several<br />
groups of related commands. By default, the Home tab is active.<br />
Home tab (active)<br />
Group<br />
Dialog box launcher<br />
Figure 1-3<br />
The Ribbon<br />
2. Click the Design tab to make it active. The groups of commands change.<br />
3. Click the Home tab.<br />
4. On the slide, click anywhere in the text Click to add title. The text disappears and a<br />
blinking insertion point appears.<br />
5. In the lower-right corner of the Font group, click the dialog box launcher (the small box<br />
with a diagonal, downward-pointing arrow, as shown in Figure 1-3). Clicking this button<br />
opens the Font dialog box. Click Cancel to close the dialog box.<br />
6. In the Font group, click the Font list drop-down arrow. A drop-down list appears. This<br />
list shows all the fonts that are currently available for use. The default font for headings<br />
is Calibri Light.<br />
7. Click the drop-down arrow again to close the list.<br />
8. Double-click the Home tab. This action collapses the Ribbon, hiding the groups of<br />
commands but leaving the tabs’ names visible on the screen.<br />
9. Double-click the Home tab again to redisplay the Ribbon.<br />
PAUSE. LEAVE the presentation open to use in the next exercise.<br />
Take Note<br />
If you aren’t sure what a command does, just point to it. When the mouse pointer rests on a tool,<br />
a ScreenTip appears. A basic ScreenTip displays the tool’s name and shortcut key (if a shortcut<br />
exists for that tool). Some of the Ribbon’s tools have enhanced ScreenTips that also provide a brief<br />
description of the tool or have a Tell me more link you can click for more information.<br />
Using Backstage View<br />
The File tab is not a regular tab; instead of displaying Ribbon commands, it displays a full-screen<br />
menu called Backstage view. Each command you select along the left side of the Backstage view,<br />
the screen displays a different dialog box or page of options and commands in the right panel.<br />
Commands on the menu in Backstage view include the following:<br />
• Info: Shows information about the active presentation and provides commands that control<br />
permissions, sharing, and version management.<br />
• New: Lists available templates from which you can create a new presentation.<br />
• Open: Opens an existing presentation from your computer, OneDrive, a network drive, or an<br />
external drive.<br />
• Save: Saves the current presentation in your choice of locations.<br />
• Save As: Lets you re-save a previously saved presentation with a different name, type, or location<br />
than before.<br />
• History: Lets you see any changes made to your presentation. This only applies to presentations<br />
saved on OneDrive for Business or SharePoint.

