

MOAC_Powerpoint_2016

You also want an ePaper? Increase the reach of your titles
YUMPU automatically turns print PDFs into web optimized ePapers that Google loves.
Delivering a Presentation 211<br />
Creating a Custom Show<br />
Here we look at how to create custom shows to customize presentations for different groups<br />
using slides from a single presentation. A comprehensive year-end corporate review presentation,<br />
for example, might include information on the company as a whole as well as on the operations of<br />
each department. You could show all of the slides to the board of directors and use custom shows<br />
to present to each department the general company statistics and the information specific to that<br />
department. Custom shows allow you to focus attention on the material most relevant to a specific<br />
audience. In this exercise, you will create a custom show that contains a subset of the slides in the<br />
main presentation.<br />
You select the slides for a custom show in the Define Custom Show dialog box. Add slide titles<br />
from the main presentation to the custom presentation. You can adjust the order in which the<br />
slides display in the custom show: Use the up and down arrows to the right of the Slides in custom<br />
show list to move a selected title up or down in the list.<br />
STEP BY STEP<br />
Create a Custom Show<br />
GET READY. USE the Bid Final presentation that is still open from the previous exercise.<br />
1. Click the Slide Show tab, if necessary, and then click the Custom Slide Show button in<br />
the Start Slide Show group.<br />
2. Click Custom Shows. The Custom Shows dialog box opens.<br />
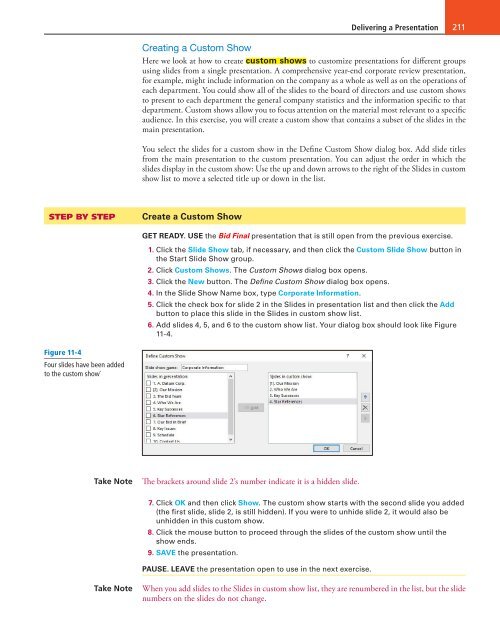
3. Click the New button. The Define Custom Show dialog box opens.<br />
4. In the Slide Show Name box, type Corporate Information.<br />
5. Click the check box for slide 2 in the Slides in presentation list and then click the Add<br />
button to place this slide in the Slides in custom show list.<br />
6. Add slides 4, 5, and 6 to the custom show list. Your dialog box should look like Figure<br />
11-4.<br />
Figure 11-4<br />
Four slides have been added<br />
to the custom show`<br />
Take Note<br />
The brackets around slide 2’s number indicate it is a hidden slide.<br />
7. Click OK and then click Show. The custom show starts with the second slide you added<br />
(the first slide, slide 2, is still hidden). If you were to unhide slide 2, it would also be<br />
unhidden in this custom show.<br />
8. Click the mouse button to proceed through the slides of the custom show until the<br />
show ends.<br />
9. SAVE the presentation.<br />
PAUSE. LEAVE the presentation open to use in the next exercise.<br />
Take Note<br />
When you add slides to the Slides in custom show list, they are renumbered in the list, but the slide<br />
numbers on the slides do not change.

