

MOAC_Powerpoint_2016

Create successful ePaper yourself
Turn your PDF publications into a flip-book with our unique Google optimized e-Paper software.
158<br />
Lesson 8<br />
STEP BY STEP<br />
Draw and Resize Shapes<br />
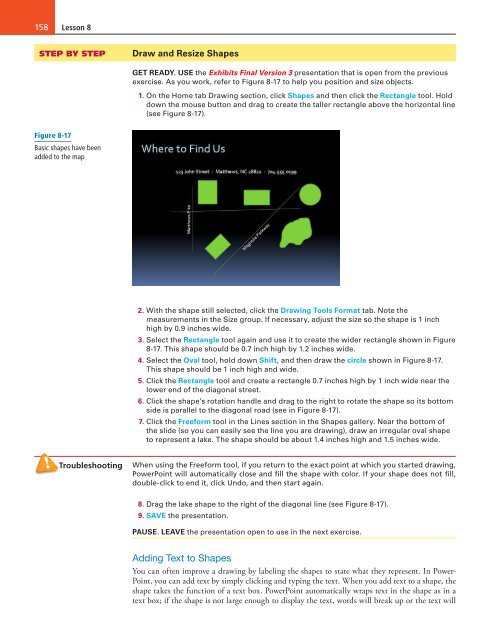
GET READY. USE the Exhibits Final Version 3 presentation that is open from the previous<br />
exercise. As you work, refer to Figure 8-17 to help you position and size objects.<br />
1. On the Home tab Drawing section, click Shapes and then click the Rectangle tool. Hold<br />
down the mouse button and drag to create the taller rectangle above the horizontal line<br />
(see Figure 8-17).<br />
Figure 8-17<br />
Basic shapes have been<br />
added to the map<br />
2. With the shape still selected, click the Drawing Tools Format tab. Note the<br />
measurements in the Size group. If necessary, adjust the size so the shape is 1 inch<br />
high by 0.9 inches wide.<br />
3. Select the Rectangle tool again and use it to create the wider rectangle shown in Figure<br />
8-17. This shape should be 0.7 inch high by 1.2 inches wide.<br />
4. Select the Oval tool, hold down Shift, and then draw the circle shown in Figure 8-17.<br />
This shape should be 1 inch high and wide.<br />
5. Click the Rectangle tool and create a rectangle 0.7 inches high by 1 inch wide near the<br />
lower end of the diagonal street.<br />
6. Click the shape’s rotation handle and drag to the right to rotate the shape so its bottom<br />
side is parallel to the diagonal road (see in Figure 8-17).<br />
7. Click the Freeform tool in the Lines section in the Shapes gallery. Near the bottom of<br />
the slide (so you can easily see the line you are drawing), draw an irregular oval shape<br />
to represent a lake. The shape should be about 1.4 inches high and 1.5 inches wide.<br />
Troubleshooting<br />
When using the Freeform tool, if you return to the exact point at which you started drawing,<br />
PowerPoint will automatically close and fill the shape with color. If your shape does not fill,<br />
double-click to end it, click Undo, and then start again.<br />
8. Drag the lake shape to the right of the diagonal line (see Figure 8-17).<br />
9. SAVE the presentation.<br />
PAUSE. LEAVE the presentation open to use in the next exercise.<br />
Adding Text to Shapes<br />
You can often improve a drawing by labeling the shapes to state what they represent. In Power-<br />
Point, you can add text by simply clicking and typing the text. When you add text to a shape, the<br />
shape takes the function of a text box. PowerPoint automatically wraps text in the shape as in a<br />
text box; if the shape is not large enough to display the text, words will break up or the text will

