

MOAC_Powerpoint_2016

Create successful ePaper yourself
Turn your PDF publications into a flip-book with our unique Google optimized e-Paper software.
Presentation Basics 25<br />
CREATING A PRESENTATION FROM A TEMPLATE<br />
PowerPoint’s templates give you a jump start in creating complete presentations. A template is<br />
a reusable sample file that includes a background, layouts, coordinating fonts, and other design<br />
elements that work together to create an attractive, finished slide show. Templates may (but are not<br />
required to) contain sample content, too.<br />
Using a Template as the Basis for a Presentation<br />
Each template employs one or more themes. A theme is a collection of settings including colors,<br />
fonts, background graphics, bullet graphics, and margin and placement settings. You can<br />
create your own templates or download new ones from Office.com. In this exercise, you will use a<br />
downloaded template to start a presentation that, when finished, will help you show pictures and<br />
descriptions of new products to a group of store managers.<br />
STEP BY STEP<br />
Create a Presentation from a Template<br />
GET READY. If PowerPoint is not already open from the previous exercise, LAUNCH<br />
PowerPoint.<br />
1. Click the File tab.<br />
2. Click New to open the New tab.<br />
3. In the Search box, type photo albums and then press Enter or click the Search button.<br />
Thumbnail images of the photo album templates appear.<br />
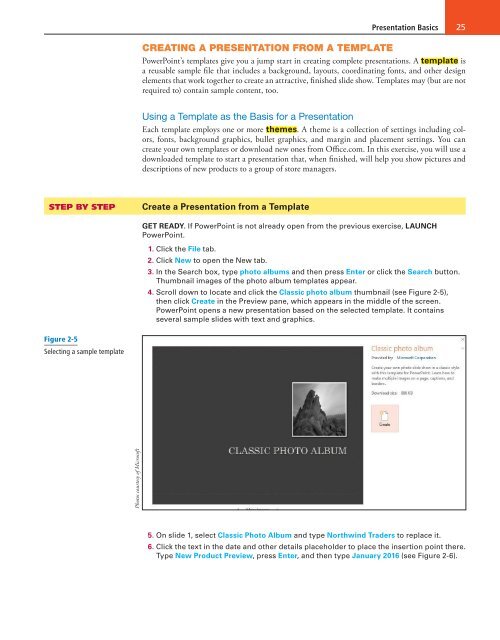
4. Scroll down to locate and click the Classic photo album thumbnail (see Figure 2-5),<br />
then click Create in the Preview pane, which appears in the middle of the screen.<br />
PowerPoint opens a new presentation based on the selected template. It contains<br />
several sample slides with text and graphics.<br />
Figure 2-5<br />
Selecting a sample template<br />
Photos courtesy of Microsoft<br />
5. On slide 1, select Classic Photo Album and type Northwind Traders to replace it.<br />
6. Click the text in the date and other details placeholder to place the insertion point there.<br />
Type New Product Preview, press Enter, and then type January <strong>2016</strong> (see Figure 2-6).

