

MOAC_Powerpoint_2016

Create successful ePaper yourself
Turn your PDF publications into a flip-book with our unique Google optimized e-Paper software.
Adding Graphics to a Presentation 143<br />
Guides feature. These drawing guides are movable, vertical and horizontal non-printing lines<br />
that you can use when positioning objects on a slide. PowerPoint also provides gridlines, a set<br />
of dotted horizontal and vertical lines that overlay the entire slide. In this exercise, you learn how<br />
to use the ruler, guides, and gridlines to position objects so that they align with other objects on a<br />
slide and appear consistently throughout a presentation.<br />
STEP BY STEP<br />
Use the Ruler, Gridlines, and Guides<br />
GET READY. USE the Exhibits Final presentation that is open from the previous exercise.<br />
1. Go to n the View tab, click Ruler if this option is not already selected. The vertical and<br />
horizontal rulers appear in the Slide pane.<br />
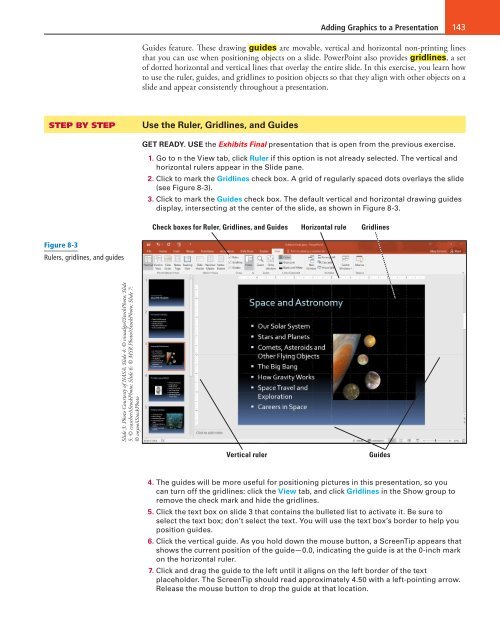
2. Click to mark the Gridlines check box. A grid of regularly spaced dots overlays the slide<br />
(see Figure 8-3).<br />
3. Click to mark the Guides check box. The default vertical and horizontal drawing guides<br />
display, intersecting at the center of the slide, as shown in Figure 8-3.<br />
Check boxes for Ruler, Gridlines, and Guides Horizontal rule Gridlines<br />
Figure 8-3<br />
Rulers, gridlines, and guides<br />
Slide 3: Photo Courtesty of NASA; Slide 4: © visualgo/iStockPhoto; Slide<br />
5: © csascher/iStockPhoto; Slide 6: © MSR Photo/iStockPhoto; Slide 7:<br />
© ooyoo/iStockPhoto<br />
Vertical ruler<br />
Guides<br />
4. The guides will be more useful for positioning pictures in this presentation, so you<br />
can turn off the gridlines: click the View tab, and click Gridlines in the Show group to<br />
remove the check mark and hide the gridlines.<br />
5. Click the text box on slide 3 that contains the bulleted list to activate it. Be sure to<br />
select the text box; don’t select the text. You will use the text box’s border to help you<br />
position guides.<br />
6. Click the vertical guide. As you hold down the mouse button, a ScreenTip appears that<br />
shows the current position of the guide—0.0, indicating the guide is at the 0-inch mark<br />
on the horizontal ruler.<br />
7. Click and drag the guide to the left until it aligns on the left border of the text<br />
placeholder. The ScreenTip should read approximately 4.50 with a left-pointing arrow.<br />
Release the mouse button to drop the guide at that location.

