Instructions for use: Ikus - Berlin Heart
Instructions for use: Ikus - Berlin Heart
Instructions for use: Ikus - Berlin Heart
Create successful ePaper yourself
Turn your PDF publications into a flip-book with our unique Google optimized e-Paper software.
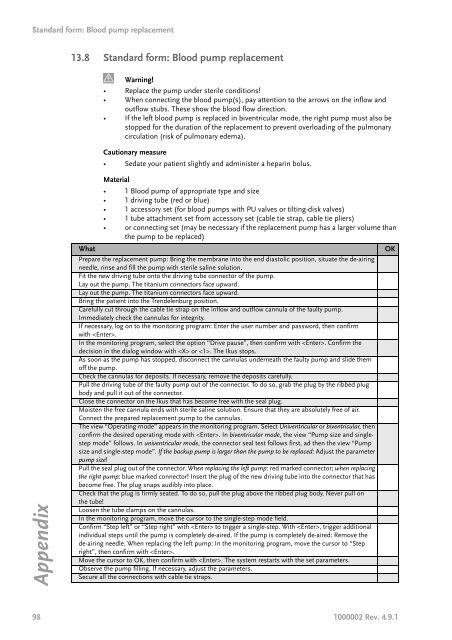
Standard <strong>for</strong>m: Blood pump replacement<br />
Appendix<br />
13.8 Standard <strong>for</strong>m: Blood pump replacement<br />
Warning!<br />
• Replace the pump under sterile conditions!<br />
• When connecting the blood pump(s), pay attention to the arrows on the inflow and<br />
outflow stubs. These show the blood flow direction.<br />
• If the left blood pump is replaced in biventricular mode, the right pump must also be<br />
stopped <strong>for</strong> the duration of the replacement to prevent overloading of the pulmonary<br />
circulation (risk of pulmonary edema).<br />
Cautionary measure<br />
• Sedate your patient slightly and administer a heparin bolus.<br />
Material<br />
• 1 Blood pump of appropriate type and size<br />
• 1 driving tube (red or blue)<br />
• 1 accessory set (<strong>for</strong> blood pumps with PU valves or tilting-disk valves)<br />
• 1 tube attachment set from accessory set (cable tie strap, cable tie pliers)<br />
• or connecting set (may be necessary if the replacement pump has a larger volume than<br />
the pump to be replaced)<br />
What OK<br />
Prepare the replacement pump: Bring the membrane into the end diastolic position, situate the de-airing<br />
needle, rinse and fill the pump with sterile saline solution.<br />
Fit the new driving tube onto the driving tube connector of the pump.<br />
Lay out the pump. The titanium connectors face upward.<br />
Lay out the pump. The titanium connectors face upward.<br />
Bring the patient into the Trendelenburg position.<br />
Carefully cut through the cable tie strap on the inflow and outflow cannula of the faulty pump.<br />
Immediately check the cannulas <strong>for</strong> integrity.<br />
If necessary, log on to the monitoring program: Enter the <strong>use</strong>r number and password, then confirm<br />
with .<br />
In the monitoring program, select the option “Drive pa<strong>use</strong>”, then confirm with . Confirm the<br />
decision in the dialog window with or . The <strong>Ikus</strong> stops.<br />
As soon as the pump has stopped, disconnect the cannulas underneath the faulty pump and slide them<br />
off the pump.<br />
Check the cannulas <strong>for</strong> deposits. If necessary, remove the deposits carefully.<br />
Pull the driving tube of the faulty pump out of the connector. To do so, grab the plug by the ribbed plug<br />
body and pull it out of the connector.<br />
Close the connector on the <strong>Ikus</strong> that has become free with the seal plug.<br />
Moisten the free cannula ends with sterile saline solution. Ensure that they are absolutely free of air.<br />
Connect the prepared replacement pump to the cannulas.<br />
The view “Operating mode” appears in the monitoring program. Select Univentricular or biventricular, then<br />
confirm the desired operating mode with . In biventricular mode, the view “Pump size and singlestep<br />
mode” follows. In univentricular mode, the connector seal test follows first, ad then the view “Pump<br />
size and single-step mode”. If the backup pump is larger than the pump to be replaced: Adjust the parameter<br />
pump size!<br />
Pull the seal plug out of the connector. When replacing the left pump: red marked connector; when replacing<br />
the right pump: blue marked connector! Insert the plug of the new driving tube into the connector that has<br />
become free. The plug snaps audibly into place.<br />
Check that the plug is firmly seated. To do so, pull the plug above the ribbed plug body. Never pull on<br />
the tube!<br />
Loosen the tube clamps on the cannulas.<br />
In the monitoring program, move the cursor to the single-step mode field.<br />
Confirm “Step left” or “Step right” with to trigger a single-step. With , trigger additional<br />
individual steps until the pump is completely de-aired. If the pump is completely de-aired: Remove the<br />
de-airing needle. When replacing the left pump: In the monitoring program, move the cursor to “Step<br />
right”, then confirm with .<br />
Move the cursor to OK, then confirm with . The system restarts with the set parameters.<br />
Observe the pump filling. If necessary, adjust the parameters.<br />
Secure all the connections with cable tie straps.<br />
98 1000002 Rev. 4.9.1


