Instructions for use: Ikus - Berlin Heart
Instructions for use: Ikus - Berlin Heart
Instructions for use: Ikus - Berlin Heart

You also want an ePaper? Increase the reach of your titles
YUMPU automatically turns print PDFs into web optimized ePapers that Google loves.
<strong>Instructions</strong><br />
1. Keep the pressure gauge set and the pump at hand.<br />
2. Seal the outflow side of the pump with the seal.<br />
3. Connect the pressure gauge set together (see image). To do so, moisten all the<br />
silicone parts.<br />
4. Fit the free end of the pressure gauge set to the inflow side of the pump.<br />
5. Increase the pressure with the pressure gauge. The membrane is located in the end-ofdiastole<br />
position.<br />
6. Build up more pressure: 300 mmHg. The pressure must remain constant over 30 s.<br />
Continue maintaining the pressure.<br />
7. If the pressure remain constant over 30 s: Check that the connector nuts are firmly seated.<br />
To do so, hold the titanium connector tightly, fix the supplied key to the connector nut<br />
and check carefully that the nut can be tightened in the direction of the arrow (see table).<br />
8. Leave the pressure gauge set connected to secure the membrane position.<br />
Caution!<br />
• Never twist the connectors beca<strong>use</strong> this would damage the seals.<br />
Status of the pump and nuts What should be done?<br />
The connector nut is firmly seated, and the pump<br />
does not leak air.<br />
The connector nut can be turned, and the pump<br />
does not leak air.<br />
The connector nut can be turned,<br />
and the pump leaks air.<br />
The connector nut is firmly seated, but the pump<br />
leaks air.<br />
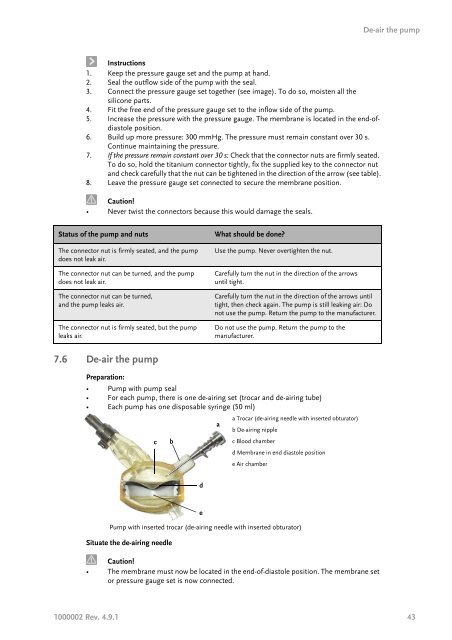
7.6 De-air the pump<br />
Preparation:<br />
• Pump with pump seal<br />
• For each pump, there is one de-airing set (trocar and de-airing tube)<br />
• Each pump has one disposable syringe (50 ml)<br />
Pump with inserted trocar (de-airing needle with inserted obturator)<br />
Situate the de-airing needle<br />
c<br />
b<br />
d<br />
e<br />
Use the pump. Never overtighten the nut.<br />
Carefully turn the nut in the direction of the arrows<br />
until tight.<br />
Carefully turn the nut in the direction of the arrows until<br />
tight, then check again. The pump is still leaking air: Do<br />
not <strong>use</strong> the pump. Return the pump to the manufacturer.<br />
Do not <strong>use</strong> the pump. Return the pump to the<br />
manufacturer.<br />
a<br />
a Trocar (de-airing needle with inserted obturator)<br />
b De-airing nipple<br />
c Blood chamber<br />
d Membrane in end diastole position<br />
e Air chamber<br />
Caution!<br />
• The membrane must now be located in the end-of-diastole position. The membrane set<br />
or pressure gauge set is now connected.<br />
De-air the pump<br />
1000002 Rev. 4.9.1 43