Instructions for use: Ikus - Berlin Heart
Instructions for use: Ikus - Berlin Heart
Instructions for use: Ikus - Berlin Heart

Create successful ePaper yourself
Turn your PDF publications into a flip-book with our unique Google optimized e-Paper software.
INSTRUCTION<br />
The sequence of anastomosis and tunneling will change depending on the type of<br />
cannula. See section 8.2 ff. of the instructions <strong>for</strong> <strong>use</strong>.<br />
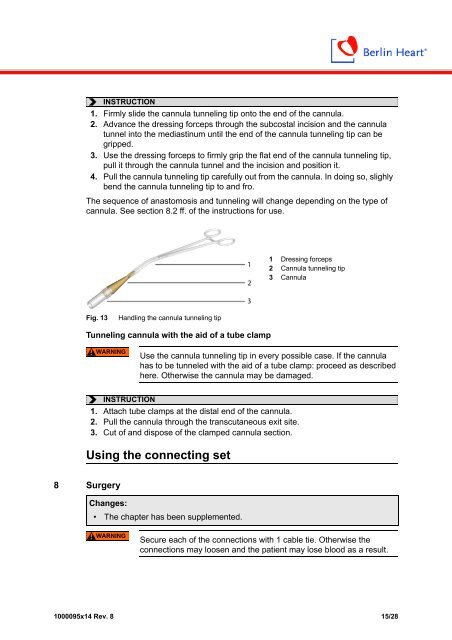
Fig. 13 Handling the cannula tunneling tip<br />
Tunneling cannula with the aid of a tube clamp<br />
WARNING<br />
INSTRUCTION<br />
WARNING<br />
Use the cannula tunneling tip in every possible case. If the cannula<br />
has to be tunneled with the aid of a tube clamp: proceed as described<br />
here. Otherwise the cannula may be damaged.<br />
Using the connecting set<br />
8 Surgery<br />
1. Firmly slide the cannula tunneling tip onto the end of the cannula.<br />
2. Advance the dressing <strong>for</strong>ceps through the subcostal incision and the cannula<br />
tunnel into the mediastinum until the end of the cannula tunneling tip can be<br />
gripped.<br />
3. Use the dressing <strong>for</strong>ceps to firmly grip the flat end of the cannula tunneling tip,<br />
pull it through the cannula tunnel and the incision and position it.<br />
4. Pull the cannula tunneling tip carefully out from the cannula. In doing so, slighly<br />
bend the cannula tunneling tip to and fro.<br />
1. Attach tube clamps at the distal end of the cannula.<br />
2. Pull the cannula through the transcutaneous exit site.<br />
3. Cut of and dispose of the clamped cannula section.<br />
Changes:<br />
• The chapter has been supplemented.<br />
1 Dressing <strong>for</strong>ceps<br />
2 Cannula tunneling tip<br />
3 Cannula<br />
Secure each of the connections with 1 cable tie. Otherwise the<br />
connections may loosen and the patient may lose blood as a result.<br />
1000095x14 Rev. 8 15/28