Instructions for use: Ikus - Berlin Heart
Instructions for use: Ikus - Berlin Heart
Instructions for use: Ikus - Berlin Heart

You also want an ePaper? Increase the reach of your titles
YUMPU automatically turns print PDFs into web optimized ePapers that Google loves.
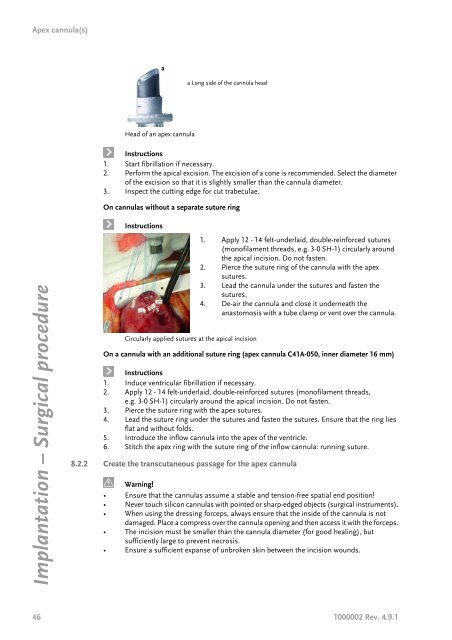
Apex cannula(s)<br />
Implantation – Surgical procedure<br />
Head of an apex cannula<br />
<strong>Instructions</strong><br />
1. Start fibrillation if necessary.<br />
2. Per<strong>for</strong>m the apical excision. The excision of a cone is recommended. Select the diameter<br />
of the excision so that it is slightly smaller than the cannula diameter.<br />
3. Inspect the cutting edge <strong>for</strong> cut trabeculae.<br />
On cannulas without a separate suture ring<br />
<strong>Instructions</strong><br />
a<br />
a Long side of the cannula head<br />
Circularly applied sutures at the apical incision<br />
On a cannula with an additional suture ring (apex cannula C41A-050, inner diameter 16 mm)<br />
<strong>Instructions</strong><br />
1. Induce ventricular fibrillation if necessary.<br />
2. Apply 12 - 14 felt-underlaid, double-rein<strong>for</strong>ced sutures (monofilament threads,<br />
e.g. 3-0 SH-1) circularly around the apical incision. Do not fasten.<br />
3. Pierce the suture ring with the apex sutures.<br />
4. Lead the suture ring under the sutures and fasten the sutures. Ensure that the ring lies<br />
flat and without folds.<br />
5. Introduce the inflow cannula into the apex of the ventricle.<br />
6. Stitch the apex ring with the suture ring of the inflow cannula: running suture.<br />
8.2.2 Create the transcutaneous passage <strong>for</strong> the apex cannula<br />
1. Apply 12 - 14 felt-underlaid, double-rein<strong>for</strong>ced sutures<br />
(monofilament threads, e.g. 3-0 SH-1) circularly around<br />
the apical incision. Do not fasten.<br />
2. Pierce the suture ring of the cannula with the apex<br />
sutures.<br />
3. Lead the cannula under the sutures and fasten the<br />
sutures.<br />
4. De-air the cannula and close it underneath the<br />
anastomosis with a tube clamp or vent over the cannula.<br />
Warning!<br />
• Ensure that the cannulas assume a stable and tension-free spatial end position!<br />
• Never touch silicon cannulas with pointed or sharp-edged objects (surgical instruments).<br />
• When using the dressing <strong>for</strong>ceps, always ensure that the inside of the cannula is not<br />
damaged. Place a compress over the cannula opening and then access it with the <strong>for</strong>ceps.<br />
• The incision must be smaller than the cannula diameter (<strong>for</strong> good healing), but<br />
sufficiently large to prevent necrosis.<br />
• Ensure a sufficient expanse of unbroken skin between the incision wounds.<br />
46 1000002 Rev. 4.9.1