Instructions for use: Ikus - Berlin Heart
Instructions for use: Ikus - Berlin Heart
Instructions for use: Ikus - Berlin Heart

Create successful ePaper yourself
Turn your PDF publications into a flip-book with our unique Google optimized e-Paper software.
Intraoperative drive management<br />
Start up the <strong>Ikus</strong> and set the parameters<br />
Caution!<br />
• Do not bend the driving tubes!<br />
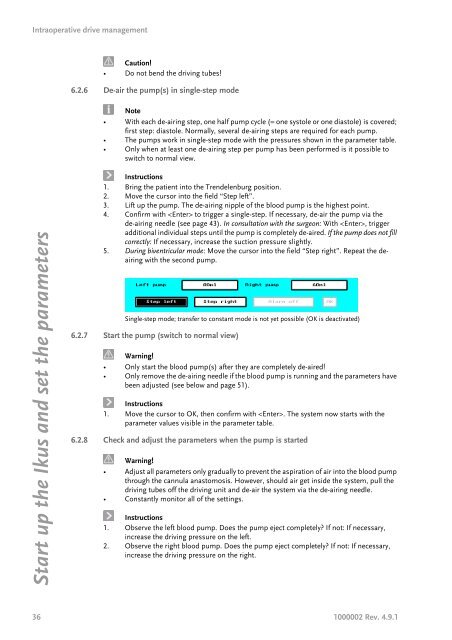
6.2.6 De-air the pump(s) in single-step mode<br />
Note<br />
• With each de-airing step, one half pump cycle (= one systole or one diastole) is covered;<br />
first step: diastole. Normally, several de-airing steps are required <strong>for</strong> each pump.<br />
• The pumps work in single-step mode with the pressures shown in the parameter table.<br />
• Only when at least one de-airing step per pump has been per<strong>for</strong>med is it possible to<br />
switch to normal view.<br />
<strong>Instructions</strong><br />
1. Bring the patient into the Trendelenburg position.<br />
2. Move the cursor into the field “Step left”.<br />
3. Lift up the pump. The de-airing nipple of the blood pump is the highest point.<br />
4. Confirm with to trigger a single-step. If necessary, de-air the pump via the<br />
de-airing needle (see page 43). In consultation with the surgeon: With , trigger<br />
additional individual steps until the pump is completely de-aired. If the pump does not fill<br />
correctly: If necessary, increase the suction pressure slightly.<br />
5. During biventricular mode: Move the cursor into the field “Step right”. Repeat the deairing<br />
with the second pump.<br />
Single-step mode; transfer to constant mode is not yet possible (OK is deactivated)<br />
6.2.7 Start the pump (switch to normal view)<br />
Warning!<br />
• Only start the blood pump(s) after they are completely de-aired!<br />
• Only remove the de-airing needle if the blood pump is running and the parameters have<br />
been adjusted (see below and page 51).<br />
<strong>Instructions</strong><br />
1. Move the cursor to OK, then confirm with . The system now starts with the<br />
parameter values visible in the parameter table.<br />
6.2.8 Check and adjust the parameters when the pump is started<br />
Warning!<br />
• Adjust all parameters only gradually to prevent the aspiration of air into the blood pump<br />
through the cannula anastomosis. However, should air get inside the system, pull the<br />
driving tubes off the driving unit and de-air the system via the de-airing needle.<br />
• Constantly monitor all of the settings.<br />
<strong>Instructions</strong><br />
1. Observe the left blood pump. Does the pump eject completely? If not: If necessary,<br />
increase the driving pressure on the left.<br />
2. Observe the right blood pump. Does the pump eject completely? If not: If necessary,<br />
increase the driving pressure on the right.<br />
36 1000002 Rev. 4.9.1