Instructions for use: Ikus - Berlin Heart
Instructions for use: Ikus - Berlin Heart
Instructions for use: Ikus - Berlin Heart

Create successful ePaper yourself
Turn your PDF publications into a flip-book with our unique Google optimized e-Paper software.
Outflow cannula(s)<br />
Implantation – Surgical procedure<br />
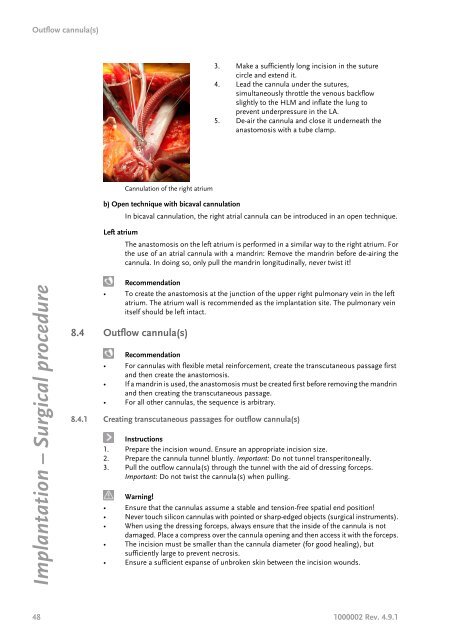
Cannulation of the right atrium<br />
b) Open technique with bicaval cannulation<br />
In bicaval cannulation, the right atrial cannula can be introduced in an open technique.<br />
Left atrium<br />
The anastomosis on the left atrium is per<strong>for</strong>med in a similar way to the right atrium. For<br />
the <strong>use</strong> of an atrial cannula with a mandrin: Remove the mandrin be<strong>for</strong>e de-airing the<br />
cannula. In doing so, only pull the mandrin longitudinally, never twist it!<br />
Recommendation<br />
• To create the anastomosis at the junction of the upper right pulmonary vein in the left<br />
atrium. The atrium wall is recommended as the implantation site. The pulmonary vein<br />
itself should be left intact.<br />
8.4 Outflow cannula(s)<br />
3. Make a sufficiently long incision in the suture<br />
circle and extend it.<br />
4. Lead the cannula under the sutures,<br />
simultaneously throttle the venous backflow<br />
slightly to the HLM and inflate the lung to<br />
prevent underpressure in the LA.<br />
5. De-air the cannula and close it underneath the<br />
anastomosis with a tube clamp.<br />
Recommendation<br />
• For cannulas with flexible metal rein<strong>for</strong>cement, create the transcutaneous passage first<br />
and then create the anastomosis.<br />
• If a mandrin is <strong>use</strong>d, the anastomosis must be created first be<strong>for</strong>e removing the mandrin<br />
and then creating the transcutaneous passage.<br />
• For all other cannulas, the sequence is arbitrary.<br />
8.4.1 Creating transcutaneous passages <strong>for</strong> outflow cannula(s)<br />
<strong>Instructions</strong><br />
1. Prepare the incision wound. Ensure an appropriate incision size.<br />
2. Prepare the cannula tunnel bluntly. Important: Do not tunnel transperitoneally.<br />
3. Pull the outflow cannula(s) through the tunnel with the aid of dressing <strong>for</strong>ceps.<br />
Important: Do not twist the cannula(s) when pulling.<br />
Warning!<br />
• Ensure that the cannulas assume a stable and tension-free spatial end position!<br />
• Never touch silicon cannulas with pointed or sharp-edged objects (surgical instruments).<br />
• When using the dressing <strong>for</strong>ceps, always ensure that the inside of the cannula is not<br />
damaged. Place a compress over the cannula opening and then access it with the <strong>for</strong>ceps.<br />
• The incision must be smaller than the cannula diameter (<strong>for</strong> good healing), but<br />
sufficiently large to prevent necrosis.<br />
• Ensure a sufficient expanse of unbroken skin between the incision wounds.<br />
48 1000002 Rev. 4.9.1