Oracle Database Oracle Clusterware Installation Guide for HP-UX
Oracle Database Oracle Clusterware Installation Guide for HP-UX
Oracle Database Oracle Clusterware Installation Guide for HP-UX

You also want an ePaper? Increase the reach of your titles
YUMPU automatically turns print PDFs into web optimized ePapers that Google loves.
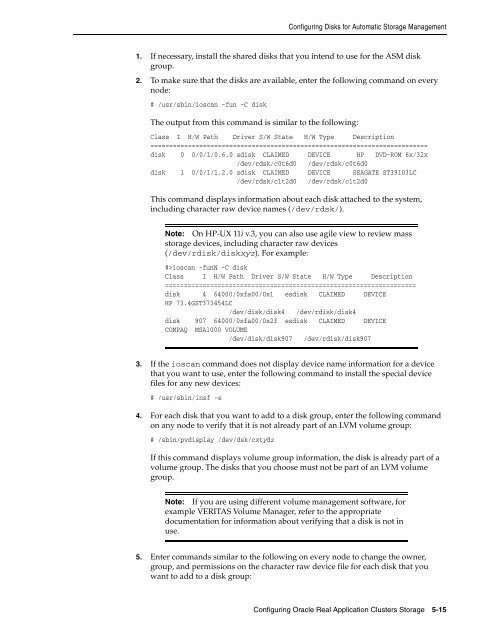
Configuring Disks <strong>for</strong> Automatic Storage Management<br />
1. If necessary, install the shared disks that you intend to use <strong>for</strong> the ASM disk<br />
group.<br />
2. To make sure that the disks are available, enter the following command on every<br />
node:<br />
# /usr/sbin/ioscan -fun -C disk<br />
The output from this command is similar to the following:<br />
Class I H/W Path Driver S/W State H/W Type Description<br />
==========================================================================<br />
disk 0 0/0/1/0.6.0 sdisk CLAIMED DEVICE <strong>HP</strong> DVD-ROM 6x/32x<br />
/dev/rdsk/c0t6d0 /dev/rdsk/c0t6d0<br />
disk 1 0/0/1/1.2.0 sdisk CLAIMED DEVICE SEAGATE ST39103LC<br />
/dev/rdsk/c1t2d0 /dev/rdsk/c1t2d0<br />
This command displays in<strong>for</strong>mation about each disk attached to the system,<br />
including character raw device names (/dev/rdsk/).<br />
Note: On <strong>HP</strong>-<strong>UX</strong> 11i v.3, you can also use agile view to review mass<br />
storage devices, including character raw devices<br />
(/dev/rdisk/diskxyz). For example:<br />
#>ioscan -funN -C disk<br />
Class I H/W Path Driver S/W State H/W Type Description<br />
===================================================================<br />
disk 4 64000/0xfa00/0x1 esdisk CLAIMED DEVICE<br />
<strong>HP</strong> 73.4GST373454LC<br />
/dev/disk/disk4 /dev/rdisk/disk4<br />
disk 907 64000/0xfa00/0x2f esdisk CLAIMED DEVICE<br />
COMPAQ MSA1000 VOLUME<br />
/dev/disk/disk907 /dev/rdisk/disk907<br />
3. If the ioscan command does not display device name in<strong>for</strong>mation <strong>for</strong> a device<br />
that you want to use, enter the following command to install the special device<br />
files <strong>for</strong> any new devices:<br />
# /usr/sbin/insf -e<br />
4. For each disk that you want to add to a disk group, enter the following command<br />
on any node to verify that it is not already part of an LVM volume group:<br />
# /sbin/pvdisplay /dev/dsk/cxtydz<br />
If this command displays volume group in<strong>for</strong>mation, the disk is already part of a<br />
volume group. The disks that you choose must not be part of an LVM volume<br />
group.<br />
Note: If you are using different volume management software, <strong>for</strong><br />
example VERITAS Volume Manager, refer to the appropriate<br />
documentation <strong>for</strong> in<strong>for</strong>mation about verifying that a disk is not in<br />
use.<br />
5. Enter commands similar to the following on every node to change the owner,<br />
group, and permissions on the character raw device file <strong>for</strong> each disk that you<br />
want to add to a disk group:<br />
Configuring <strong>Oracle</strong> Real Application Clusters Storage 5-15