Oracle Database Oracle Clusterware Installation Guide for HP-UX
Oracle Database Oracle Clusterware Installation Guide for HP-UX
Oracle Database Oracle Clusterware Installation Guide for HP-UX

You also want an ePaper? Increase the reach of your titles
YUMPU automatically turns print PDFs into web optimized ePapers that Google loves.
Configuring Storage <strong>for</strong> <strong>Oracle</strong> <strong>Clusterware</strong> Files on Raw Devices<br />
■ Disabling Operating System Activation of Shared Volume Groups<br />
■ Configuring Raw Disk Devices Without <strong>HP</strong> Serviceguard Extension<br />
■ Configuring Shared Raw Logical Volumes With <strong>HP</strong> Serviceguard Extension<br />
■ Create the <strong>Database</strong> Configuration Assistant Raw Device Mapping File<br />
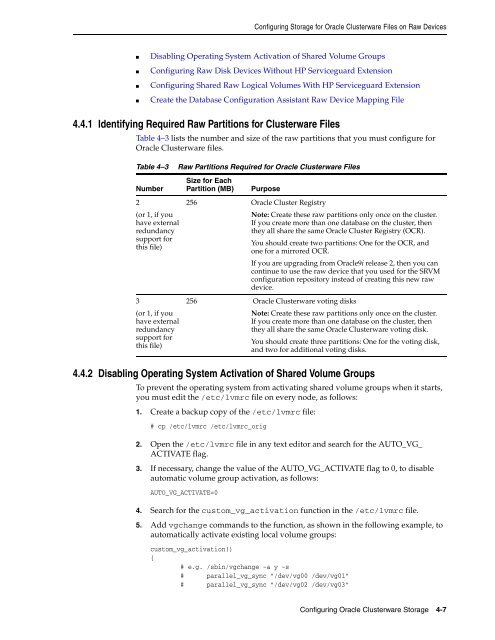
4.4.1 Identifying Required Raw Partitions <strong>for</strong> <strong>Clusterware</strong> Files<br />
Table 4–3 lists the number and size of the raw partitions that you must configure <strong>for</strong><br />
<strong>Oracle</strong> <strong>Clusterware</strong> files.<br />
Table 4–3 Raw Partitions Required <strong>for</strong> <strong>Oracle</strong> <strong>Clusterware</strong> Files<br />
Number<br />
2<br />
(or 1, if you<br />
have external<br />
redundancy<br />
support <strong>for</strong><br />
this file)<br />
3<br />
(or 1, if you<br />
have external<br />
redundancy<br />
support <strong>for</strong><br />
this file)<br />
4.4.2 Disabling Operating System Activation of Shared Volume Groups<br />
To prevent the operating system from activating shared volume groups when it starts,<br />
you must edit the /etc/lvmrc file on every node, as follows:<br />
1. Create a backup copy of the /etc/lvmrc file:<br />
# cp /etc/lvmrc /etc/lvmrc_orig<br />
2. Open the /etc/lvmrc file in any text editor and search <strong>for</strong> the AUTO_VG_<br />
ACTIVATE flag.<br />
3. If necessary, change the value of the AUTO_VG_ACTIVATE flag to 0, to disable<br />
automatic volume group activation, as follows:<br />
AUTO_VG_ACTIVATE=0<br />
Size <strong>for</strong> Each<br />
Partition (MB) Purpose<br />
256 <strong>Oracle</strong> Cluster Registry<br />
Note: Create these raw partitions only once on the cluster.<br />
If you create more than one database on the cluster, then<br />
they all share the same <strong>Oracle</strong> Cluster Registry (OCR).<br />
You should create two partitions: One <strong>for</strong> the OCR, and<br />
one <strong>for</strong> a mirrored OCR.<br />
If you are upgrading from <strong>Oracle</strong>9i release 2, then you can<br />
continue to use the raw device that you used <strong>for</strong> the SRVM<br />
configuration repository instead of creating this new raw<br />
device.<br />
256 <strong>Oracle</strong> <strong>Clusterware</strong> voting disks<br />
Note: Create these raw partitions only once on the cluster.<br />
If you create more than one database on the cluster, then<br />
they all share the same <strong>Oracle</strong> <strong>Clusterware</strong> voting disk.<br />
You should create three partitions: One <strong>for</strong> the voting disk,<br />
and two <strong>for</strong> additional voting disks.<br />
4. Search <strong>for</strong> the custom_vg_activation function in the /etc/lvmrc file.<br />
5. Add vgchange commands to the function, as shown in the following example, to<br />
automatically activate existing local volume groups:<br />
custom_vg_activation()<br />
{<br />
# e.g. /sbin/vgchange -a y -s<br />
# parallel_vg_sync "/dev/vg00 /dev/vg01"<br />
# parallel_vg_sync "/dev/vg02 /dev/vg03"<br />
Configuring <strong>Oracle</strong> <strong>Clusterware</strong> Storage 4-7