DN-V200/DN-V300
DN-V200/DN-V300
DN-V200/DN-V300
- No tags were found...

Create successful ePaper yourself
Turn your PDF publications into a flip-book with our unique Google optimized e-Paper software.
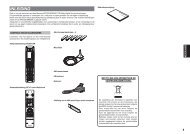
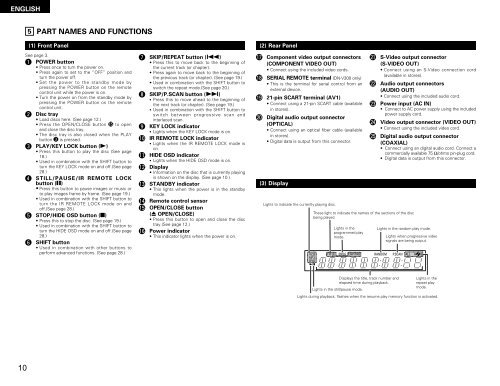
ENGLISH5 PART NAMES AND FUNCTIONS(1) Front Panel (2) Rear PanelSee page 3.q POWER button• Press once to turn the power on.• Press again to set to the “OFF” position andturn the power off.• Set the power to the standby mode bypressing the POWER button on the remotecontrol unit while the power is on.• Turn the power on from the standby mode bypressing the POWER button on the remotecontrol unit.w Disc tray• Load discs here. (See page 12.)• Press the OPEN/CLOSE button !5 to openand close the disc tray.• The disc tray is also closed when the PLAYbutton e is pressed.e PLAY/KEY LOCK button (1)• Press this button to play the disc (See page18.)• Used in combination with the SHIFT button toturn the KEY LOCK mode on and off.(See page28.)r STILL/PAUSE/IR REMOTE LOCKbutton (3)• Press this button to pause images or music orto play images frame by frame. (See page 19.)• Used in combination with the SHIFT button toturn the IR REMOTE LOCK mode on andoff.(See page 28.)t STOP/HIDE OSD button (2)• Press this to stop the disc. (See page 19.)• Used in combination with the SHIFT button toturn the HIDE OSD mode on and off.(See page28.)y SHIFT button• Used in combination with other buttons toperform advanced functions. (See page 28.)u SKIP/REPEAT button (8)• Press this to move back to the beginning ofthe current track (or chapter).• Press again to move back to the beginning ofthe previous track (or chapter). (See page 19.)• Used in combination with the SHIFT button toswitch the repeat mode.(See page 20.)i SKIP/P.SCAN button (9)• Press this to move ahead to the beginning ofthe next track (or chapter). (See page 19.)• Used in combination with the SHIFT button toswitch between progressive scan andinterlaced scan.o KEY LOCK indicator• Lights when the KEY LOCK mode is on.!0 IR REMOTE LOCK indicator• Lights when the IR REMOTE LOCK mode ison.!1 HIDE OSD indicator• Lights when the HIDE OSD mode is on.!2 Display• Information on the disc that is currently playingis shown on the display. (See page 10.)!3 STANDBY indicator• This lights when the power is in the standbymode.!4 Remote control sensor!5 OPEN/CLOSE button(5 OPEN/CLOSE)• Press this button to open and close the disctray.(See page 12.)!6 Power indicator• This indicator lights when the power is on.!7 Component video output connectors(COMPONENT VIDEO OUT)• Connect using the included video cords.!8 SERIAL REMOTE terminal (<strong>DN</strong>-<strong>V300</strong> only)• This is the terminal for serial control from anexternal device.!9 21-pin SCART terminal (AV1)• Connect using a 21-pin SCART cable (availablein stores).@0 Digital audio output connector(OPTICAL)• Connect using an optical fiber cable (availablein stores).• Digital data is output from this connector.(3) DisplayLights to indicate the currently playing disc.These light to indicate the names of the sections of the discbeing played.Lights in theprogrammed playmode.@1 S-Video output connector(S-VIDEO OUT)• Connect using an S-Video connection cord(available in stores).@2 Audio output connectors(AUDIO OUT)• Connect using the included audio cord.@3 Power input (AC IN)• Connect to AC power supply using the includedpower supply cord.@4 Video output connector (VIDEO OUT)• Connect using the included video cord.@5 Digital audio output connector(COAXIAL)• Connect using an digital audio cord. Connect acommercially available 75 Ω/ohms pin-plug cord.• Digital data is output from this connector.Lights in the random play mode.Lights when progressive videosignals are being output.Lights in the still/pause mode.Displays the title, track number andelapsed time during playback.Lights in therepeat playmode.Lights during playback, flashes when the resume play memory function is activated.10