Service Manual TNC 407 / TNC 415 - heidenhain - DR. JOHANNES ...
Service Manual TNC 407 / TNC 415 - heidenhain - DR. JOHANNES ...
Service Manual TNC 407 / TNC 415 - heidenhain - DR. JOHANNES ...

Create successful ePaper yourself
Turn your PDF publications into a flip-book with our unique Google optimized e-Paper software.
F!!!! HEIDENHAIN<br />
- <strong>DR</strong> <strong>JOHANNES</strong> HEIDENHAIN GrnbH<br />
D-~3292Tia"nre"t'~'108669) 31-o<br />
Kundendienst<br />
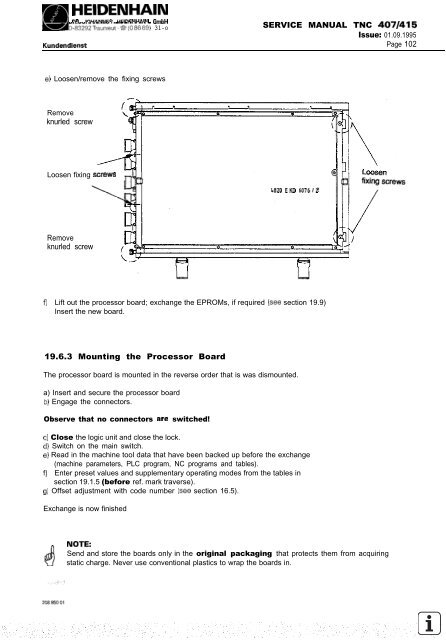
e) Loosen/remove the fixing screws<br />
Remove<br />
knurled screw<br />
Loosen fixing screws<br />
Remove<br />
knurled screw<br />
SERVICE MANUAL <strong>TNC</strong> <strong>407</strong>/<strong>415</strong><br />
Issue: 01.09.1995<br />
Page 102<br />
LB20 EKD 607612<br />
f) Lift out the processor board; exchange the EPROMs, if required (see section 19.9)<br />
Insert the new board.<br />
19.6.3 Mounting the Processor Board<br />
The processor board is mounted in the reverse order that is was dismounted.<br />
a) Insert and secure the processor board<br />
b) Engage the connectors.<br />
Observe that no connectors are switched!<br />
c) Close the logic unit and close the lock.<br />
d) Switch on the main switch.<br />
e) Read in the machine tool data that have been backed up before the exchange<br />
(machine parameters, PLC program, NC programs and tables).<br />
f) Enter preset values and supplementary operating modes from the tables in<br />
section 19.1.5 (before ref. mark traverse).<br />
g) Offset adjustment with code number (see section 16.5).<br />
Exchange is now finished<br />
NOTE:<br />
Send and store the boards only in the original packaging that protects them from acquiring<br />
static charge. Never use conventional plastics to wrap the boards in.