TVG-Series System Guide v1-4 - SerVision
TVG-Series System Guide v1-4 - SerVision
TVG-Series System Guide v1-4 - SerVision

You also want an ePaper? Increase the reach of your titles
YUMPU automatically turns print PDFs into web optimized ePapers that Google loves.
<strong>SerVision</strong><br />
<strong>TVG</strong> <strong>System</strong> <strong>Guide</strong><br />
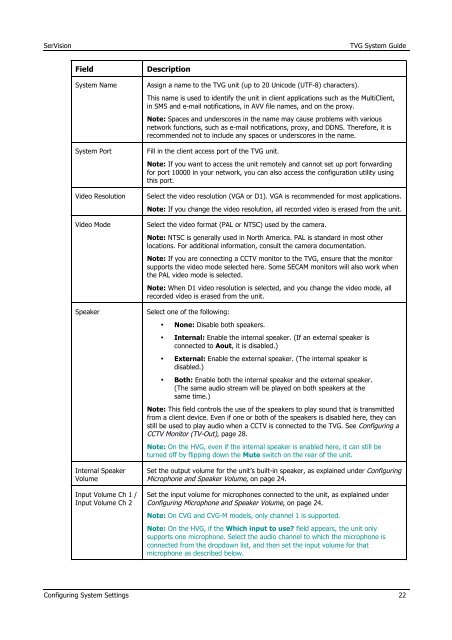
• Field<br />
<strong>System</strong> Name<br />
<strong>System</strong> Port<br />
Video Resolution<br />
Video Mode<br />
Speaker<br />
Internal Speaker<br />
Volume<br />
• Description<br />
Assign a name to the <strong>TVG</strong> unit (up to 20 Unicode (UTF-8) characters).<br />
This name is used to identify the unit in client applications such as the MultiClient,<br />
in SMS and e-mail notifications, in AVV file names, and on the proxy.<br />
Note: Spaces and underscores in the name may cause problems with various<br />
network functions, such as e-mail notifications, proxy, and DDNS. Therefore, it is<br />
recommended not to include any spaces or underscores in the name.<br />
Fill in the client access port of the <strong>TVG</strong> unit.<br />
Note: If you want to access the unit remotely and cannot set up port forwarding<br />
for port 10000 in your network, you can also access the configuration utility using<br />
this port.<br />
Select the video resolution (VGA or D1). VGA is recommended for most applications.<br />
Note: If you change the video resolution, all recorded video is erased from the unit.<br />
Select the video format (PAL or NTSC) used by the camera.<br />
Note: NTSC is generally used in North America. PAL is standard in most other<br />
locations. For additional information, consult the camera documentation.<br />
Note: If you are connecting a CCTV monitor to the <strong>TVG</strong>, ensure that the monitor<br />
supports the video mode selected here. Some SECAM monitors will also work when<br />
the PAL video mode is selected.<br />
Note: When D1 video resolution is selected, and you change the video mode, all<br />
recorded video is erased from the unit.<br />
Select one of the following:<br />
• None: Disable both speakers.<br />
• Internal: Enable the internal speaker. (If an external speaker is<br />
connected to Aout, it is disabled.)<br />
• External: Enable the external speaker. (The internal speaker is<br />
disabled.)<br />
• Both: Enable both the internal speaker and the external speaker.<br />
(The same audio stream will be played on both speakers at the<br />
same time.)<br />
Note: This field controls the use of the speakers to play sound that is transmitted<br />
from a client device. Even if one or both of the speakers is disabled here, they can<br />
still be used to play audio when a CCTV is connected to the <strong>TVG</strong>. See Configuring a<br />
CCTV Monitor (TV-Out), page 28.<br />
Note: On the HVG, even if the internal speaker is enabled here, it can still be<br />
turned off by flipping down the Mute switch on the rear of the unit.<br />
Set the output volume for the unit’s built-in speaker, as explained under Configuring<br />
Microphone and Speaker Volume, on page 24.<br />
Input Volume Ch 1 /<br />
Input Volume Ch 2<br />
Set the input volume for microphones connected to the unit, as explained under<br />
Configuring Microphone and Speaker Volume, on page 24.<br />
Note: On CVG and CVG-M models, only channel 1 is supported.<br />
Note: On the HVG, if the Which input to use field appears, the unit only<br />
supports one microphone. Select the audio channel to which the microphone is<br />
connected from the dropdown list, and then set the input volume for that<br />
microphone as described below.<br />
Configuring <strong>System</strong> Settings 22