Extron XTP CrossPoint 1600 and 3200 ... - Extron Electronics
Extron XTP CrossPoint 1600 and 3200 ... - Extron Electronics
Extron XTP CrossPoint 1600 and 3200 ... - Extron Electronics

Create successful ePaper yourself
Turn your PDF publications into a flip-book with our unique Google optimized e-Paper software.
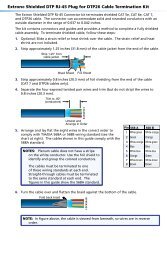
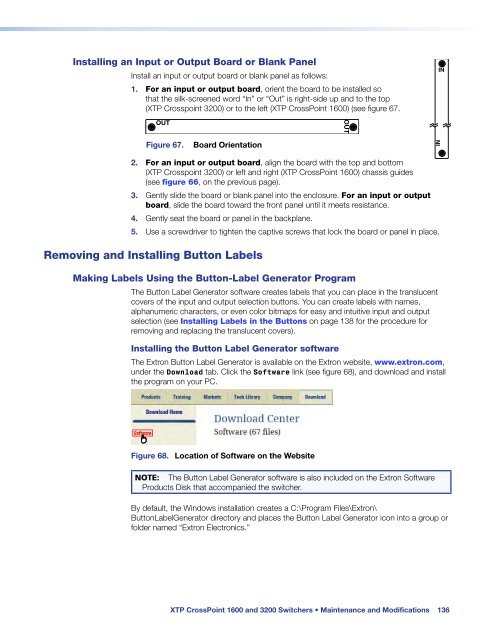
Installing an Input or Output Board or Blank Panel<br />
Install an input or output board or blank panel as follows:<br />
1. For an input or output board, orient the board to be installed so<br />
that the silk-screened word “In” or “Out” is right-side up <strong>and</strong> to the top<br />
(<strong>XTP</strong> Crosspoint <strong>3200</strong>) or to the left (<strong>XTP</strong> <strong>CrossPoint</strong> <strong>1600</strong>) (see figure 67.<br />
IN<br />
OUT<br />
OUT<br />
Figure 67.<br />
Board Orientation<br />
IN<br />
2. For an input or output board, align the board with the top <strong>and</strong> bottom<br />
(<strong>XTP</strong> Crosspoint <strong>3200</strong>) or left <strong>and</strong> right (<strong>XTP</strong> <strong>CrossPoint</strong> <strong>1600</strong>) chassis guides<br />
(see figure 66, on the previous page).<br />
3. Gently slide the board or blank panel into the enclosure. For an input or output<br />
board, slide the board toward the front panel until it meets resistance.<br />
4. Gently seat the board or panel in the backplane.<br />
5. Use a screwdriver to tighten the captive screws that lock the board or panel in place.<br />
Removing <strong>and</strong> Installing Button Labels<br />
Making Labels Using the Button-Label Generator Program<br />
The Button Label Generator software creates labels that you can place in the translucent<br />
covers of the input <strong>and</strong> output selection buttons. You can create labels with names,<br />
alphanumeric characters, or even color bitmaps for easy <strong>and</strong> intuitive input <strong>and</strong> output<br />
selection (see Installing Labels in the Buttons on page 138 for the procedure for<br />
removing <strong>and</strong> replacing the translucent covers).<br />
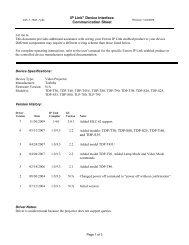
Installing the Button Label Generator software<br />
The <strong>Extron</strong> Button Label Generator is available on the <strong>Extron</strong> website, www.extron.com,<br />
under the Download tab. Click the Software link (see figure 68), <strong>and</strong> download <strong>and</strong> install<br />
the program on your PC.<br />
Figure 68. Location of Software on the Website<br />
NOTE: The Button Label Generator software is also included on the <strong>Extron</strong> Software<br />
Products Disk that accompanied the switcher.<br />
By default, the Windows installation creates a C:\Program Files\<strong>Extron</strong>\<br />
ButtonLabelGenerator directory <strong>and</strong> places the Button Label Generator icon into a group or<br />
folder named “<strong>Extron</strong> <strong>Electronics</strong>.”<br />
<strong>XTP</strong> <strong>CrossPoint</strong> <strong>1600</strong> <strong>and</strong> <strong>3200</strong> Switchers • Maintenance <strong>and</strong> Modifications 136