Extron XTP CrossPoint 1600 and 3200 ... - Extron Electronics
Extron XTP CrossPoint 1600 and 3200 ... - Extron Electronics
Extron XTP CrossPoint 1600 and 3200 ... - Extron Electronics
Create successful ePaper yourself
Turn your PDF publications into a flip-book with our unique Google optimized e-Paper software.
Installing Labels in the Buttons<br />
Install new labels in the front panel buttons as follows:<br />
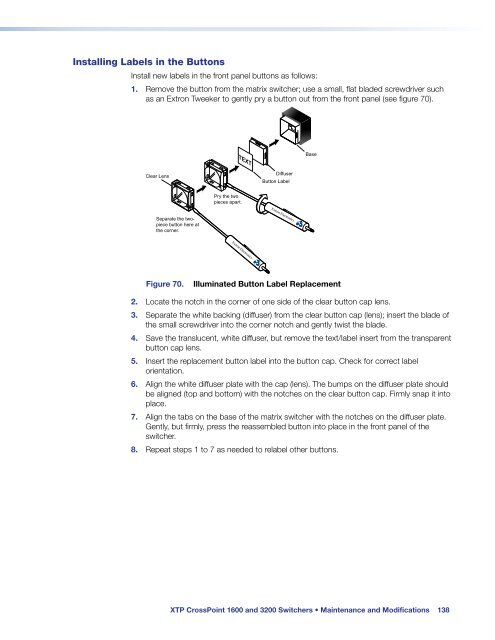
1. Remove the button from the matrix switcher; use a small, flat bladed screwdriver such<br />
as an <strong>Extron</strong> Tweeker to gently pry a button out from the front panel (see figure 70).<br />
TEXT<br />
Base<br />
Clear Lens<br />
Diffuser<br />
Button Label<br />
Pry the two<br />
pieces apart.<br />
Separate the twopiece<br />
button here at<br />
the corner.<br />
Figure 70.<br />
Illuminated Button Label Replacement<br />
2. Locate the notch in the corner of one side of the clear button cap lens.<br />
3. Separate the white backing (diffuser) from the clear button cap (lens); insert the blade of<br />
the small screwdriver into the corner notch <strong>and</strong> gently twist the blade.<br />
4. Save the translucent, white diffuser, but remove the text/label insert from the transparent<br />
button cap lens.<br />
5. Insert the replacement button label into the button cap. Check for correct label<br />
orientation.<br />
6. Align the white diffuser plate with the cap (lens). The bumps on the diffuser plate should<br />
be aligned (top <strong>and</strong> bottom) with the notches on the clear button cap. Firmly snap it into<br />
place.<br />
7. Align the tabs on the base of the matrix switcher with the notches on the diffuser plate.<br />
Gently, but firmly, press the reassembled button into place in the front panel of the<br />
switcher.<br />
8. Repeat steps 1 to 7 as needed to relabel other buttons.<br />
<strong>XTP</strong> <strong>CrossPoint</strong> <strong>1600</strong> <strong>and</strong> <strong>3200</strong> Switchers • Maintenance <strong>and</strong> Modifications 138


