Extron XTP CrossPoint 1600 and 3200 ... - Extron Electronics
Extron XTP CrossPoint 1600 and 3200 ... - Extron Electronics
Extron XTP CrossPoint 1600 and 3200 ... - Extron Electronics
Create successful ePaper yourself
Turn your PDF publications into a flip-book with our unique Google optimized e-Paper software.
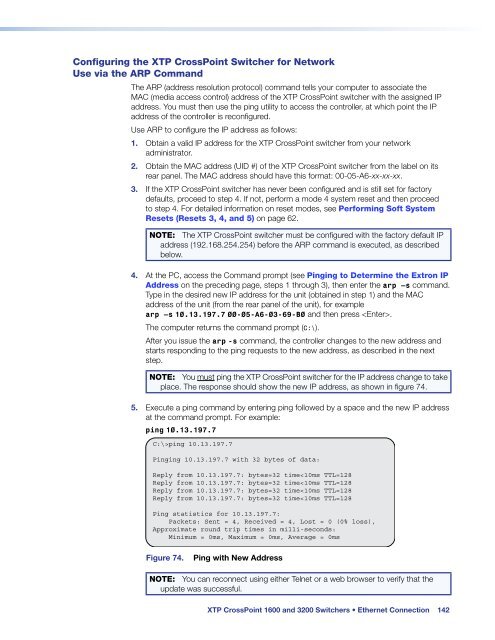
Configuring the <strong>XTP</strong> <strong>CrossPoint</strong> Switcher for Network<br />
Use via the ARP Comm<strong>and</strong><br />
The ARP (address resolution protocol) comm<strong>and</strong> tells your computer to associate the<br />
MAC (media access control) address of the <strong>XTP</strong> <strong>CrossPoint</strong> switcher with the assigned IP<br />
address. You must then use the ping utility to access the controller, at which point the IP<br />
address of the controller is reconfigured.<br />
Use ARP to configure the IP address as follows:<br />
1. Obtain a valid IP address for the <strong>XTP</strong> <strong>CrossPoint</strong> switcher from your network<br />
administrator.<br />
2. Obtain the MAC address (UID #) of the <strong>XTP</strong> <strong>CrossPoint</strong> switcher from the label on its<br />
rear panel. The MAC address should have this format: 00-05-A6-xx-xx-xx.<br />
3. If the <strong>XTP</strong> <strong>CrossPoint</strong> switcher has never been configured <strong>and</strong> is still set for factory<br />
defaults, proceed to step 4. If not, perform a mode 4 system reset <strong>and</strong> then proceed<br />
to step 4. For detailed information on reset modes, see Performing Soft System<br />
Resets (Resets 3, 4, <strong>and</strong> 5) on page 62.<br />
NOTE: The <strong>XTP</strong> <strong>CrossPoint</strong> switcher must be configured with the factory default IP<br />
address (192.168.254.254) before the ARP comm<strong>and</strong> is executed, as described<br />
below.<br />
4. At the PC, access the Comm<strong>and</strong> prompt (see Pinging to Determine the <strong>Extron</strong> IP<br />
Address on the preceding page, steps 1 through 3), then enter the arp –s comm<strong>and</strong>.<br />
Type in the desired new IP address for the unit (obtained in step 1) <strong>and</strong> the MAC<br />
address of the unit (from the rear panel of the unit), for example<br />
arp –s 10.13.197.7 00-05-A6-03-69-B0 <strong>and</strong> then press .<br />
The computer returns the comm<strong>and</strong> prompt (C:\).<br />
After you issue the arp -s comm<strong>and</strong>, the controller changes to the new address <strong>and</strong><br />
starts responding to the ping requests to the new address, as described in the next<br />
step.<br />
NOTE: You must ping the <strong>XTP</strong> <strong>CrossPoint</strong> switcher for the IP address change to take<br />
place. The response should show the new IP address, as shown in figure 74.<br />
5. Execute a ping comm<strong>and</strong> by entering ping followed by a space <strong>and</strong> the new IP address<br />
at the comm<strong>and</strong> prompt. For example:<br />
ping 10.13.197.7<br />
C:\>ping 10.13.197.7<br />
Pinging 10.13.197.7 with 32 bytes of data:<br />
Reply from 10.13.197.7: bytes=32 time


