Extron XTP CrossPoint 1600 and 3200 ... - Extron Electronics
Extron XTP CrossPoint 1600 and 3200 ... - Extron Electronics
Extron XTP CrossPoint 1600 and 3200 ... - Extron Electronics

You also want an ePaper? Increase the reach of your titles
YUMPU automatically turns print PDFs into web optimized ePapers that Google loves.
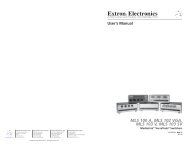
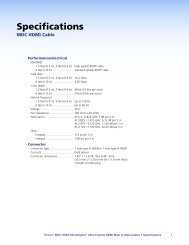
Selecting Lock mode 2 or toggling between mode 2 <strong>and</strong> mode 1<br />
NOTE: If the switcher is in Lock mode 0 or mode 1, this procedure selects mode 2.<br />
If the switcher is in Lock mode 2, this procedure selects mode 1.<br />
Toggle the lock on <strong>and</strong> off by pressing <strong>and</strong> holding the Video button <strong>and</strong> the Audio button<br />
simultaneously for approximately 2 seconds (see figure 40).<br />
Lock mode 1 Lock mode 2<br />
C O N T R O L<br />
C O N T R O L<br />
C O N T R O L<br />
C O N T R O L<br />
ENTER<br />
PRESET<br />
VIEW<br />
ESC<br />
ENTER PRESET<br />
VIEW<br />
ESC<br />
ENTER<br />
PRESET<br />
VIEW<br />
ESC<br />
ENTER PRESET<br />
VIEW<br />
ESC<br />
Press <strong>and</strong> hold for<br />
2 seconds.<br />
Press <strong>and</strong> hold for<br />
2 seconds.<br />
Figure 40. Toggle Front Panel Lock Between Mode 2 <strong>and</strong> Mode 1<br />
Performing a System Reset from the Front Panel<br />
The front panel reset is identical to issuing the EZXXX} SIS comm<strong>and</strong> defined on<br />
page 104. A system reset performs the following functions:<br />
NOTE: System reset does not reset the Internet protocol (IP) settings or replace userinstalled<br />
firmware.<br />
• Clears all ties <strong>and</strong> presets<br />
• Clears all mutes<br />
• Disables all RS-232 output inserts<br />
• Resets all input audio levels to unity gain (0 dB)<br />
• Sets all output volume levels to 100% (0 dB of attenuation)<br />
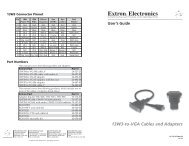
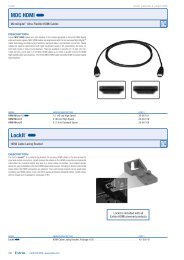
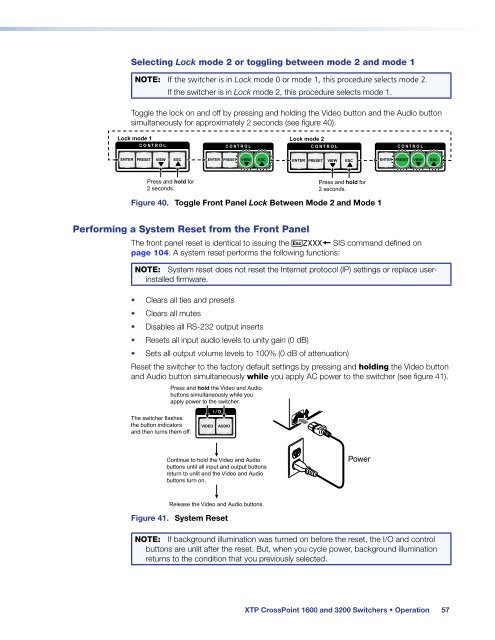
Reset the switcher to the factory default settings by pressing <strong>and</strong> holding the Video button<br />
<strong>and</strong> Audio button simultaneously while you apply AC power to the switcher (see figure 41).<br />
The switcher flashes<br />
the button indicators<br />
<strong>and</strong> then turns them off.<br />
Press <strong>and</strong> hold the Video <strong>and</strong> Audio<br />
buttons simultaneously while you<br />
apply power to the switcher.<br />
VIDEO<br />
I / O<br />
AUDIO<br />
Continue to hold the Video <strong>and</strong> Audio<br />
buttons until all input <strong>and</strong> output buttons<br />
return to unlit <strong>and</strong> the Video <strong>and</strong> Audio<br />
buttons turn on.<br />
Power<br />
Release the Video <strong>and</strong> Audio buttons.<br />
Figure 41. System Reset<br />
NOTE: If background illumination was turned on before the reset, the I/O <strong>and</strong> control<br />
buttons are unlit after the reset. But, when you cycle power, background illumination<br />
returns to the condition that you previously selected.<br />
<strong>XTP</strong> <strong>CrossPoint</strong> <strong>1600</strong> <strong>and</strong> <strong>3200</strong> Switchers • Operation 57