- Page 1:
Adept Cobr
- Page 4 and 5:
The information contained herein is
- Page 6 and 7:
Table of Contents 3 Equipment Insta
- Page 8 and 9:
Table of Contents Instruction Comma
- Page 11 and 12:
List of Figures Figure 1-1. <strong
- Page 13 and 14:
List of Tables Table 1-1. Installat
- Page 15 and 16:
Introduction 1 1.1 Product Descript
- Page 17 and 18:
Product Description Joint 2 Joint 1
- Page 19:
Product Description 1.3 How Can I G
- Page 22 and 23:
Safety 2.2 Warning Labels on the Ro
- Page 24 and 25:
Safety 2.3 Precautions and Required
- Page 26 and 27:
Safety 2.4 Intended Use of the Robo
- Page 28 and 29:
Safety 2.6 Transport Always use ade
- Page 30 and 31:
Safety All personnel must observe s
- Page 33 and 34:
Equipment Installation 3 3.1 Unpack
- Page 35 and 36:
Repacking for Relocation 3.4 Enviro
- Page 37 and 38:
Repacking for Relocation 2. While t
- Page 39 and 40:
PLC Server Installation Mounting th
- Page 41 and 42:
PLC Server Installation Table Mount
- Page 43 and 44:
R SmartServo IEEE-1394 OK HPE LAN S
- Page 45 and 46:
PLC Server Connectors and Indicator
- Page 47 and 48:
PLC Server Connectors and Indicator
- Page 49 and 50:
Connecting 24 VDC Power to Robot
- Page 51 and 52:
Connecting 24 VDC Power to Robot Pr
- Page 53 and 54:
Connecting 24 VDC Power to Robot AC
- Page 55 and 56:
Connecting 24 VDC Power to the PLC
- Page 57 and 58:
Grounding the Adept</strong
- Page 59 and 60:
Connecting Customer-Supplied Safety
- Page 61 and 62:
Connecting Customer-Supplied Safety
- Page 63 and 64:
Connecting Customer-Supplied Safety
- Page 65 and 66:
Connecting Customer-Supplied Safety
- Page 67 and 68:
Connecting Customer-Supplied Digita
- Page 69 and 70:
Connecting Customer-Supplied Digita
- Page 71 and 72:
System Operation 5 5.1 Robot Status
- Page 73 and 74:
Using the Brake Release Button NOTE
- Page 75: Commissioning the System System Sta
- Page 78 and 79: Programming the Robot RSLogix 500 F
- Page 80 and 81: Programming the Robot 6.3 PLC Softw
- Page 82 and 83: Programming the Robot Moving the Ro
- Page 84 and 85: Programming the Robot To use the Ju
- Page 86 and 87: Programming the Robot Output Signal
- Page 88 and 89: Programming the Robot Motion Qualif
- Page 90 and 91: Programming the Robot Bit 11, which
- Page 92 and 93: Programming the Robot Bit RSLogix 5
- Page 94 and 95: Programming the Robot To teach a lo
- Page 96 and 97: Programming the Robot • For ST245
- Page 98 and 99: Programming the Robot When defining
- Page 101 and 102: 7 Optional Robot Equipment Installa
- Page 103 and 104: Removing and Installing the User Fl
- Page 105 and 106: Removing and Installing the User Fl
- Page 107 and 108: Removing and Installing the User Fl
- Page 109 and 110: Installing Robot Solenoid Kit 7.6 I
- Page 111 and 112: Installing Robot Solenoid Kit Air i
- Page 113 and 114: DeviceNet Pass-Through Cable 7.7 De
- Page 115 and 116: Maintenance 8 8.1 Periodic Maintena
- Page 117 and 118: Check Robot for Oil Around Harmonic
- Page 119 and 120: Check Robot for Oil Around Harmonic
- Page 121 and 122: Check Robot for Oil Around Harmonic
- Page 123 and 124: Check Robot for Oil Around Harmonic
- Page 125: Changing the Lamp in the High Power
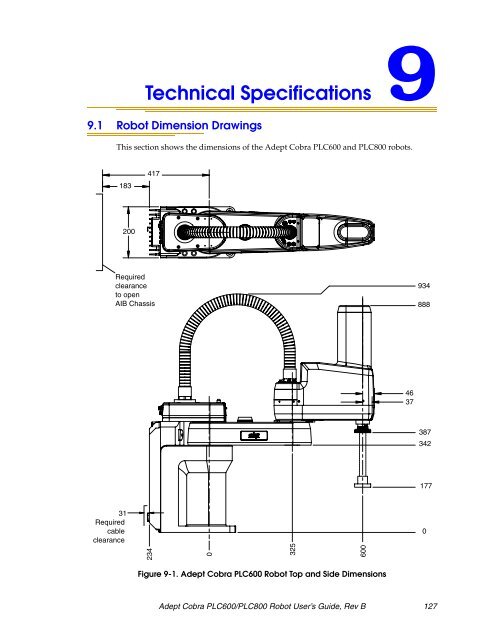
- Page 129 and 130: Robot Dimension Drawings 3.0 mm (0.
- Page 131 and 132: Robot Dimension Drawings 34 76 - <s
- Page 133 and 134: PLC Server Dimensions 9.2 PLC Serve
- Page 135 and 136: Adept Front Panel
- Page 137 and 138: Robot Concepts 10 10.1 Understandin
- Page 139 and 140: Understanding Robot Motion Paramete
- Page 141 and 142: Understanding Robot Motion Paramete
- Page 143 and 144: Understanding Robot Motion Paramete
- Page 145 and 146: Defining a Pallet Layout Figure 10-
- Page 147 and 148: Defining a Pallet Layout Figure 10-
- Page 149 and 150: Diagnostic and Error Messages11 11.
- Page 151 and 152: PLC Server Messages LED Pattern 1 2
- Page 153 and 154: PLC Server Messages *Invalid pallet
- Page 155 and 156: PLC Server Messages Table 11-3. EXT
- Page 157 and 158: Index Numerics 200 - 240 VAC cable,
- Page 159 and 160: Index Cobra PLC ro
- Page 161 and 162: Index incorrect installation or ope
- Page 163 and 164: Index origin, pallet 147 outer link
- Page 165 and 166: Index solenoid kit 109 installing 1
- Page 167: Index digital output wiring 69 func