- Page 1 and 2: Infortrend External RAID Controller
- Page 3 and 4: UNIX is a registered trademark of T
- Page 5 and 6: Chapter 5 LCD Screen Messages 5.1 T
- Page 7 and 8: Logical Drive Information..........
- Page 9 and 10: 13.9.1 Supported Operating Systems
- Page 11 and 12: Chapter 8 Figure 8 - 1 Drive Space
- Page 13 and 14: Chapter 13 details how to install t
- Page 15 and 16: Functional Table of Contents: This
- Page 17 and 18: Chapter 9 Fibre Operation Page numb
- Page 19 and 20: Chapter 14 Fault-Bus Page number: L
- Page 21 and 22: Chapter 2 1 2 3 Logical Drive Funct
- Page 23 and 24: Figure 2 - 2 NRAID = + + + Logical
- Page 25 and 26: Figure 2 - 7 RAID 3 Logical Drive P
- Page 27 and 28: Local Spare Drive LS (9GB) 1 2 (9GB
- Page 29 and 30: 2.4.3 Automatic Rebuild and Manual
- Page 31 and 32: 2.5 Logical Volume (Multi-Level RAI
- Page 33 and 34: Configuration A is a large logical
- Page 35 and 36: To perform RAID expansion on a logi
- Page 37 and 38: Chapter 3 RAID Planning 3.1 Conside
- Page 39 and 40: Spare drives allow for the unattend
- Page 41 and 42: 3.3.2 Understanding Step by Step Fi
- Page 43 and 44: following chapters. The configurati
- Page 45 and 46: 3. Create and configure one or more
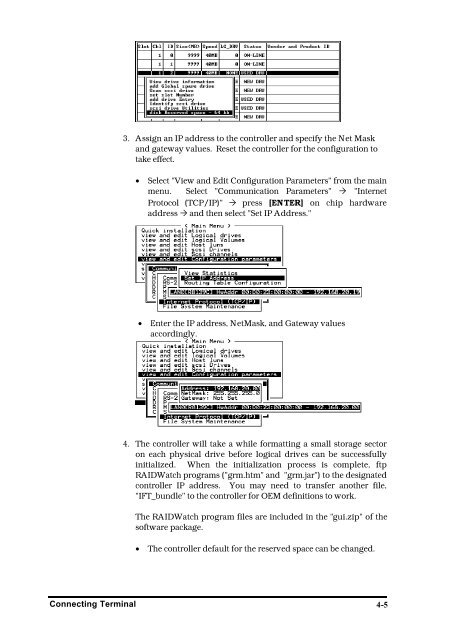
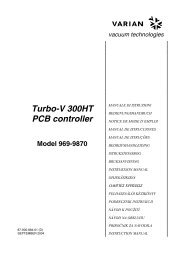
- Page 47 and 48: 4-2 Select "Communication Parameter
- Page 49: 4-4 4.2 Out-of-Band via Ethernet Ne
- Page 53 and 54: 5-2 5.3 Logical Drive Status Logica
- Page 55 and 56: 5-4 5.5 SCSI Drive Status SCSI Chan
- Page 57 and 58: 5-6 5.7 Controller Voltage and Temp
- Page 59 and 60: Chapter 6 Front Panel Operation 6.1
- Page 61 and 62: Write-Back/Write-Through Cache Enab
- Page 63 and 64: You may first examine whether there
- Page 65 and 66: Maximum Drive Capacity: Choose “M
- Page 67 and 68: 6.6 Partitioning a Logical Drive/Lo
- Page 69 and 70: With any of the Host LUN mapped, th
- Page 71 and 72: NOTE: • The different levels of r
- Page 73 and 74: Assigning a Logical Drive Name Pres
- Page 75 and 76: 6.10 Viewing and Editing Host LUNs
- Page 77 and 78: press ENT. Press ▼ or ▲ to choo
- Page 79 and 80: SCSI channel information will be di
- Page 81 and 82: Setting a SCSI Channel’s Terminat
- Page 83 and 84: Press ▼ or ▲ to select “Set T
- Page 85 and 86: Press ENT for two seconds to change
- Page 87 and 88: Reset Controller To reset the contr
- Page 89 and 90: Controller Unique Identifier Choose
- Page 91 and 92: Chapter 7 Terminal Screen Messages
- Page 93 and 94: 7.4 Logical Drive Status LG LV ID R
- Page 95 and 96: 7.6 SCSI Drive’s Status Slot Chl
- Page 97 and 98: On Terminator is enabled. Off Termi
- Page 99 and 100: 7.9 Viewing Event Logs on the Scree
- Page 101 and 102:
8-2 mode is to backup all data to s
- Page 103 and 104:
8-4 IMPORTANT! • The default opti
- Page 105 and 106:
8-6 Logical Drive Preferences: Afte
- Page 107 and 108:
8-8 8.5 Creating a Logical Volume A
- Page 109 and 110:
8-10 Choose the logical volume you
- Page 111 and 112:
8-12 select an available LUN (one n
- Page 113 and 114:
8-14 Move cursor bar to the SCSI dr
- Page 115 and 116:
8-16 Choose the logical drive you w
- Page 117 and 118:
8-18 8.10 Viewing and Editing Host
- Page 119 and 120:
8-20 You may also choose “flash s
- Page 121 and 122:
8-22 Viewing and Editing SCSI IDs /
- Page 123 and 124:
8-24 Setting a Secondary Controller
- Page 125 and 126:
8-26 IMPORTANT! • Every time you
- Page 127 and 128:
8-28 Disconnecting Support Choose
- Page 129 and 130:
8-30 Change Password Use the contro
- Page 131 and 132:
8-32 For "Controller Maintenance" f
- Page 133 and 134:
8-34 Saving NVRAM to File (via Text
- Page 135 and 136:
8-36 Choose “View and Edit Periph
- Page 137 and 138:
8-38 SCSI Drive Read/Write Test Fro
- Page 139 and 140:
9-2 Different Fibre arrays can be d
- Page 141 and 142:
9-4 issue when every server in this
- Page 143 and 144:
9-6 Figure 9 - 1 Host Loop Connecti
- Page 145 and 146:
9-8 9.4 Configuration: Host and Dri
- Page 147 and 148:
9-10 View and Edit Fibre Drive Choo
- Page 149 and 150:
9-12 Figure 9 - 3 Dual Loop Configu
- Page 151 and 152:
9-14 With firmware release 3.14 and
- Page 153 and 154:
9-16 Figure 9 - 5 Host-LUN Mapping
- Page 155 and 156:
9-18 When a logical unit is selecte
- Page 157 and 158:
9-20 Include: If a node's (a workst
- Page 159 and 160:
9-22 The exemplary entry list is sh
- Page 161 and 162:
10-2 Figure 10 - 1 Logical Drive Ex
- Page 163 and 164:
10-4 A list of available drives wil
- Page 165 and 166:
10-6 10.1.3 Copy and Replace Drives
- Page 167 and 168:
10-8 10.1.4 Expand Logical Drive In
- Page 169 and 170:
10-10 10.1.6 Example: RAID Expansio
- Page 171 and 172:
10-12 Follow the steps described in
- Page 173 and 174:
10-14 Select an existing volume (Di
- Page 175 and 176:
10-16 Drive E: now has a capacity r
- Page 177 and 178:
10-18 The cloning process will begi
- Page 179 and 180:
10-20 The cloning progress will be
- Page 181 and 182:
10-22 NOTE: Clone + Replace: Contro
- Page 183 and 184:
10-24 How to Utilize the S.M.A.R.T.
- Page 185 and 186:
A SCSI channel (SCSI bus) can conne
- Page 187 and 188:
10-28 This controller supports the
- Page 189 and 190:
10-30 Table 10 - 1 Peripheral Devic
- Page 191 and 192:
10-32 10.3.2 Drive-side Parameters:
- Page 193 and 194:
10-34 When the drive itself detects
- Page 195 and 196:
10-36 Edit SCSI Drives.” If any d
- Page 197 and 198:
10-38 To decide under what conditio
- Page 199 and 200:
11-2 Partition Information LG Parti
- Page 201 and 202:
11-4 11.3 View and Edit Host LUN’
- Page 203 and 204:
11-6 11.4 View and Edit SCSI Drives
- Page 205 and 206:
11-8 11.6 View and Edit Configurati
- Page 207 and 208:
11-10 Disk Array Parameters Rebuild
- Page 209 and 210:
11-12 Update Firmware 11.8 Save NVR
- Page 211 and 212:
12-2 � Fibre Interface The contro
- Page 213 and 214:
12-4 Figure 12 - 4 Partitioning Log
- Page 215 and 216:
12-6 in this configuration should f
- Page 217 and 218:
12-8 interface and multiple IDs are
- Page 219 and 220:
12-10 F. Considerations with Redund
- Page 221 and 222:
12-12 Controller Settings: Redundan
- Page 223 and 224:
12-14 12.2.2 Limitations • Both c
- Page 225 and 226:
12-16 12.3 Configuration Listed bel
- Page 227 and 228:
12-18 When the redundant controller
- Page 229 and 230:
12-20 The process of creating Prima
- Page 231 and 232:
12-22 NOTE: Front Panel View of Con
- Page 233 and 234:
12-24 The message "Enable Redundant
- Page 235 and 236:
12-26 Creating Primary and Secondar
- Page 237 and 238:
12-28 Select partition Mapping opti
- Page 239 and 240:
12-30 If the replacement has been i
- Page 241 and 242:
Chapter 13 In-band SCSI Text RAID M
- Page 243 and 244:
13.2 Windows NT for DEC Alpha Intro
- Page 245 and 246:
NOTE: • The names and values in t
- Page 247 and 248:
13.3 MS-DOS Introduction: The Drive
- Page 249 and 250:
(where "filename" is the filename o
- Page 251 and 252:
13.5.3 Install SNMP Extension Agent
- Page 253 and 254:
To uncompress the compressed file,
- Page 255 and 256:
5. Reboot the system. 6. Run the Te
- Page 257 and 258:
13.7 Solaris 2.5.x/2.6/7/8 for SPAR
- Page 259 and 260:
Select package(s) you will to proce
- Page 261 and 262:
(where "filename" is the filename o
- Page 263 and 264:
13.9 SCO UnixWare Introduction: The
- Page 265 and 266:
the corresponded Peripheral Device
- Page 267 and 268:
• SNMP MIB file ("RAIDSNMP.MIB")
- Page 269 and 270:
NOTE: 11. Type "Pathname" for value
- Page 271 and 272:
Chapter 14 Fault-Bus 14.1 What is F
- Page 273 and 274:
failure, activate the signal. When
- Page 275 and 276:
information list. Assign a slot num
- Page 277 and 278:
Press ▼ or ▲ to select “Toggl
- Page 279 and 280:
Delete the Slot Number of a SCSI Dr
- Page 281 and 282:
Viewing the Status of Each Fault-bu
- Page 283 and 284:
A-2 Create Create Logical Volume Su
- Page 285 and 286:
A-4 Change Setting Do Reset Ctlr ?
- Page 287 and 288:
A-6 Enable/Disable Motor Spin-Up ?
- Page 289 and 290:
Appendix B Basic RAID Management: F
- Page 291 and 292:
Maximum concurrent Host LUN connect
- Page 293 and 294:
Drive S.M.A.R.T. Support Supported,
- Page 295 and 296:
Data Safety: Redundant Controller f
- Page 297 and 298:
User Interface: RAIDWatch on-board
- Page 299 and 300:
C-2 The rolling upgrade is automati
- Page 301 and 302:
C-4 Upgrade the Firmware Binary Onl
- Page 303 and 304:
C-6 2. Go to "Controller Maintenanc
- Page 305 and 306:
D-2 Drive SCSI Channel/Drive Error
- Page 307 and 308:
Controller Event 2-Line LCD DRAM Pa
- Page 309 and 310:
2-Line LCD Controller Init Complete
- Page 311 and 312:
Drive SCSI Channel/Drive Error 2-Li
- Page 313 and 314:
2-Line LCD C=_ I=_ Drive Not Ready
- Page 315 and 316:
2-Line LCD CHL=_ SCSI Channel Failu
- Page 317 and 318:
2-Line LCD Mem is Now Enough Suppor
- Page 319 and 320:
2-Line LCD LG=_ Expansion Completed
- Page 321 and 322:
2-Line LCD LG=_ Add SCSI Drive Comp
- Page 323 and 324:
2-Line LCD High +12V Voltage Detect
- Page 325 and 326:
2-Line LCD High +5V Voltage Detecte
- Page 327 and 328:
Appendix E Differences in Logical D
- Page 329 and 330:
You may also see the status of rese
- Page 331 and 332:
D Dedicated Communications Loops 9-
- Page 333 and 334:
port) Out-of-band Configuration, Re
- Page 335:
target/drive channel, viewing and 6