

Curlin 4000 User Manual - Med-E-Quip Locators
Curlin 4000 User Manual - Med-E-Quip Locators
Curlin 4000 User Manual - Med-E-Quip Locators
- No tags were found...

You also want an ePaper? Increase the reach of your titles
YUMPU automatically turns print PDFs into web optimized ePapers that Google loves.
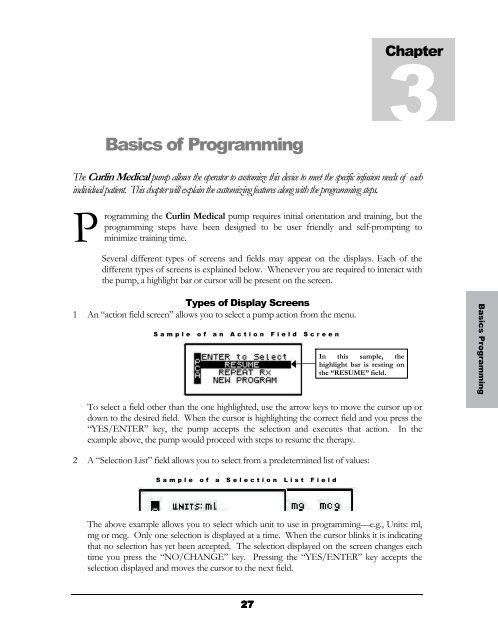
Chapter3Basics of ProgrammingThe <strong>Curlin</strong> <strong>Med</strong>ical pump allows the operator to customize this device to meet the specific infusion needs of eachindividual patient. This chapter will explain the customizing features along with the programming steps.Programming the <strong>Curlin</strong> <strong>Med</strong>ical pump requires initial orientation and training, but theprogramming steps have been designed to be user friendly and self-prompting tominimize training time.Several different types of screens and fields may appear on the displays. Each of thedifferent types of screens is explained below. Whenever you are required to interact withthe pump, a highlight bar or cursor will be present on the screen.Types of Display Screens1 An “action field screen” allows you to select a pump action from the menu.Sample of an Action Field ScreenIn this sample, thehighlight bar is resting onthe “RESUME” field.Basics ProgrammingTo select a field other than the one highlighted, use the arrow keys to move the cursor up ordown to the desired field. When the cursor is highlighting the correct field and you press the“YES/ENTER” key, the pump accepts the selection and executes that action. In theexample above, the pump would proceed with steps to resume the therapy.2 A “Selection List” field allows you to select from a predetermined list of values:Sample of a Selection List FieldThe above example allows you to select which unit to use in programming—e.g., Units: ml,mg or mcg. Only one selection is displayed at a time. When the cursor blinks it is indicatingthat no selection has yet been accepted. The selection displayed on the screen changes eachtime you press the “NO/CHANGE” key. Pressing the “YES/ENTER” key accepts theselection displayed and moves the cursor to the next field.27


