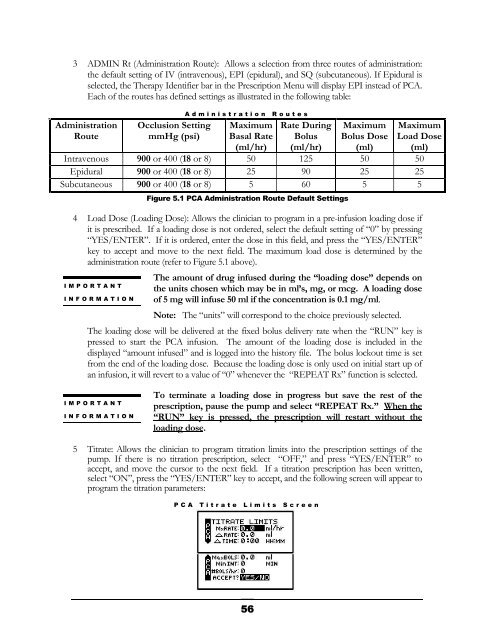
3 ADMIN Rt (Administration Route): Allows a selection from three routes of administration:the default setting of IV (intravenous), EPI (epidural), and SQ (subcutaneous). If Epidural isselected, the Therapy Identifier bar in the Prescription Menu will display EPI instead of PCA.Each of the routes has defined settings as illustrated in the following table:AdministrationRouteOcclusion SettingmmHg (psi)Administration RoutesMaximumBasal Rate(ml/hr)Rate DuringBolus(ml/hr)MaximumBolus Dose(ml)MaximumLoad Dose(ml)Intravenous 900 or 400 (18 or 8) 50 125 50 50Epidural 900 or 400 (18 or 8) 25 90 25 25Subcutaneous 900 or 400 (18 or 8) 5 60 5 5Figure 5.1 PCA Administration Route Default Settings4 Load Dose (Loading Dose): Allows the clinician to program in a pre-infusion loading dose ifit is prescribed. If a loading dose is not ordered, select the default setting of “0” by pressing“YES/ENTER”. If it is ordered, enter the dose in this field, and press the “YES/ENTER”key to accept and move to the next field. The maximum load dose is determined by theadministration route (refer to Figure 5.1 above).The amount of drug infused during the “loading dose” depends onthe units chosen which may be in ml’s, mg, or mcg. A loading doseof 5 mg will infuse 50 ml if the concentration is 0.1 mg/ml.Note: The “units” will correspond to the choice previously selected.The loading dose will be delivered at the fixed bolus delivery rate when the “RUN” key ispressed to start the PCA infusion. The amount of the loading dose is included in thedisplayed “amount infused” and is logged into the history file. The bolus lockout time is setfrom the end of the loading dose. Because the loading dose is only used on initial start up ofan infusion, it will revert to a value of “0” whenever the “REPEAT Rx” function is selected.IMPORTANTINFORMATIONIMPORTANTINFORMATIONTo terminate a loading dose in progress but save the rest of theprescription, pause the pump and select “REPEAT Rx.” When the“RUN” key is pressed, the prescription will restart without theloading dose.5 Titrate: Allows the clinician to program titration limits into the prescription settings of thepump. If there is no titration prescription, select “OFF,” and press “YES/ENTER” toaccept, and move the cursor to the next field. If a titration prescription has been written,select “ON”, press the “YES/ENTER” key to accept, and the following screen will appear toprogram the titration parameters:PCA Titrate Limits Screen56
a. MxRATE (Maximum Rate) limits: Use the numeric keys to enter the upper limits of theinfusion rate. When the correct maximum titration rate is entered, press “YES/ENTER”and the cursor will move to the next field. The minimum rate is 0, and the maximum ratemust be equal to or less than maximum Basal Rate listed in Figure 5.1 AdministrationRoutes table.b. ∆Rate (Delta Rate): Some prescriptions include incremental levels or delta limitations (e.g.,“Do not raise the rate more than 1 ml in 12 hours”). If the prescription has thesecomponents, use the ∆Rate field and the ∆ Time field to enter those limits. Example:Enter the incremental titration amount level of 1 ml on this field, and press“YES/ENTER” to move to the next field.c. ∆Time (Delta Time): Enter the incremental or delta time limit. (Example: Enter 12:00hours.) If there are no incremental or delta level components to the prescription, leavethese fields (∆Rate and ∆Time) set at their default settings of “0” and press“YES/ENTER” to move to the next field.d. Max BOLS (Maximum Bolus Dose): Use this field to set the upper limit of the Bolus orPatient Demand dose. If there is no bolus dose, enter “0”. If a value is given for theBolus Dose, use the numeric keys to enter it on this field, press the “YES/ENTER” keyto accept, and move to the next field. The value entered for this field must be equal to orless than maximum Bolus Dose listed in Figure 5.1 Administration Routes table.e. MinINT (Minimum Bolus Interval): Use this field to set the minimum amount of timeallowed between bolus doses. When the correct time is entered, press the“YES/ENTER” key to accept, and move to the next field.f. #BOLS/hr (Number of Boluses allowed per hour): Use this field to enter the maximumbolus/hr. When correct, press the “YES/ENTER” key to accept, and move to the nextfield.g. ACCEPT? If there are any changes to be made, use the up or down arrows to move tothat field, use the numeric keys to enter the corrected data, and press “YES/ENTER” toaccept the new values. Move the cursor back to the “ACCEPT?” field and press“YES/ENTER”. The Titration Limits are now entered and the display returns to thePre-Prescription screen. If the entire Titration Limit Screen is to be aborted, press “NO”to return to the Pre-Prescription screen.6 NEXT? If any field is not satisfactory, use the arrow keys to locate the field to be changed,enter the changes, press the “YES/ENTER” key to accept the new values and then go backto the “NEXT?” field. When all fields are satisfied with correct settings, press the“YES/ENTER” key to exit this screen, and move on to the next PCA Programming Menu.PCA TherapyAt the following screen, the patient’s prescription information is entered to complete theprogramming of the pump for a PCA Therapy. Remember that there may be additional limits torates and doses based on limits for the route of administration selected. (See Figure 5.1).Note that the screen Identifier gives the abbreviation “PCA” for Patient Controlled AnalgesicTherapy (or EPI if Epidural route is selected) and has a down arrow configuration, whichindicates that there are more than four fields of text or information to be considered.57
- Page 1 and 2:
CURLIN MEDICALUser’s Manualfor us
- Page 3 and 4:
TABLE OF CONTENTSEntering or Changi
- Page 5 and 6:
TABLE OF CONTENTSPrime.............
- Page 7 and 8:
IntroductionChapter1IntroductionThe
- Page 9 and 10:
• Retained memory features that a
- Page 11 and 12: CAUTIONS• U.S. federal law restri
- Page 13 and 14: • This equipment generates, uses,
- Page 15 and 16: Serial Number LabelIntroductionBatt
- Page 17 and 18: Preparing Medication for Infusion/C
- Page 19 and 20: Opening and Closing the Pump DoorTh
- Page 21 and 22: Air DetectorNote: Open theslide cla
- Page 23 and 24: Installing the Batteries and Using
- Page 25 and 26: IMPORTANTINFORMATIONWhenever an ext
- Page 27 and 28: IntroductionLocking SleeveTwo-Pin A
- Page 29 and 30: Chapter2Learning Pump FeaturesLearn
- Page 31 and 32: LED Light IndicatorsThis “three-l
- Page 33 and 34: Chapter3Basics of ProgrammingThe Cu
- Page 35 and 36: whenever an alarm or error code occ
- Page 37 and 38: Access CodeClinician Access Code Sc
- Page 39 and 40: to all pump functions. Each level h
- Page 41 and 42: 8 PRINT PATIENT HISTORY: To print t
- Page 43 and 44: a. Time Format: You have the option
- Page 45 and 46: If only one therapy is programmed a
- Page 47 and 48: Chapter4Continuous TherapyContinuou
- Page 49 and 50: If the KVO rate is set to 0, the pu
- Page 51 and 52: 6 DONE?: If any changes are to be m
- Page 53 and 54: The following screen displays the C
- Page 55 and 56: detects in-line pressures at 400 mm
- Page 57 and 58: In CMS-enabled pumps, the graphic b
- Page 59 and 60: . If the incomplete therapy is to b
- Page 61: PCA TherapyChapter5PCA TherapyPCA o
- Page 65 and 66: using the numeric keys and, when co
- Page 67 and 68: Note. After the infusion has starte
- Page 69 and 70: d. To exit the shift total feature
- Page 71 and 72: pressures at 400 mmHg ±150 (8 ±3
- Page 73 and 74: This screen will continue to displa
- Page 75 and 76: When the program is accepted, the d
- Page 77: which therapy to repeat by moving t
- Page 80 and 81: The time format (12 hr AM/PM or 24
- Page 82 and 83: time period using the numeric keys,
- Page 84 and 85: 7 To continue priming, press the PR
- Page 86 and 87: Note: Whatever Down Ramp time was a
- Page 88 and 89: 1 The first field displays the “R
- Page 90 and 91: . If the incomplete therapy is to b
- Page 95 and 96: IMPORTANTINFORMATIONDuring the dela
- Page 97 and 98: 10 DONE?: If there are any changes
- Page 99 and 100: The following screen displays the I
- Page 101 and 102: This message alerts you to the Air-
- Page 103 and 104: Intermittent Information ScreensInt
- Page 105 and 106: Intermittent Dosing ScheduleThe dos
- Page 107 and 108: This screen displays:1 “INFUSION
- Page 109 and 110: CHAPTER8Variable TherapyThis therap
- Page 111 and 112: During the delay start period, if t
- Page 113 and 114:
5 NEXT?: If there are any changes t
- Page 115 and 116:
7 To continue priming, press the PR
- Page 117 and 118:
4 DN Occlu (Down Occlusion): This f
- Page 119 and 120:
Variable Run Screen 2This screen di
- Page 121 and 122:
stop the auto-advance function by p
- Page 123 and 124:
The pump will then display the prog
- Page 125 and 126:
TroubleshootingChapter9Troubleshoot
- Page 127 and 128:
LCD Display:Alert:Cause:Resolution:
- Page 129 and 130:
If it is not necessary to preserve
- Page 131 and 132:
Resolution:LCD Display:Alert:Cause:
- Page 133 and 134:
LCD Display: ALERT NEW DOSE IS LESS
- Page 135 and 136:
LCD Display:Alert:Cause:Resolution:
- Page 137 and 138:
ALARMSAlarms are conditions that re
- Page 139 and 140:
LCD Display:Alarm:Cause:Resolution:
- Page 141 and 142:
ERROR CODESIf a pump goes into an e
- Page 143 and 144:
ErrorCodeLCD DisplayedMessage162 St
- Page 145 and 146:
ChapterAccessories10There are a num
- Page 147 and 148:
AccessoriesFigure 10.3 Safety Shell
- Page 149 and 150:
Keypad CoversThese accessories are
- Page 151 and 152:
Chapter11Cleaning, EnvironmentalCon
- Page 153 and 154:
1 PARTIES COVERED BY THIS WARRANTY:
- Page 155 and 156:
d Program the following CONTINUOUS
- Page 157 and 158:
Chapter12TechnicalSpecificationsThe
- Page 159 and 160:
ITEMDown Occlusion Detection TimeMi
- Page 161 and 162:
Curlin pump inusing at .1 ml/hr w i
- Page 163 and 164:
Percent Error, Curlin Pump infusing
- Page 165 and 166:
Clinician Information andAccess Cod