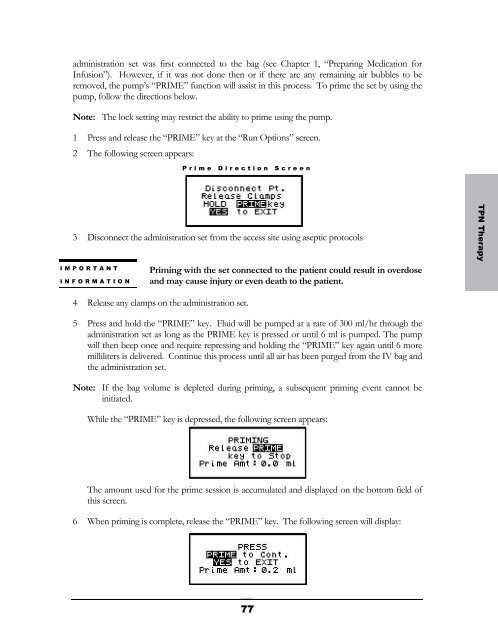
time period using the numeric keys, and when correct, press the “YES/ENTER” key toaccept and move the cursor to the next field. Since this field is optional, “0” may be enteredand accepted. The range for this field is 0:00 to 9:00 HH:MM.6 TotTime (Total Time): This field displays the entire time period over which the infusion willbe delivered, including up and down ramp times. When the pump is given the Volume ToBe Infused, the RATE at which to infuse, and the up and down ramp times, it willautomatically calculate the Total Time and display it here. Or you may choose to program theTotal Volume To Be Infused, Total Time and ramp times and let the pump calculate the levelrate of infusion. If so, the cursor will go back to the “Inf RATE” field, display the rate, andrequire the operator to accept it by pressing the “YES/ENTER” key. If the time is notacceptable, enter the new TIME with the numeric keys. When the TIME field is satisfactory,press the “YES/ENTER” key and move to the final field. The range for this field is 0:01 to288:00 HH:MM.Note: The time calculated by the pump may be less than a minute; however, one minute is theminimum entry and display value.7 KVO Rate (Keep Vein Open Rate): This field requires data entry using the numeric keys toset the rate at which fluid will be delivered in a “Keep Open” state. The pump defaults to arate of 0.1 ml/hour can be set from 0 to 10 ml/hour, but cannot be set at a rate to exceed thetherapy operating rate. When the desired KVO rate has been entered, press the“YES/ENTER” key to accept and move the cursor to the next field.8 DONE?: If there are any changes to be made, use the up or down arrow keys to locate thefield to be changed, enter the corrected information, and press “YES/ENTER” to accept thenew data. If all the fields are acceptable, at the “DONE?” prompt, press “YES/ENTER” tomove to the next screen.IMPORTANTINFORMATIONBefore the infusion is started, it is important to consider a fewremaining issues, such as checking the administration set to be sureit was primed or purged of all air, or perhaps the pump may need tobe put into a security lock setting for additional safety.The next screen that appears when the programming is complete offers four choices:Run Options ScreenNote that you do not need to answer “yes” or “no” questions or enter data with the numeric keysas previously requested. This screen requires you to press the corresponding key on the keypad tobegin the requested function. The following section explains each selection beginning with Prime:PrimeThe IV bag and administration set should be inspected and be free of all air and air bubblesbefore they are connected to the access site. Priming may have been done by gravity when the76
administration set was first connected to the bag (see Chapter 1, “Preparing <strong>Med</strong>ication forInfusion”). However, if it was not done then or if there are any remaining air bubbles to beremoved, the pump’s “PRIME” function will assist in this process. To prime the set by using thepump, follow the directions below.Note: The lock setting may restrict the ability to prime using the pump.1 Press and release the “PRIME” key at the “Run Options” screen.2 The following screen appears:Prime Direction Screen3 Disconnect the administration set from the access site using aseptic protocolsIMPORTANTINFORMATIONPriming with the set connected to the patient could result in overdoseand may cause injury or even death to the patient.TPN Therapy4 Release any clamps on the administration set.5 Press and hold the “PRIME” key. Fluid will be pumped at a rate of 300 ml/hr through theadministration set as long as the PRIME key is pressed or until 6 ml is pumped. The pumpwill then beep once and require repressing and holding the “PRIME” key again until 6 moremilliliters is delivered. Continue this process until all air has been purged from the IV bag andthe administration set.Note: If the bag volume is depleted during priming, a subsequent priming event cannot beinitiated.While the “PRIME” key is depressed, the following screen appears:The amount used for the prime session is accumulated and displayed on the bottom field ofthis screen.6 When priming is complete, release the “PRIME” key. The following screen will display:77
- Page 1 and 2:
CURLIN MEDICALUser’s Manualfor us
- Page 3 and 4:
TABLE OF CONTENTSEntering or Changi
- Page 5 and 6:
TABLE OF CONTENTSPrime.............
- Page 7 and 8:
IntroductionChapter1IntroductionThe
- Page 9 and 10:
• Retained memory features that a
- Page 11 and 12:
CAUTIONS• U.S. federal law restri
- Page 13 and 14:
• This equipment generates, uses,
- Page 15 and 16:
Serial Number LabelIntroductionBatt
- Page 17 and 18:
Preparing Medication for Infusion/C
- Page 19 and 20:
Opening and Closing the Pump DoorTh
- Page 21 and 22:
Air DetectorNote: Open theslide cla
- Page 23 and 24:
Installing the Batteries and Using
- Page 25 and 26:
IMPORTANTINFORMATIONWhenever an ext
- Page 27 and 28:
IntroductionLocking SleeveTwo-Pin A
- Page 29 and 30:
Chapter2Learning Pump FeaturesLearn
- Page 31 and 32: LED Light IndicatorsThis “three-l
- Page 33 and 34: Chapter3Basics of ProgrammingThe Cu
- Page 35 and 36: whenever an alarm or error code occ
- Page 37 and 38: Access CodeClinician Access Code Sc
- Page 39 and 40: to all pump functions. Each level h
- Page 41 and 42: 8 PRINT PATIENT HISTORY: To print t
- Page 43 and 44: a. Time Format: You have the option
- Page 45 and 46: If only one therapy is programmed a
- Page 47 and 48: Chapter4Continuous TherapyContinuou
- Page 49 and 50: If the KVO rate is set to 0, the pu
- Page 51 and 52: 6 DONE?: If any changes are to be m
- Page 53 and 54: The following screen displays the C
- Page 55 and 56: detects in-line pressures at 400 mm
- Page 57 and 58: In CMS-enabled pumps, the graphic b
- Page 59 and 60: . If the incomplete therapy is to b
- Page 61 and 62: PCA TherapyChapter5PCA TherapyPCA o
- Page 63 and 64: a. MxRATE (Maximum Rate) limits: Us
- Page 65 and 66: using the numeric keys and, when co
- Page 67 and 68: Note. After the infusion has starte
- Page 69 and 70: d. To exit the shift total feature
- Page 71 and 72: pressures at 400 mmHg ±150 (8 ±3
- Page 73 and 74: This screen will continue to displa
- Page 75 and 76: When the program is accepted, the d
- Page 77: which therapy to repeat by moving t
- Page 80 and 81: The time format (12 hr AM/PM or 24
- Page 84 and 85: 7 To continue priming, press the PR
- Page 86 and 87: Note: Whatever Down Ramp time was a
- Page 88 and 89: 1 The first field displays the “R
- Page 90 and 91: . If the incomplete therapy is to b
- Page 95 and 96: IMPORTANTINFORMATIONDuring the dela
- Page 97 and 98: 10 DONE?: If there are any changes
- Page 99 and 100: The following screen displays the I
- Page 101 and 102: This message alerts you to the Air-
- Page 103 and 104: Intermittent Information ScreensInt
- Page 105 and 106: Intermittent Dosing ScheduleThe dos
- Page 107 and 108: This screen displays:1 “INFUSION
- Page 109 and 110: CHAPTER8Variable TherapyThis therap
- Page 111 and 112: During the delay start period, if t
- Page 113 and 114: 5 NEXT?: If there are any changes t
- Page 115 and 116: 7 To continue priming, press the PR
- Page 117 and 118: 4 DN Occlu (Down Occlusion): This f
- Page 119 and 120: Variable Run Screen 2This screen di
- Page 121 and 122: stop the auto-advance function by p
- Page 123 and 124: The pump will then display the prog
- Page 125 and 126: TroubleshootingChapter9Troubleshoot
- Page 127 and 128: LCD Display:Alert:Cause:Resolution:
- Page 129 and 130: If it is not necessary to preserve
- Page 131 and 132: Resolution:LCD Display:Alert:Cause:
- Page 133 and 134:
LCD Display: ALERT NEW DOSE IS LESS
- Page 135 and 136:
LCD Display:Alert:Cause:Resolution:
- Page 137 and 138:
ALARMSAlarms are conditions that re
- Page 139 and 140:
LCD Display:Alarm:Cause:Resolution:
- Page 141 and 142:
ERROR CODESIf a pump goes into an e
- Page 143 and 144:
ErrorCodeLCD DisplayedMessage162 St
- Page 145 and 146:
ChapterAccessories10There are a num
- Page 147 and 148:
AccessoriesFigure 10.3 Safety Shell
- Page 149 and 150:
Keypad CoversThese accessories are
- Page 151 and 152:
Chapter11Cleaning, EnvironmentalCon
- Page 153 and 154:
1 PARTIES COVERED BY THIS WARRANTY:
- Page 155 and 156:
d Program the following CONTINUOUS
- Page 157 and 158:
Chapter12TechnicalSpecificationsThe
- Page 159 and 160:
ITEMDown Occlusion Detection TimeMi
- Page 161 and 162:
Curlin pump inusing at .1 ml/hr w i
- Page 163 and 164:
Percent Error, Curlin Pump infusing
- Page 165 and 166:
Clinician Information andAccess Cod