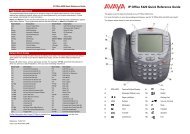
Voicemail Pro installation - IP Office Info
Voicemail Pro installation - IP Office Info
Voicemail Pro installation - IP Office Info

You also want an ePaper? Increase the reach of your titles
YUMPU automatically turns print PDFs into web optimized ePapers that Google loves.
· Read<br />
· Execute<br />
· Read permissions<br />
· Create children<br />
· List contents<br />
· Read properties<br />
· Write properties<br />
· Administer information store<br />
· Create named properties in the information store<br />
· View information store status<br />
· Receive As<br />
· Send As<br />
12.Click Apply.<br />
13.Click OK.<br />
14.Close the Active Directory Sites and Services dialog box.<br />
15.Wait for the directory cache to expire.<br />
3.4.3.4.3 Assigning Permissions on Exchange 2007<br />
Installation: UMS Web Services<br />
If user account is on Exchange 2007 server, proceed as follows to assign additional permissions to the user account:<br />
1. Verify that the user to be added is a member of the Exchange recipient Administrator group.<br />
2. Log on to the Active Directory server using an account that has privileges to assign permissions to accounts (such as<br />
administrator).<br />
3. Click Start | Administrative Tools | Active Directory Sites and Services.<br />
4. In the left pane, select Active Directory Sites and Services.<br />
5. From the View pull-down menu, select Show Services Node.<br />
6. In the left pane, expand Services, expand Microsoft Exchange, and then locate the appropriate Exchange<br />
Organization.<br />
7. Right-click it and select <strong>Pro</strong>perties.<br />
8. In the <strong>Pro</strong>perties window, click the Security tab.<br />
The Security tab may not be visible in an environment with both Exchange 2003 and Exchange 2007 mail servers. To<br />
enable the Security tab, see Editing the registry 52<br />
.<br />
9. Click Add.<br />
10. In the Select Users, Computers, Service Accounts, or Groups window, add the user’s account.<br />
11. Click OK.<br />
12. Under Permissions for the group, select Read and click Apply.<br />
13. Click Advanced.<br />
14. In the Advanced Security Settings window, on the Permissions tab, select the check box at the bottom of the<br />
window. This will apply the permissions inherited from the parent to this object and its child objects.<br />
15. Click Add and add the user’s account.<br />
16. Click OK.<br />
17. In the Apply to field, select This object and all descendant objects.<br />
18. Verify that the following box is not selected: Apply these permissions to objects and/or containers within<br />
this container only.<br />
19. In the Permissions field, select the required permissions.<br />
· List contents<br />
· Read all properties<br />
· Write all properties<br />
· Read permissions<br />
· Create all child objects<br />
· Administer information store<br />
· Create named properties in the information store<br />
· Receive As<br />
Implementing <strong>Voicemail</strong> <strong>Pro</strong> Page 53<br />
<strong>IP</strong> <strong>Office</strong> 8.1<br />
15-601064 Issue 8b (Tuesday, December 11, 2012)