

TROLL 9500 Operator's Manual - Geotech Environmental Equipment
TROLL 9500 Operator's Manual - Geotech Environmental Equipment
TROLL 9500 Operator's Manual - Geotech Environmental Equipment

Create successful ePaper yourself
Turn your PDF publications into a flip-book with our unique Google optimized e-Paper software.
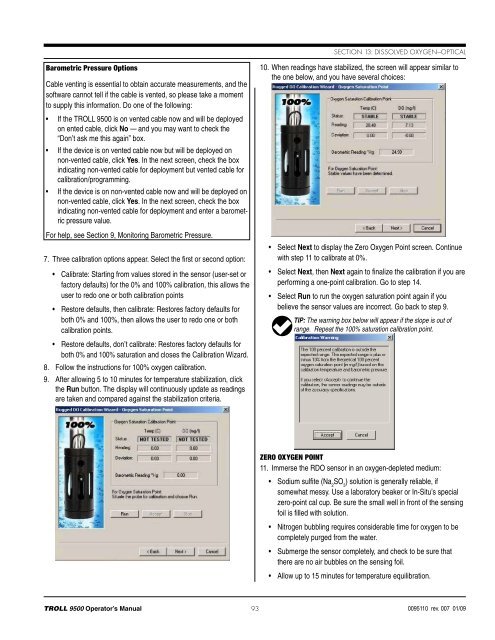
Section 13: Dissolved Oxygen—OpticalBarometric Pressure OptionsCable venting is essential to obtain accurate measurements, and thesoftware cannot tell if the cable is vented, so please take a momentto supply this information. Do one of the following:• If the <strong>TROLL</strong> <strong>9500</strong> is on vented cable now and will be deployedon ented cable, click No — and you may want to check the“Don’t ask me this again” box.• If the device is on vented cable now but will be deployed onnon-vented cable, click Yes. In the next screen, check the boxindicating non-vented cable for deployment but vented cable forcalibration/programming.• If the device is on non-vented cable now and will be deployed onnon-vented cable, click Yes. In the next screen, check the boxindicating non-vented cable for deployment and enter a barometricpressure value.For help, see Section 9, Monitoring Barometric Pressure.7. Three calibration options appear. Select the first or second option:• Calibrate: Starting from values stored in the sensor (user-set orfactory defaults) for the 0% and 100% calibration, this allows theuser to redo one or both calibration points• Restore defaults, then calibrate: Restores factory defaults forboth 0% and 100%, then allows the user to redo one or bothcalibration points.• Restore defaults, don’t calibrate: Restores factory defaults forboth 0% and 100% saturation and closes the Calibration Wizard.8. Follow the instructions for 100% oxygen calibration.9. After allowing 5 to 10 minutes for temperature stabilization, clickthe Run button. The display will continuously update as readingsare taken and compared against the stabilization criteria.10. When readings have stabilized, the screen will appear similar tothe one below, and you have several choices:• Select Next to display the Zero Oxygen Point screen. Continuewith step 11 to calibrate at 0%.• Select Next, then Next again to finalize the calibration if you areperforming a one-point calibration. Go to step 14.• Select Run to run the oxygen saturation point again if youbelieve the sensor values are incorrect. Go back to step 9.TIP: The warning box below will appear if the slope is out ofrange. Repeat the 100% saturation calibration point.Zero Oxygen Point11. Immerse the RDO sensor in an oxygen-depleted medium:• Sodium sulfite (Na 2SO 3) solution is generally reliable, ifsomewhat messy. Use a laboratory beaker or In-Situ’s specialzero-point cal cup. Be sure the small well in front of the sensingfoil is filled with solution.• Nitrogen bubbling requires considerable time for oxygen to becompletely purged from the water.• Submerge the sensor completely, and check to be sure thatthere are no air bubbles on the sensing foil.• Allow up to 15 minutes for temperature equilibration.<strong>TROLL</strong> <strong>9500</strong> Operator’s <strong>Manual</strong> 930095110 rev. 007 01/09


