

TROLL 9500 Operator's Manual - Geotech Environmental Equipment
TROLL 9500 Operator's Manual - Geotech Environmental Equipment
TROLL 9500 Operator's Manual - Geotech Environmental Equipment

Create successful ePaper yourself
Turn your PDF publications into a flip-book with our unique Google optimized e-Paper software.
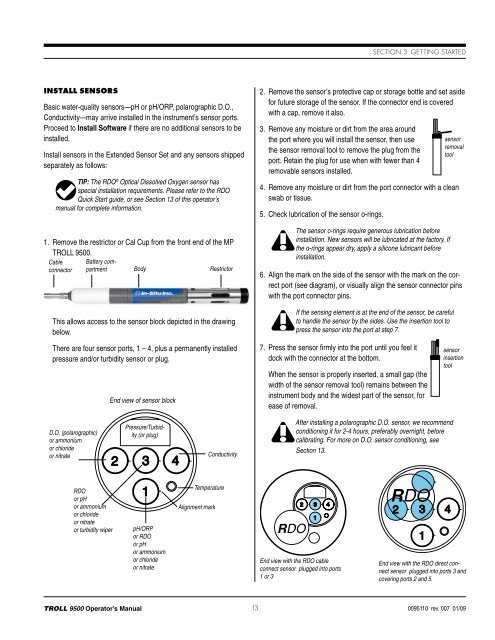
Section 3: Getting StartedInstall SensorsBasic water-quality sensors—pH or pH/ORP, polarographic D.O.,Conductivity—may arrive installed in the instrument’s sensor ports.Proceed to Install Software if there are no additional sensors to beinstalled.Install sensors in the Extended Sensor Set and any sensors shippedseparately as follows:TIP: The RDO ® Optical Dissolved Oxygen sensor hasspecial installation requirements. Please refer to the RDOQuick Start guide, or see Section 13 of this operator’smanual for complete information.1. Remove the restrictor or Cal Cup from the front end of the MP<strong>TROLL</strong> <strong>9500</strong>.Cable Battery compartmentconnector Body RestrictorThis allows access to the sensor block depicted in the drawingbelow.2. Remove the sensor’s protective cap or storage bottle and set asidefor future storage of the sensor. If the connector end is coveredwith a cap, remove it also.3. Remove any moisture or dirt from the area aroundthe port where you will install the sensor, then usethe sensor removal tool to remove the plug from theport. Retain the plug for use when with fewer than 4removable sensors installed.sensorremovaltool4. Remove any moisture or dirt from the port connector with a cleanswab or tissue.5. Check lubrication of the sensor o-rings.The sensor o-rings require generous lubrication beforeinstallation. New sensors will be lubricated at the factory. Ifthe o-rings appear dry, apply a silicone lubricant beforeinstallation.6. Align the mark on the side of the sensor with the mark on the correctport (see diagram), or visually align the sensor connector pinswith the port connector pins.If the sensing element is at the end of the sensor, be carefulto handle the sensor by the sides. Use the insertion tool topress the sensor into the port at step 7.There are four sensor ports, 1 – 4, plus a permanently installedpressure and/or turbidity sensor or plug.End view of sensor block7. Press the sensor firmly into the port until you feel itdock with the connector at the bottom.When the sensor is properly inserted, a small gap (thewidth of the sensor removal tool) remains between theinstrument body and the widest part of the sensor, forease of removal.sensorinsertiontoolD.O. (polarographic)or ammoniumor chlorideor nitratePressure/Turbidity(or plug)ConductivityAfter installing a polarographic D.O. sensor, we recommendconditioning it for 2-4 hours, preferably overnight, beforecalibrating. For more on D.O. sensor conditioning, seeSection 13.RDOor pHor ammoniumor chlorideor nitrateor turbidity wiperpH/ORPor RDOor pHor ammoniumor chlorideor nitrateTemperatureAlignment markEnd view with the RDO cableconnect sensor plugged into ports1 or 3End view with the RDO direct connectsensor plugged into ports 3 andcovering ports 2 and 5.<strong>TROLL</strong> <strong>9500</strong> Operator’s <strong>Manual</strong>13 0095110 rev. 007 01/09


