

TROLL 9500 Operator's Manual - Geotech Environmental Equipment
TROLL 9500 Operator's Manual - Geotech Environmental Equipment
TROLL 9500 Operator's Manual - Geotech Environmental Equipment

Create successful ePaper yourself
Turn your PDF publications into a flip-book with our unique Google optimized e-Paper software.
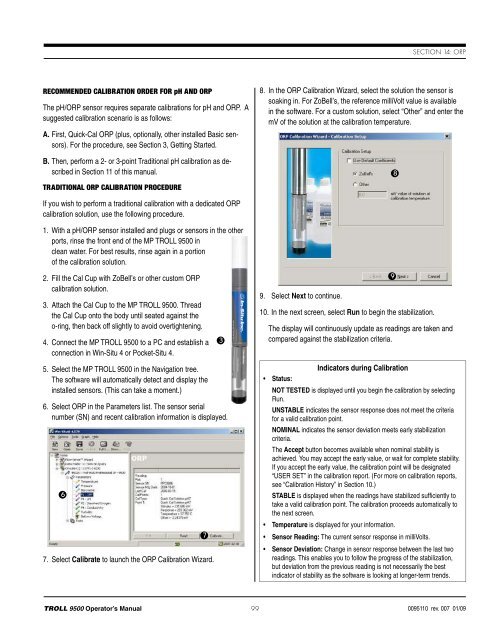
Section 14: orpRecommended Calibration Order for pH and ORPThe pH/ORP sensor requires separate calibrations for pH and ORP. Asuggested calibration scenario is as follows:A. First, Quick-Cal ORP (plus, optionally, other installed Basic sensors).For the procedure, see Section 3, Getting Started.B. Then, perform a 2- or 3-point Traditional pH calibration as describedin Section 11 of this manual.Traditional ORP Calibration Procedure8. In the ORP Calibration Wizard, select the solution the sensor issoaking in. For ZoBell’s, the reference milliVolt value is availablein the software. For a custom solution, select “Other” and enter themV of the solution at the calibration temperature.8If you wish to perform a traditional calibration with a dedicated ORPcalibration solution, use the following procedure.1. With a pH/ORP sensor installed and plugs or sensors in the otherports, rinse the front end of the MP <strong>TROLL</strong> <strong>9500</strong> inclean water. For best results, rinse again in a portionof the calibration solution.2. Fill the Cal Cup with ZoBell’s or other custom ORPcalibration solution.3. Attach the Cal Cup to the MP <strong>TROLL</strong> <strong>9500</strong>. Threadthe Cal Cup onto the body until seated against theo-ring, then back off slightly to avoid overtightening.4. Connect the MP <strong>TROLL</strong> <strong>9500</strong> to a PC and establish aconnection in Win-Situ 4 or Pocket-Situ 4.39. Select Next to continue.10. In the next screen, select Run to begin the stabilization.The display will continuously update as readings are taken andcompared against the stabilization criteria.95. Select the MP <strong>TROLL</strong> <strong>9500</strong> in the Navigation tree.The software will automatically detect and display theinstalled sensors. (This can take a moment.)6. Select ORP in the Parameters list. The sensor serialnumber (SN) and recent calibration information is displayed.67. Select Calibrate to launch the ORP Calibration Wizard.7• Status:Indicators during CalibrationNOT TESTED is displayed until you begin the calibration by selectingRun.UNSTABLE indicates the sensor response does not meet the criteriafor a valid calibration point.NOMINAL indicates the sensor deviation meets early stabilizationcriteria.The Accept button becomes available when nominal stability isachieved. You may accept the early value, or wait for complete stability.If you accept the early value, the calibration point will be designated“USER SET” in the calibration report. (For more on calibration reports,see “Calibration History” in Section 10.)STABLE is displayed when the readings have stabilized sufficiently totake a valid calibration point. The calibration proceeds automatically tothe next screen.• Temperature is displayed for your information.• Sensor Reading: The current sensor response in milliVolts.• Sensor Deviation: Change in sensor response between the last tworeadings. This enables you to follow the progress of the stabilization,but deviation from the previous reading is not necessarily the bestindicator of stability as the software is looking at longer-term trends.<strong>TROLL</strong> <strong>9500</strong> Operator’s <strong>Manual</strong> 990095110 rev. 007 01/09


