

TROLL 9500 Operator's Manual - Geotech Environmental Equipment
TROLL 9500 Operator's Manual - Geotech Environmental Equipment
TROLL 9500 Operator's Manual - Geotech Environmental Equipment

You also want an ePaper? Increase the reach of your titles
YUMPU automatically turns print PDFs into web optimized ePapers that Google loves.
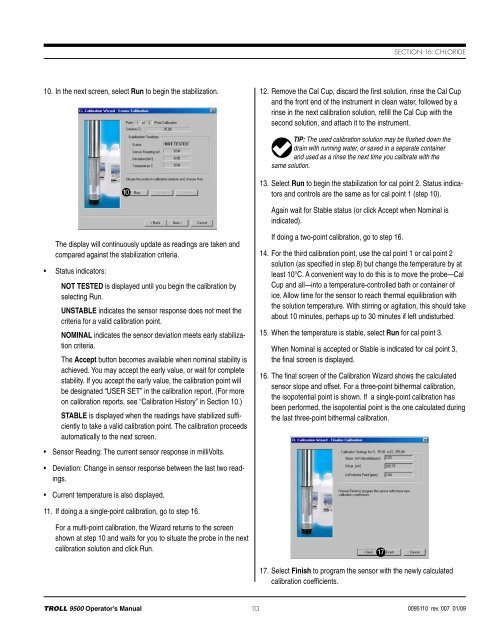
Section 16: Chloride10. In the next screen, select Run to begin the stabilization.12. Remove the Cal Cup, discard the first solution, rinse the Cal Cupand the front end of the instrument in clean water, followed by arinse in the next calibration solution, refill the Cal Cup with thesecond solution, and attach it to the instrument.TIP: The used calibration solution may be flushed down thedrain with running water, or saved in a separate containerand used as a rinse the next time you calibrate with thesame solution.1013. Select Run to begin the stabilization for cal point 2. Status indicatorsand controls are the same as for cal point 1 (step 10).Again wait for Stable status (or click Accept when Nominal isindicated).The display will continuously update as readings are taken andcompared against the stabilization criteria.• Status indicators:NOT TESTED is displayed until you begin the calibration byselecting Run.UNSTABLE indicates the sensor response does not meet thecriteria for a valid calibration point.NOMINAL indicates the sensor deviation meets early stabilizationcriteria.The Accept button becomes available when nominal stability isachieved. You may accept the early value, or wait for completestability. If you accept the early value, the calibration point willbe designated “USER SET” in the calibration report. (For moreon calibration reports, see “Calibration History” in Section 10.)STABLE is displayed when the readings have stabilized sufficientlyto take a valid calibration point. The calibration proceedsautomatically to the next screen.• Sensor Reading: The current sensor response in milliVolts.If doing a two-point calibration, go to step 16.14. For the third calibration point, use the cal point 1 or cal point 2solution (as specified in step 8) but change the temperature by atleast 10°C. A convenient way to do this is to move the probe—CalCup and all—into a temperature-controlled bath or container ofice. Allow time for the sensor to reach thermal equilibration withthe solution temperature. With stirring or agitation, this should takeabout 10 minutes, perhaps up to 30 minutes if left undisturbed.15. When the temperature is stable, select Run for cal point 3.When Nominal is accepted or Stable is indicated for cal point 3,the final screen is displayed.16. The final screen of the Calibration Wizard shows the calculatedsensor slope and offset. For a three-point bithermal calibration,the isopotential point is shown. If a single-point calibration hasbeen performed, the isopotential point is the one calculated duringthe last three-point bithermal calibration.• Deviation: Change in sensor response between the last two readings.• Current temperature is also displayed.11. If doing a a single-point calibration, go to step 16.For a multi-point calibration, the Wizard returns to the screenshown at step 10 and waits for you to situate the probe in the nextcalibration solution and click Run.1717. Select Finish to program the sensor with the newly calculatedcalibration coefficients.<strong>TROLL</strong> <strong>9500</strong> Operator’s <strong>Manual</strong> 1130095110 rev. 007 01/09


