Section 3: Getting StartedQuick-Cal the Basic Water-Quality SensorsYou will need:• MP <strong>TROLL</strong> <strong>9500</strong> with Basic sensors installed (pH or pH/ORP,polarographic D.O., Conductivity), plugs in any unused ports.• Cal Cup. Remove sponge if present.• Quick Cal solution, at room temperature. Shake wellbefore use.1. Fill the Cal Cup with the Quick Cal solution. See guidelinesin the sidebar on this page.2. Remove the restrictor (if attached) and insert the frontend of the MP <strong>TROLL</strong> <strong>9500</strong> into the Cal Cup. Threadthe Cal Cup onto the body until seated against the o-ring, then back off slightly to avoid overtightening.3. Connect the MP <strong>TROLL</strong> <strong>9500</strong> to a PC and establish aconnection in Win-Situ 4 or Pocket-Situ 4.4. Select the MP <strong>TROLL</strong> <strong>9500</strong> in the Navigation tree. The softwarewill automatically detect and display the installed sensors.45. In the Navigation tree, click on Parameters.56. In the Information pane, select QuickCal.62Quick-Cal Tips• A Quick Cal is the fastest way to cali brate pH, conductivity, polarographicD.O., & ORP. But for best results, if your software supports it,we recommend traditional calibration for pH, conductivity, and D.O., asdescribed in Sections 11-13.• Be sure to condition a new polarographic D.O. sensor for 2-4 hours,preferably overnight, before cal i brat ing. See Section 13 for information.If the sensor is installed when you receive the instrument, it is conditionedand ready to calibrate.• Guidelines for filling the Cal Cup with Quick Cal solution:• With a full complement of sensors installed, use the lower line as aguide (about half full).• With 1 or 2 sensors installed, fill to the upper line.• When calibrating a high-range conductivity sensor, insure the sideports are immersed in solution. Dislodge any bubbles that mayappear. For a Quick Cal with a full set of sensors, we suggest you fillthe Cal Cup above the line labeled “Recommended Fill Line - High.”Use about a half-inch of additional fluid, depending on the sensorload. Some experimentation may be needed.• When Quick-Calibrating polarographic D.O. with a high-range conductivitysensor installed, the increased fill level suggests handling withcare when you invert the Cal Cup at step 11—allow the excess fluid tospill into a sink, or remove the Cal Cup from the instrument and poursome fluid out, re-attach the Cal Cup, then invert it and loosen the endcap to achieve the correct atmospheric pressure for a polarographicD.O. calibration. The D.O. sensor membrane should be in air, thetemperature sensor should be completely submerged.• For best accuracy, conductivity sensors should be wetted for 15-30minutes immediately prior to calibration. This immersion can be in eitherclean water or the Quick Cal solution.• For best results at temperatures at or below 15°C, de-select the conductivitysensor when perfoming a Quick-Cal; follow up with a singleparametercalibration uisng 8000 microSiemens/cm.• If an RDO Optical Dissolved Oxygen sensor is installed, use the specialsoft plastic cal insert (it has an orange base) to Quick Cal the standardsensors, since the standard Cal Cup will not fit when the RDO sensoris installed. Fill the cal insert with calibration solution, slide it up aroundthe sensors, including the RDO cable, and use the RDO restrictor as asupport during calibration.• If your MP <strong>TROLL</strong> <strong>9500</strong> includes a turbidity wiper, insure the pad doesnot absorb Quick Cal solution. Either carefully remove the wiper head(see Wiper Maintenance in Section 18), or soak the front end of the<strong>TROLL</strong> in water before calibrating; allow the pad to become saturated.• Quick Cal is not available for these sensors: Nitrate, Ammonium, Chloride,Turbidity, Optical D.O. Traditional calibrations should be performedfor best results from these sensors.<strong>TROLL</strong> <strong>9500</strong> Operator’s <strong>Manual</strong>17 0095110 rev. 007 01/09
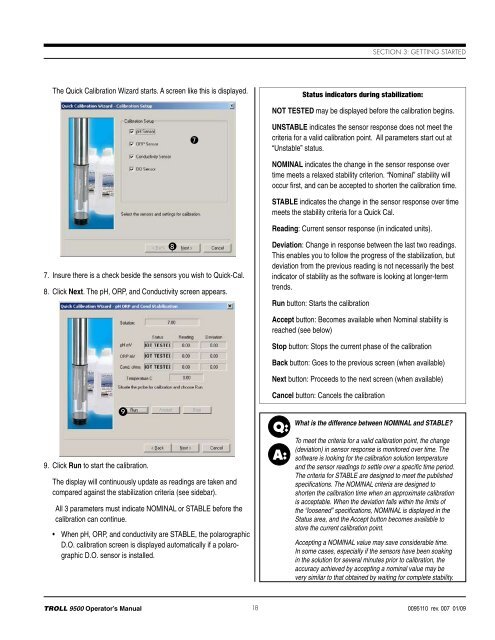
Section 3: Getting StartedThe Quick Calibration Wizard starts. A screen like this is displayed.Status indicators during stabilization:NOT TESTED may be displayed before the calibration begins.7UNSTABLE indicates the sensor response does not meet thecriteria for a valid calibration point. All parameters start out at“Unstable” status.NOMINAL indicates the change in the sensor response overtime meets a relaxed stability criterion. “Nominal” stability willoccur first, and can be accepted to shorten the calibration time.STABLE indicates the change in the sensor response over timemeets the stability criteria for a Quick Cal.Reading: Current sensor response (in indicated units).7. Insure there is a check beside the sensors you wish to Quick-Cal.8. Click Next. The pH, ORP, and Conductivity screen appears.8Deviation: Change in response between the last two readings.This enables you to follow the progress of the stabilization, butdeviation from the previous reading is not necessarily the bestindicator of stability as the software is looking at longer-termtrends.Run button: Starts the calibrationAccept button: Becomes available when Nominal stability isreached (see below)Stop button: Stops the current phase of the calibrationBack button: Goes to the previous screen (when available)Next button: Proceeds to the next screen (when available)Cancel button: Cancels the calibration9. Click Run to start the calibration.9The display will continuously update as readings are taken andcompared against the stabilization criteria (see sidebar).All 3 parameters must indicate NOMINAL or STABLE before thecalibration can continue.• When pH, ORP, and conductivity are STABLE, the polarographicD.O. calibration screen is displayed automatically if a polarographicD.O. sensor is installed.Q:A:What is the difference between NOMINAL and STABLE?To meet the criteria for a valid calibration point, the change(deviation) in sensor response is monitored over time. Thesoftware is looking for the calibration solution temperatureand the sensor readings to settle over a specific time period.The criteria for STABLE are designed to meet the publishedspecifications. The NOMINAL criteria are designed toshorten the calibration time when an approximate calibrationis acceptable. When the deviation falls within the limits ofthe “loosened” specifications, NOMINAL is displayed in theStatus area, and the Accept button becomes available tostore the current calibration point.Accepting a NOMINAL value may save considerable time.In some cases, especially if the sensors have been soakingin the solution for several minutes prior to calibration, theaccuracy achieved by accepting a nominal value may bevery similar to that obtained by waiting for complete stability.<strong>TROLL</strong> <strong>9500</strong> Operator’s <strong>Manual</strong>18 0095110 rev. 007 01/09