- Page 1 and 2:
User Guide
- Page 3 and 4:
Contents Chapter 1 Welcome Chapter
- Page 5 and 6:
Online accounts available for Palm
- Page 7 and 8:
Welcome Congratulations on the purc
- Page 9 and 10:
and automatic, frequent backups of
- Page 11 and 12:
Basics You’re about to discover t
- Page 13 and 14:
NOTE The volume you set for each in
- Page 15 and 16:
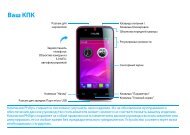
Back view The back cover of your Pr
- Page 17 and 18:
5 To remove the battery: Grasp the
- Page 19 and 20:
What is a Palm profile? Your Palm p
- Page 21 and 22:
TIP You can also unlock the screen
- Page 23 and 24:
You make gestures in two areas on y
- Page 25 and 26:
Scroll gestures Scroll slow: Drag t
- Page 27 and 28:
Select text when you can see a curs
- Page 29 and 30:
1 Page indicator shows that there a
- Page 31 and 32:
Move among open applications 1 In C
- Page 33 and 34:
2 After a halo appears around the i
- Page 35 and 36:
• Turn on Caps Lock: Press Shift
- Page 37 and 38:
2 Do any of the following: • To t
- Page 39 and 40:
(paste), or A (copy/select all, in
- Page 41 and 42:
mode)). If you see a downward-point
- Page 43 and 44:
3 Do one of the following: • To a
- Page 45 and 46:
2 If a message appears stating that
- Page 47 and 48:
Buy an application 1 Open App Catal
- Page 49 and 50:
Update or delete a billing account
- Page 51 and 52:
Just Type With Just Type, you can t
- Page 53 and 54:
• To view suggested search terms
- Page 55 and 56:
3 When the app appears, tap it. TIP
- Page 57 and 58:
Copy files and sync your personal d
- Page 59 and 60:
4 Open My Computer (Windows XP), Co
- Page 61 and 62:
Transfer data from an old phone BEF
- Page 63 and 64: Sync your desktop organizer and you
- Page 65 and 66: Phone Your Palm ® Pre 2 phone enab
- Page 67 and 68: 1 Open Phone . 2 Tap the dial pad n
- Page 69 and 70: Redial the last number dialed 1 Ope
- Page 71 and 72: the speakerphone. If appears with a
- Page 73 and 74: What can I do during a call? Your p
- Page 75 and 76: 2 Tap to create the conference call
- Page 77 and 78: Create a favorite You can also crea
- Page 79 and 80: WARNING If driving while using a ph
- Page 81 and 82: Turn call waiting on/off You can ch
- Page 83 and 84: 1 Open Phone . 2 Open the applicati
- Page 85 and 86: Email, text, multimedia, and instan
- Page 87 and 88: If the email account you set up tak
- Page 89 and 90: • Any other time you open Email,
- Page 91 and 92: 4 Tap Remove Account, and then tap
- Page 93 and 94: • To share a link to a web site:
- Page 95 and 96: 2 Do one of the following: • To c
- Page 97 and 98: Add an email folder as a favorite F
- Page 99 and 100: Switch between messaging accounts i
- Page 101 and 102: you tap New Video, tap to start rec
- Page 103 and 104: • To forward the message in an em
- Page 105 and 106: 1 Open Messaging . 2 Do one of the
- Page 107 and 108: 3 In Show Notifications, tap On or
- Page 109 and 110: Contacts, Calendar, and other perso
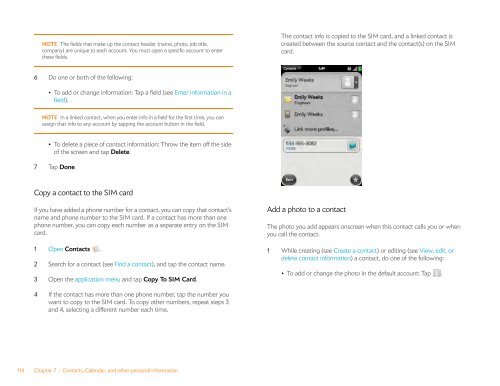
- Page 111 and 112: you’re looking at a linked contac
- Page 113: 9 (Optional) To assign the contact
- Page 117 and 118: Link a contact When your phone reco
- Page 119 and 120: If you delete a contact that is ass
- Page 121 and 122: Send contacts You can send all cont
- Page 123 and 124: If you are setting up an Exchange a
- Page 125 and 126: Customize event notification sounds
- Page 127 and 128: • Tap the event name. Open the ap
- Page 129 and 130: Stop synchronization of Calendar wi
- Page 131 and 132: TIP If you add a due date to a task
- Page 133 and 134: Hide or delete all completed tasks
- Page 135 and 136: Clock The Clock application lets yo
- Page 137 and 138: Install Facebook BEFORE YOU BEGIN T
- Page 139 and 140: 2 Tap Profile. 3 Tap any of the fol
- Page 141 and 142: Photos, videos, and music There’s
- Page 143 and 144: Photos Look at pictures To get pict
- Page 145 and 146: Look at photos in a slideshow You c
- Page 147 and 148: 3 Tap and tap Upload. 4 Do one of t
- Page 149 and 150: 8 To make adjustments to the portio
- Page 151 and 152: Delete a video 1 Open Videos . 2 Ta
- Page 153 and 154: more information, open the browser
- Page 155 and 156: Search for related songs or content
- Page 157 and 158: View album information and buy an a
- Page 159 and 160: Web and wireless connections With y
- Page 161 and 162: • From any screen: Open the conne
- Page 163 and 164: 3 The current setting is displayed
- Page 165 and 166:
Create an open hotspot 1 Open Palm
- Page 167 and 168:
3 If VPNC is not selected already i
- Page 169 and 170:
2 By default, Location Services is
- Page 171 and 172:
1 Open Web . 2 Enter the search ter
- Page 173 and 174:
The first 12 bookmarks you create b
- Page 175 and 176:
Customize web browser settings 1 Op
- Page 177 and 178:
6 If you are pairing with a car kit
- Page 179 and 180:
Use your phone as a modem BEFORE YO
- Page 181 and 182:
Documents Your Palm ® Pre 2 phone
- Page 183 and 184:
1 Open Quickoffice . Any accounts y
- Page 185 and 186:
Add, edit, or delete an online acco
- Page 187 and 188:
1 With the file open, open the appl
- Page 189 and 190:
Preferences There are lots of ways
- Page 191 and 192:
Table 1. Backup details Application
- Page 193 and 194:
Manually back up information to you
- Page 195 and 196:
1 Open Date & Time . 2 Set any of t
- Page 197 and 198:
Run Interactive Tests If you are tr
- Page 199 and 200:
2 Under Screen, drag the Brightness
- Page 201 and 202:
NOTE The volume you set for each in
- Page 203 and 204:
Troubleshooting Although we can’t
- Page 205 and 206:
TIP An occasional restart can be go
- Page 207 and 208:
For users of other Palm ® devices
- Page 209 and 210:
10 Position the back cover over the
- Page 211 and 212:
I can’t get the back cover on 1 P
- Page 213 and 214:
Phone Signal strength is weak Becom
- Page 215 and 216:
I hear static or interference when
- Page 217 and 218:
If your company requires you to cha
- Page 219 and 220:
I have problems sending email (IMAP
- Page 221 and 222:
information you have online is auto
- Page 223 and 224:
play the files on your phone. Howev
- Page 225 and 226:
4 Delete the most recently installe
- Page 227 and 228:
Glossary of Terms airplane mode A m
- Page 229 and 230:
notification A message that appears
- Page 231 and 232:
Online accounts available for Palm
- Page 233 and 234:
Specifications Table 1. Specificati
- Page 235 and 236:
Table 1. Specifications Category De
- Page 237 and 238:
Regulatory and Safety Information T
- Page 239 and 240:
exposure to RF Energy under the rec
- Page 241 and 242:
Persons with pacemakers should do t
- Page 243 and 244:
5 Do not take notes, look up phone
- Page 245 and 246:
Index NUMERICS 100PALM folder 143,
- Page 247 and 248:
Clear Cache option 175 Clear Call H
- Page 249 and 250:
editing bookmarks 173 contacts 113,
- Page 251 and 252:
images 93, 220 See also pictures IM
- Page 253 and 254:
synchronization 207, 216 overdue ta
- Page 255 and 256:
for contacts 80, 113 for emails 94
- Page 257 and 258:
wireless services 21 TXT files 182