Palm Pre 2 User Guide (World Ready) - DevDB
Palm Pre 2 User Guide (World Ready) - DevDB
Palm Pre 2 User Guide (World Ready) - DevDB
Create successful ePaper yourself
Turn your PDF publications into a flip-book with our unique Google optimized e-Paper software.
4 Tap Remove Account, and then tap Remove Email Account.<br />
Create and send an email message<br />
1 Open Email .<br />
2 If this is the first time you have opened the Email application, and you<br />
set up synchronization with at least one email account already while<br />
setting up an account in Contacts, Calendar, or Messaging, tap Done.<br />
If you have not set up an email account, see Set up email.<br />
3 Tap .<br />
TIP If you have set up an email account, you can also start writing an email from<br />
Card view or the Launcher. Start typing a message, scroll down the list of search<br />
options, and tap New Email. The Email application opens at a new email message,<br />
with the text you entered in the body of the message.<br />
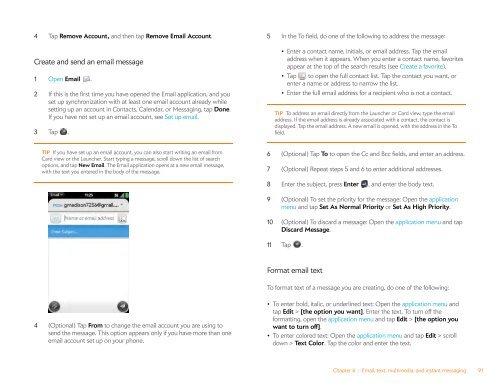
4 (Optional) Tap From to change the email account you are using to<br />
send the message. This option appears only if you have more than one<br />
email account set up on your phone.<br />
5 In the To field, do one of the following to address the message:<br />
• Enter a contact name, initials, or email address. Tap the email<br />
address when it appears. When you enter a contact name, favorites<br />
appear at the top of the search results (see Create a favorite).<br />
• Tap to open the full contact list. Tap the contact you want, or<br />
enter a name or address to narrow the list.<br />
• Enter the full email address for a recipient who is not a contact.<br />
TIP To address an email directly from the Launcher or Card view, type the email<br />
address. If the email address is already associated with a contact, the contact is<br />
displayed. Tap the email address. A new email is opened, with the address in the To<br />
field.<br />
6 (Optional) Tap To to open the Cc and Bcc fields, and enter an address.<br />
7 (Optional) Repeat steps 5 and 6 to enter additional addresses.<br />
8 Enter the subject, press Enter , and enter the body text.<br />
9 (Optional) To set the priority for the message: Open the application<br />
menu and tap Set As Normal Priority or Set As High Priority.<br />
10 (Optional) To discard a message: Open the application menu and tap<br />
Discard Message.<br />
11 Tap .<br />
Format email text<br />
To format text of a message you are creating, do one of the following:<br />
• To enter bold, italic, or underlined text: Open the application menu and<br />
tap Edit > [the option you want]. Enter the text. To turn off the<br />
formatting, open the application menu and tap Edit > [the option you<br />
want to turn off].<br />
• To enter colored text: Open the application menu and tap Edit > scroll<br />
down > Text Color. Tap the color and enter the text.<br />
Chapter 6 : Email, text, multimedia, and instant messaging 91


