Palm Pre 2 User Guide (World Ready) - DevDB
Palm Pre 2 User Guide (World Ready) - DevDB
Palm Pre 2 User Guide (World Ready) - DevDB
Create successful ePaper yourself
Turn your PDF publications into a flip-book with our unique Google optimized e-Paper software.
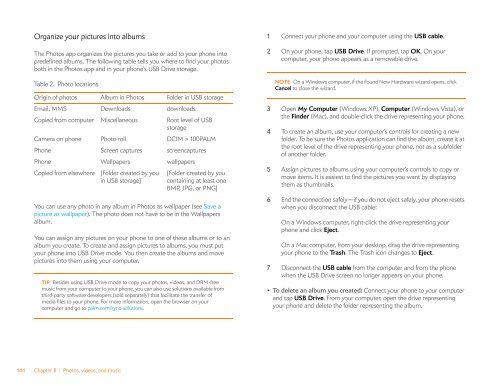
Organize your pictures into albums<br />
The Photos app organizes the pictures you take or add to your phone into<br />
predefined albums. The following table tells you where to find your photos<br />
both in the Photos app and in your phone’s USB Drive storage.<br />
Table 2. Photo locations<br />
Origin of photos Album in Photos Folder in USB storage<br />
Email, MMS Downloads downloads<br />
Copied from computer Miscellaneous Root level of USB<br />
storage<br />
Camera on phone Photo roll DCIM > 100PALM<br />
Phone Screen captures screencaptures<br />
Phone Wallpapers wallpapers<br />
Copied from elsewhere [Folder created by you [Folder created by you<br />
in USB storage] containing at least one<br />
BMP, JPG, or PNG]<br />
You can use any photo in any album in Photos as wallpaper (see Save a<br />
picture as wallpaper). The photo does not have to be in the Wallpapers<br />
album.<br />
You can assign any pictures on your phone to one of these albums or to an<br />
album you create. To create and assign pictures to albums, you must put<br />
your phone into USB Drive mode. You then create the albums and move<br />
pictures into them using your computer.<br />
TIP Besides using USB Drive mode to copy your photos, videos, and DRM-free<br />
music from your computer to your phone, you can also use solutions available from<br />
third-party software developers (sold separately) that facilitate the transfer of<br />
media files to your phone. For more information, open the browser on your<br />
computer and go to palm.com/sync-solutions.<br />
144 Chapter 8 : Photos, videos, and music<br />
1 Connect your phone and your computer using the USB cable.<br />
2 On your phone, tap USB Drive. If prompted, tap OK. On your<br />
computer, your phone appears as a removable drive.<br />
NOTE On a Windows computer, if the Found New Hardware wizard opens, click<br />
Cancel to close the wizard.<br />
3 Open My Computer (Windows XP), Computer (Windows Vista), or<br />
the Finder (Mac), and double-click the drive representing your phone.<br />
4 To create an album, use your computer’s controls for creating a new<br />
folder. To be sure the Photos application can find the album, create it at<br />
the root level of the drive representing your phone, not as a subfolder<br />
of another folder.<br />
5 Assign pictures to albums using your computer’s controls to copy or<br />
move items. It is easiest to find the pictures you want by displaying<br />
them as thumbnails.<br />
6 End the connection safely—if you do not eject safely, your phone resets<br />
when you disconnect the USB cable:<br />
On a Windows computer, right-click the drive representing your<br />
phone and click Eject.<br />
On a Mac computer, from your desktop, drag the drive representing<br />
your phone to the Trash. The Trash icon changes to Eject.<br />
7 Disconnect the USB cable from the computer and from the phone<br />
when the USB Drive screen no longer appears on your phone.<br />
• To delete an album you created: Connect your phone to your computer<br />
and tap USB Drive. From your computer, open the drive representing<br />
your phone and delete the folder representing the album.


