Thermo Scientific TVA-1000B Instruction Manual - Geotech ...
Thermo Scientific TVA-1000B Instruction Manual - Geotech ...
Thermo Scientific TVA-1000B Instruction Manual - Geotech ...
You also want an ePaper? Increase the reach of your titles
YUMPU automatically turns print PDFs into web optimized ePapers that Google loves.
MI 611-185 – June 1996<br />
Display Menus<br />
High Ceiling Alarm<br />
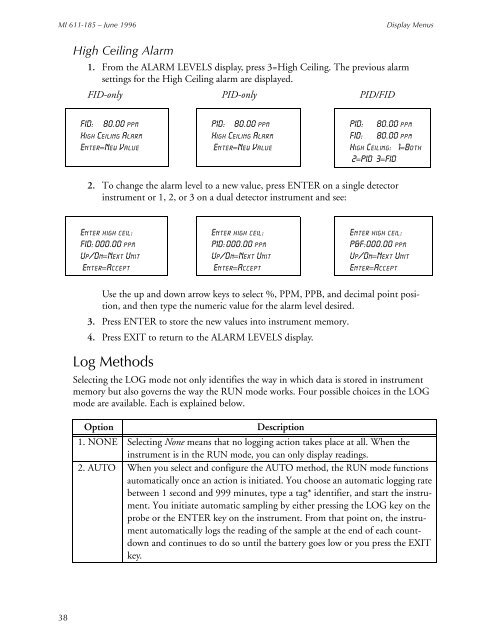
1. From the ALARM LEVELS display, press 3=High Ceiling. The previous alarm<br />
settings for the High Ceiling alarm are displayed.<br />
FID-only PID-only PID/FID<br />
FID: 80.00 ppm<br />
High Ceiling Alarm<br />
Enter=New Value<br />
PID: 80.00 ppm<br />
High Ceiling Alarm<br />
Enter=New Value<br />
PID: 80.00 ppm<br />
FID: 80.00 ppm<br />
High Ceiling: 1=Both<br />
2=PID 3=FID<br />
2. To change the alarm level to a new value, press ENTER on a single detector<br />
instrument or 1, 2, or 3 on a dual detector instrument and see:<br />
Enter high ceil:<br />
FID: 000.00 ppm<br />
Up/Dn=Next Unit<br />
Enter=Accept<br />
Enter high ceil:<br />
PID:000.00 ppm<br />
Up/Dn=Next Unit<br />
Enter=Accept<br />
Enter high ceil:<br />
P&F:000.00 ppm<br />
Up/Dn=Next Unit<br />
Enter=Accept<br />
Use the up and down arrow keys to select %, PPM, PPB, and decimal point position,<br />
and then type the numeric value for the alarm level desired.<br />
3. Press ENTER to store the new values into instrument memory.<br />
4. Press EXIT to return to the ALARM LEVELS display.<br />
Log Methods<br />
Selecting the LOG mode not only identifies the way in which data is stored in instrument<br />
memory but also governs the way the RUN mode works. Four possible choices in the LOG<br />
mode are available. Each is explained below.<br />
Option<br />
Description<br />
1. NONE Selecting None means that no logging action takes place at all. When the<br />
instrument is in the RUN mode, you can only display readings.<br />
2. AUTO When you select and configure the AUTO method, the RUN mode functions<br />
automatically once an action is initiated. You choose an automatic logging rate<br />
between 1 second and 999 minutes, type a tag* identifier, and start the instrument.<br />
You initiate automatic sampling by either pressing the LOG key on the<br />
probe or the ENTER key on the instrument. From that point on, the instrument<br />
automatically logs the reading of the sample at the end of each countdown<br />
and continues to do so until the battery goes low or you press the EXIT<br />
key.<br />
38


