

Thermo Scientific TVA-1000B Instruction Manual - Geotech ...
Thermo Scientific TVA-1000B Instruction Manual - Geotech ...
Thermo Scientific TVA-1000B Instruction Manual - Geotech ...

You also want an ePaper? Increase the reach of your titles
YUMPU automatically turns print PDFs into web optimized ePapers that Google loves.
MI 611-185 – June 1996<br />
Display Menus<br />
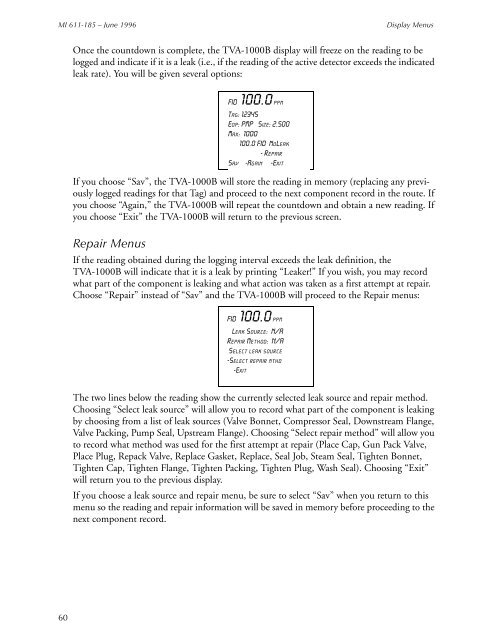
Once the countdown is complete, the <strong>TVA</strong>-<strong>1000B</strong> display will freeze on the reading to be<br />
logged and indicate if it is a leak (i.e., if the reading of the active detector exceeds the indicated<br />
leak rate). You will be given several options:<br />
If you choose “Sav”, the <strong>TVA</strong>-<strong>1000B</strong> will store the reading in memory (replacing any previously<br />
logged readings for that Tag) and proceed to the next component record in the route. If<br />
you choose “Again,” the <strong>TVA</strong>-<strong>1000B</strong> will repeat the countdown and obtain a new reading. If<br />
you choose “Exit” the <strong>TVA</strong>-<strong>1000B</strong> will return to the previous screen.<br />
Repair Menus<br />
FID 100.0 ppm<br />
Tag: 12345<br />
Eqp: PMP Size: 2.500<br />
Max: 1000<br />
100.0 FID NoLeak<br />
- Repair<br />
[Sav] -Again -Exit<br />
If the reading obtained during the logging interval exceeds the leak definition, the<br />
<strong>TVA</strong>-<strong>1000B</strong> will indicate that it is a leak by printing “Leaker!” If you wish, you may record<br />
what part of the component is leaking and what action was taken as a first attempt at repair.<br />
Choose “Repair” instead of “Sav” and the <strong>TVA</strong>-<strong>1000B</strong> will proceed to the Repair menus:<br />
FID 100.0 ppm<br />
Leak Source: N/A<br />
Repair Method: N/A<br />
[Select leak source]<br />
-Select repair mthd<br />
-Exit<br />
The two lines below the reading show the currently selected leak source and repair method.<br />
Choosing “Select leak source” will allow you to record what part of the component is leaking<br />
by choosing from a list of leak sources (Valve Bonnet, Compressor Seal, Downstream Flange,<br />
Valve Packing, Pump Seal, Upstream Flange). Choosing “Select repair method” will allow you<br />
to record what method was used for the first attempt at repair (Place Cap, Gun Pack Valve,<br />
Place Plug, Repack Valve, Replace Gasket, Replace, Seal Job, Steam Seal, Tighten Bonnet,<br />
Tighten Cap, Tighten Flange, Tighten Packing, Tighten Plug, Wash Seal). Choosing “Exit”<br />
will return you to the previous display.<br />
If you choose a leak source and repair menu, be sure to select “Sav” when you return to this<br />
menu so the reading and repair information will be saved in memory before proceeding to the<br />
next component record.<br />
60


