

Thermo Scientific TVA-1000B Instruction Manual - Geotech ...
Thermo Scientific TVA-1000B Instruction Manual - Geotech ...
Thermo Scientific TVA-1000B Instruction Manual - Geotech ...

You also want an ePaper? Increase the reach of your titles
YUMPU automatically turns print PDFs into web optimized ePapers that Google loves.
Display Menus MI 611-185 – June 1996<br />
route and displays the component tag number (Tag), equipment type (Eqp), equipment size<br />
(Size), and leak definition (Max). If a reading has already been logged into memory for this<br />
record, it will also be displayed followed by the words “LastLog.”<br />
Route Entry Response Factor<br />
A secondary response factor correction is based on the response factor associated with the current<br />
route entry. This secondary correction adjusts the concentration reading for different<br />
component measurements in the same route.<br />
For example, let a route contain two entries, one for propane and one for methane. Assume<br />
that propane has only half the detector response of methane. If each route location has a leak<br />
of 100 ppm, a single response factor based on methane would produce a concentration reading<br />
of 100 ppm for methane, but only 50 ppm for propane. The addition of a secondary<br />
response factor allows each entry to be corrected for detector sensitivity. Thus, if the secondary<br />
response factor is 1.0 for methane and 2.0 for propane, both route samples will read correctly<br />
as 100 ppm.<br />
Only the linear correction mode is used for the secondary route response correction:<br />
Linear: FinalConc = RouteRF x BackConc<br />
The secondary RouteRF is downloaded to the instrument as part of each route entry. This<br />
factor is applied to both detectors, as it is expected that when operating in this mode, only one<br />
detector will be used. Entries inserted by the instrument default to a RouteRF of 1.0.<br />
Navigating the Route File<br />
Selecting “Next” from the first logging mode screen will allow you to step to the next record<br />
in the route. Selecting “Prev” will allow you to step to the previous record in the route. You<br />
can also enter a tag via the keypad or barcode scanner and the <strong>TVA</strong>-<strong>1000B</strong> will automatically<br />
skip to that tag if it is contained within the route. If the tag is not contained within the route,<br />
a “TAG NOT FOUND” message will appear and you will be given the option to “Insert”<br />
that tag into the route or “Exit.”<br />
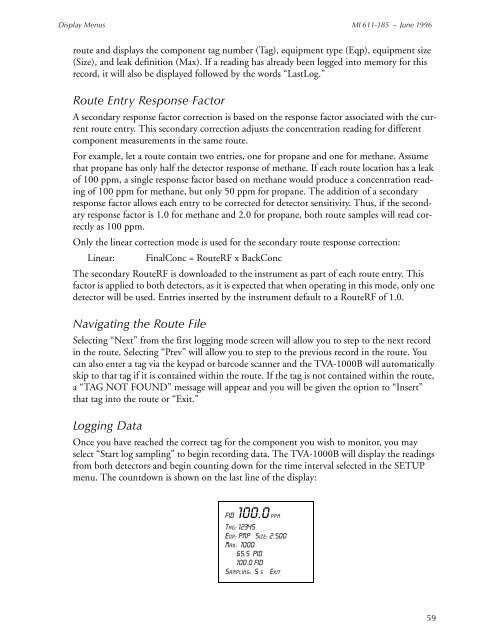
Logging Data<br />
Once you have reached the correct tag for the component you wish to monitor, you may<br />
select “Start log sampling” to begin recording data. The <strong>TVA</strong>-<strong>1000B</strong> will display the readings<br />
from both detectors and begin counting down for the time interval selected in the SETUP<br />
menu. The countdown is shown on the last line of the display:<br />
FID 100.0 ppm<br />
Tag: 12345<br />
Eqp: PMP Size: 2.500<br />
Max: 1000<br />
65.5 PID<br />
100.0 FID<br />
Sampling: 5 s [Exit]<br />
59


